










Tanking in The Elder Scrolls Online looks straightforward at first: hold the boss, block its attacks and let your group deal damage. As you progress, it becomes one of the game’s most demanding roles. You need to survive, manage resources, position enemies and handle mechanics while maintaining buffs and debuffs that help your group. In harder content, a missed mechanic or poorly positioned boss can put the whole team at risk, but you do not need to master everything on your first dungeon run.
This ESO Beginner Tank Build helps you learn those responsibilities step by step, whichever class you play. It takes you from your first tank setup through normal dungeons, early Veteran content and eventually Veteran trials. Every class can tank, and Scribing provides additional tools as you develop your character. The starting setups focus on accessible gear, reliable survival and manageable skills, giving you room to learn without needing a finished endgame build.
Your first priority is becoming comfortable with the fundamentals: maintaining taunt, controlling enemy positioning, recognising dangerous attacks and sustaining through a fight. As those become familiar, you can take on more group support and move towards setups tailored to specific encounters.
These builds are designed for learning and progression. Once you understand your role and the mechanics, coordinate with your group to choose the gear, skills, buffs and debuffs they need. A dependable tank starts with good habits, and this guide gives you a foundation to build them.
Ready to Take Your Tanking to the Next Level?
Once you’re comfortable with the fundamentals, our full ESO Tank Guide breaks down advanced gear, group optimisation, mechanics, and endgame setups used in veteran dungeons and trials.
Want My Best Builds Before Everyone Else?
Get builds before release, exclusive setups, and direct input on future content.
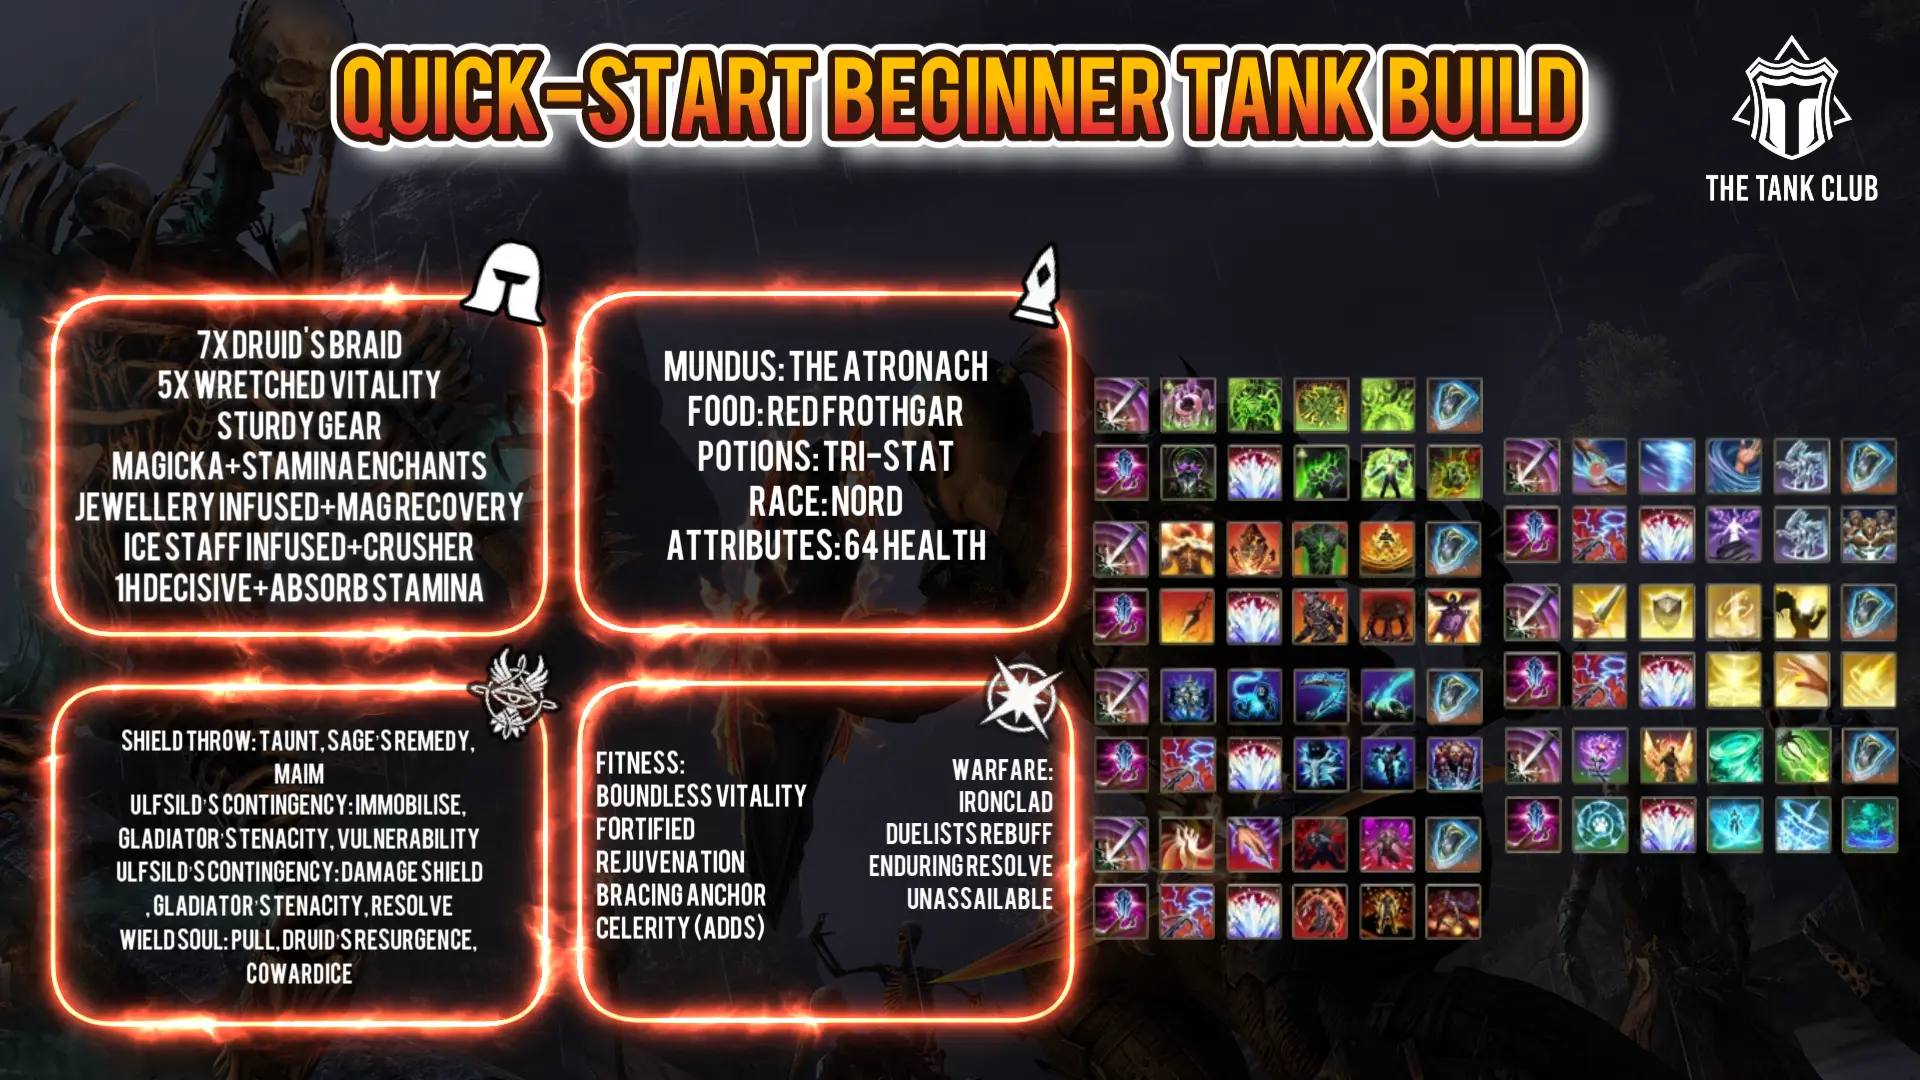
Quick-Start ESO Dungeon Tank Build
Choosing Your Class as a Beginner Tank
Every class can tank in ESO, so you do not need to abandon an existing character to follow this guide. The main differences for beginners are how easily you can survive, maintain resources and access useful tanking tools.
Arcanist is my first recommendation for a new tank, thanks to its compact skills, strong shields and built-in group support. Dragonknight is another strong starting point, offering healing, enemy pulls and crowd control without needing Scribing, although its resource management now takes more attention.
The comparison below reflects how each class feels to learn, rather than its position in an optimised endgame group.
Choose a class whose playstyle interests you. Learning positioning, mechanics and resource management will have a greater impact on your progress than choosing the class that ranks highest in an organised trial group.
| Class | Why choose it, and what to watch |
|---|---|
| Arcanist | A complete starting toolkit with strong shields, sustain and several benefits combined into individual skills. Learn to shield before dangerous hits and manage Crux. Its charm can bring enemies towards you, but a scribed pull makes stacking faster and more precise. |
| Dragonknight | Provides healing, shields, buffs, debuffs, pulls and crowd control within its own class toolkit. A strong option for learning the full tank role, but you need to use its sustain skills deliberately rather than expect resources to maintain themselves. |
| Necromancer | Offers damage transfer through Spirit Guardian, reduced damage-over-time pressure and strong Ultimate generation from corpses. Creating and consuming corpses adds another system to manage, making it less straightforward for a first tank. |
| Nightblade | Excellent sustain, healing and Ultimate generation, with strong group value through Class Masteries. Some control and support tools need supplementing, while getting the most from its passives and Masteries requires more timing and attention. |
| Sorcerer | Strong defence and relatively straightforward skill upkeep make it comfortable to learn. Scribing supplies a reliable pull. Take care with Dark Deal: its cast interrupts blocking, so using it at the wrong moment can leave you exposed. |
| Templar | Class Masteries strengthen its defence and group support considerably. Survival relies on maintaining healing and defensive effects, with fewer convenient emergency healing options. It also benefits from a scribed pull, making it a more active starting choice. |
| Warden | Strong healing, defence and group support, with built-in tools for pulling and controlling enemies. A dependable choice, although maintaining its buffs, healing areas and Mastery benefits gives you more effects to track. |
Core Essentials
Attributes
- 64 Health
Mundus Stone
The Atronach increases Magicka Recovery, helping you maintain defensive buffs, taunts and utility skills without running out of resources as quickly. It is a useful default while you learn how often to cast each ability.
→ See more: ESO Tank Mundus Stones
Food Options
Orzorga’s Red Frothgar provides Max Health and Magicka Recovery, combining a larger survival buffer with steady sustain. Keep your food buff active whenever you enter group content.
Bewitched Sugar Skulls increases all three maximum resources. Use it if your setup needs larger Stamina or Magicka pools, but bear in mind that it doesn’t provides Magicka Recovery.
Potions
Essence of Health (Tri-Stat) potions restore Health, Magicka and Stamina together. Keep them on your quickslot and use them before your resources become critically low, rather than waiting until you cannot block or heal.
Look for potions that restore all three resources; not every potion named Essence of Health has the same effects.
Race
Nord is my recommended beginner tank race. Its additional resistances help make incoming damage more manageable, while its Ultimate generation supports more frequent defensive or group Ultimates.
Any race can tank successfully. If you already have a character you enjoy, you do not need to change race to use this build.
Imperial provides Max Health, Max Stamina and reduced ability costs, making it a comfortable choice if you want easier resource management. Redguard offers Stamina sustain through its racial passives, which can help during longer fights.
Race has less impact than knowing the mechanics and managing your resources well. If you already have a tank of another race, there is no need to change it for this build.
→ See more: ESO Tank Race
Attributes
Put all 64 attribute points into Health as they become available. This improves your ability to survive mistakes and strengthens the heals and damage shields that scale with Max Health.
Use gear enchantments to adjust your Stamina or Magicka pools if needed, while keeping your attributes in Health.
Beginner Stat Targets (Fully Buffed)
These are starting targets for a developed beginner setup, rather than requirements for your first normal dungeon. Check them with your food, equipment and usual defensive buffs active.
- Around 38,000 Health – Gives you room to survive missed blocks and overlapping damage while learning.
- Around 20,000 Stamina – Provides resources for blocking, dodging, breaking free and Stamina skills.
- Around 15,000 Magicka – A useful starting pool for defensive and support abilities.
- 25,000–30,000 Physical and Spell Resistance – A practical defensive range as you progress towards Veteran content.
- Around 2,000 Magicka Recovery – Helps maintain your skills, although some classes can sustain comfortably with less.
- Under 1,000 Block Cost – A useful goal if repeated attacks drain your Stamina quickly. Sturdy armor or a Bracing jewellery enchantment can help.
You do not need to reach every target before starting. In normal dungeons, concentrate on maintaining taunt, using your defensive buffs and responding to dangerous attacks. As you progress, adjust your setup around the problems you actually encounter.
The resistance cap is 33,100, but you do not need to reach it immediately. Reliable sustain and good defensive habits are just as important as your character-sheet numbers.
Subclassing
Should Beginner Tanks Use Subclassing?
I recommend learning with your full class first. You can build a capable tank without Subclassing, then use Scribing to fill specific gaps as it becomes available. Staying with your full class also lets you benefit from Class Masteries later in your progression.
Subclassing remains an option if you want to combine particular defensive, healing or sustain tools. However, it adds more choices to learn and means giving up Class Masteries. For most beginners, developing one class and adding a small number of useful scribed skills is a clearer starting point.
Consider Subclassing later if it solves a specific problem or supports an agreed group setup.
Beginner Tank Gear
Which Gear Setup Should You Use?
Choose the setup that matches your experience and the content you can access. New ESO Tank starts with crafted gear to help you survive and manage resources while learning. Beginner Tank (No DLCs) uses base-game sets, while Beginner Tank (With DLCs) offers more options if you have access to DLC dungeons. Progressive Tank is your next step once you’re comfortable with the fundamentals and ready to provide stronger group support. Start with the gear you can realistically obtain and upgrade as you progress—you do not need the final setup before you begin tanking.
| Piece | Set | Weight | Trait | Enchantment |
|---|---|---|---|---|
| Head | Druid’s Braid | Medium | Sturdy | Stamina |
| Shoulder | Druid’s Braid | Light | Sturdy | Magicka |
| Chest | Druid’s Braid | Heavy | Sturdy | Stamina |
| Hands | Druid’s Braid | Heavy | Sturdy | Magicka |
| Waist | Druid’s Braid | Heavy | Sturdy | Magicka |
| Legs | Druid’s Braid | Heavy | Sturdy | Stamina |
| Feet | Druid’s Braid | Heavy | Sturdy | Magicka |
| Necklace | Wretched Vitality | Jewellery | Infused | Magicka Recovery |
| Ring | Wretched Vitality | Jewellery | Infused | Magicka Recovery |
| Ring | Wretched Vitality | Jewellery | Infused | Magicka Recovery |
| Main Hand | Wretched Vitality | Any 1H | Infused | Absorb Stamina |
| Off Hand | Wretched Vitality | Shield | Sturdy | Health |
| Main Hand Backup | Wretched Vitality | Ice Staff | Infused | Crusher |
| Piece | Set | Weight | Trait | Enchantment |
|---|---|---|---|---|
| Head | Engine Guardian | Medium | Sturdy | Stamina |
| Shoulder | Engine Guardian | Light | Sturdy | Magicka |
| Chest | Ebon Armory | Heavy | Sturdy | Stamina |
| Hands | Ebon Armory | Heavy | Sturdy | Magicka |
| Waist | Ebon Armory | Heavy | Sturdy | Magicka |
| Legs | Ebon Armory | Heavy | Sturdy | Stamina |
| Feet | Ebon Armory | Heavy | Sturdy | Magicka |
| Necklace | Torug’s Pact | Jewellery | Infused/Any | Magicka Recovery |
| Ring | Torug’s Pact | Jewellery | Infused/Any | Magicka Recovery |
| Ring | Torug’s Pact | Jewellery | Infused/Any | Magicka Recovery |
| Main Hand | Torug’s Pact | Any 1H | Infused | Absorb Stamina |
| Off Hand | Torug’s Pact | Shield | Sturdy | Health |
| Main Hand Backup | Torug’s Pact | Ice Staff | Infused | Crusher |
| Piece | Set | Weight | Trait | Enchantment |
|---|---|---|---|---|
| Head | Engine Guardian | Medium | Sturdy | Stamina |
| Shoulder | Engine Guardian | Light | Sturdy | Magicka |
| Chest | Turning Tide | Heavy | Sturdy | Stamina |
| Hands | Turning Tide | Heavy | Sturdy | Magicka |
| Waist | Turning Tide | Heavy | Sturdy | Magicka |
| Legs | Turning Tide | Heavy | Sturdy | Stamina |
| Feet | Turning Tide | Heavy | Sturdy | Magicka |
| Necklace | Crimson Oath’s Rive | Jewellery | Infused | Magicka Recovery |
| Ring | Crimson Oath’s Rive | Jewellery | Infused | Magicka Recovery |
| Ring | Crimson Oath’s Rive | Jewellery | Infused | Magicka Recovery |
| Main Hand | Void Bash | Any 1H | Sturdy | Absorb Stamina |
| Off Hand | Void Bash | Shield | Divines | Stamina |
| Main Hand Backup | Crimson Oath’s Rive | Ice Staff | Infused | Crusher |
| Piece | Set | Weight | Trait | Enchantment |
|---|---|---|---|---|
| Head | Roksa the Warped | Medium | Reinforced | Prismatic Defence |
| Shoulder | Roksa the Warped | Light | Divines | Health |
| Chest | Lucent Echoes | Heavy | Reinforced | Prismatic Defence |
| Hands | Lucent Echoes | Heavy | Divines | Health |
| Waist | Lucent Echoes | Heavy | Divines | Health |
| Legs | Lucent Echoes | Heavy | Reinforced | Prismatic Defence |
| Feet | Lucent Echoes | Heavy | Divines | Health |
| Necklace | Pearlescent Ward | Jewellery | Infused | Bracing |
| Ring | Pearlescent Ward | Jewellery | Harmony | Magicka Recovery |
| Ring | Pearlescent Ward | Jewellery | Harmony | Magicka Recovery |
| Main Hand | Pearlescent Ward | Any 1H | Decisive | Absorb Stamina |
| Off Hand | Pearlescent Ward | Shield | Reinforced | Prismatic Defence |
| Main Hand Backup | Pearlescent Ward | Ice Staff | Infused | Crusher |
Gear Information
Gear Weights
- 5 Heavy / 1 Medium / 1 Light: A strong default for dungeon Tanks. Five Heavy pieces provide defensive passives and resistances, while one Medium and one Light give you the full Undaunted Mettle bonus and useful passives from both armor lines.
Armor Traits
- Sturdy – Reduces Block Cost and is one of the most reliable tank traits for stamina sustain, particularly useful during prolonged block phases or encounters with multiple enemies.
- Divines – Increases the effectiveness of your Mundus Stone and is a strong option when using recovery-focused Mundus choices to improve sustain.
- Reinforced – Provides additional Armor and can help reach the resistance cap in difficult Veteran DLC and Hardmode encounters.
Armor Enchants
- Prismatic Defence (Tri-Stat) – Adds Max Health, Magicka and Stamina. Across a full setup, the combined gain is over 2,000 points higher than using single-stat glyphs, although a Health, Magicka or Stamina glyph will provide more of that one resource on an individual piece.
- Prismatic glyphs cost more to make because they require Hakeijo. If you are gearing a new tank on a budget, use single-stat enchantments where needed and replace them gradually, starting with the chest, legs, head and shield, which receive the full enchantment value.
Jewellery
- Harmony + Magicka Recovery: Strong when your group provides frequent synergies. Harmony restores additional Health, Magicka and Stamina whenever you activate one, while Magicka Recovery enchants provide steady sustain.
- Infused + Magicka Recovery: A reliable alternative when synergies are less frequent or inconsistent. It improves your recovery without depending on another player.
- Infused + Bracing: Reduced your block cost, allowing you to essentially replace full Sturdy gear with one jewellery enchant.
- Prismatic Cost Reduction: Consider this if you regularly cast both Magicka and Stamina skills. If most of your active skills cost Magicka, a more focused enchant may provide better value.
- Magicka Cost Reduction: Can work well if you cast Magicka skills frequently. It saves resources on each cast, whereas Magicka Recovery continues to provide value between casts. Compare them against how you actually play rather than assuming either is always stronger.
- Swift: Useful for add pulls, especially with a separate gear setup for those phases. The extra movement speed helps you reach, taunt and position enemies before they spread through the group.
One-Hand & Shield
- Decisive + Hardening: A solid all-round choice. Decisive gives you a chance to generate additional Ultimate, while Hardening provides a small damage shield.
- Infused + Weakening: A defensive option when you need to reduce a dangerous enemy’s Weapon and Spell Damage, particularly in encounters where the group splits or tanks handle separate targets.
- Absorb Stamina enchant: Offers some Stamina return and can apply Sundered for Minor Breach. Check whether your other skills and group members already maintain Minor Breach before choosing it for that purpose.
Ice Staff
- Infused + Crusher: The standard boss setup when you are responsible for Crusher. Infused strengthens the enchant and helps maintain its Armor reduction through Wall of Elements. Keep the Wall positioned so Crusher applies to the priority target.
- Charged + Crusher: An option for add pulls when spreading Chilled is more valuable than maximising Crusher on a single target. With Frost Pulsar, Charged improves your chance of applying Chilled across the pack, providing Minor Maim and Minor Brittle.
Gear for Brand New ESO Players
If you’ve just reached CP160 or are completely new to tanking, start with crafted sets.
Crafted gear is inexpensive, easy to obtain, and provides stable stats that help you survive while learning dungeon mechanics.
Wretched Vitality is excellent early because it provides strong resource recovery, helping you maintain taunts and defensive skills. Druid’s Braid increases your maximum stats, giving you a larger survivability buffer.
At this stage:
- Use Sturdy traits to reduce block cost.
- Use simple stamina and magicka enchants.
- Don’t upgrade to legendary quality, this gear is temporary. Even use it at CP150.
This setup is designed for Normal dungeons, normal trials, and early veteran content and pledges. Your goal here is not optimisation, it’s consistency.
How To Obtain
- Wretched Vitality Crafted: 3 Traits research needed.
- Druid’s Braid Crafted: 7 Traits research needed.
Optional Useful Gear
- Armor of the Seducer Crafted: 3 Traits research needed.
- Fortified Brass Crafted: 3 Traits research needed.
- Torug’s Pact Crafted: 3 Traits research needed.
Beginner Tank (No DLC Required)
Once you’re comfortable, you can move into base-game dungeon sets that begin supporting your group more directly.
Ebon Armory increases your group’s Max Health, which improves overall survivability. Torug’s Pact strengthens your enchantment effects, making your debuffs more impactful.
This is your first step toward playing as a support-focused tank rather than purely a survival-focused one.
These sets are still transitional. They help you farm stronger gear while learning positioning and debuff uptime. If you have access to DLC dungeons these sets are not worth the time to gather but are the best on offer for anyone without DLC dungeons unlocked.
Adding Your First Monster Set
Once you’re comfortable running veteran base-game dungeons, you can start collecting monster sets. These provide a noticeable boost to sustain, survivability, or group utility.
For beginners, monster sets are often the first meaningful upgrade beyond crafted gear.
Engine Guardian is one of the most beginner-friendly options. It provides strong resource sustain, helping you maintain taunts and defensive skills during longer fights.
Other accessible options include:
- Bloodspawn – Increases ultimate generation and resistances
- Sentinel of Rkugamz – Group sustain support
- Lord Warden – Defensive group utility
You do not need a monster set immediately but once obtained, it will make tanking feel significantly smoother.
Where To Obtain
- Torug’s Pact Crafted: 3 traits research needed.
- Ebon Armory Looted: Crypt of Hearts I & II.
- Engine Guardian Looted: Veteran Darkshade II & Maj al-Ragath.
- Sentinel of Rkugamz Looted: Veteran Darkshade Caverns I & Maj al-Ragath.
- Bloodspawn Looted: Veteran Spindleclutch II & Maj al-Ragath.
- Lord Warden Looted: Veteran Imperial City Prison & Urgarlag Chief-bane.
Beginner Tank (With DLC Access)
If you have DLC dungeons, you gain access to stronger group-oriented sets.
Crimson Oath’s Rive reduces enemy resistances, speeding up fights. Turning Tide provides a powerful group damage debuff that increases overall DPS.
This is where tanking begins to feel more active and supportive rather than purely defensive.
You are no longer just surviving, you are accelerating fights.
Turning Tide and Crimson Oath pairs well with:
- Engine Guardian for sustain
- Tremorscale for added group penetration
- Archdruid later for stronger group debuffs
Where To Obtain
- Turning Tide Looted: Shipwright’s Regret
- Crimson Oath’s Rive Looted: The Dread Cellar.
- Engine Guardian Looted: Veteran Darkshade II & Maj al-Ragath.
- Sentinel of Rkugamz Looted: Veteran Darkshade Caverns I & Maj al-Ragath.
- Bloodspawn Looted: Veteran Spindleclutch II & Maj al-Ragath.
- Lord Warden Looted Veteran Imperial City Prison & Urgarlag Chief-bane.
Progressive / Trial Entry Setup
As you begin harder Veteran dungeons and your first Vet trials, your gear can provide more group support while still helping you learn and survive.
Pearlescent Ward increases group Weapon and Spell Damage while players are alive, with damage reduction becoming stronger as group members die. Lucent Echoes increases nearby allies’ Critical Damage and Critical Healing while you are above 50% Health, switching to personal damage reduction against monsters at 50% Health or below. Both provide useful support without adding another activation to manage, letting you concentrate on positioning, mechanics and sustain.
Saxhleel Champion is an alternative when your group needs Major Force. It allows you to provide that damage buff while casting a defensive Ultimate such as Barrier. If an Arcanist already maintains Major Force through Ink-Scribe’s Verve, choose a set that supplies a different benefit.
For your Monster Set, Roksa the Warped builds additional Health, Magicka and Stamina Recovery during combat, making it a straightforward sustain option. Its Stamina Recovery helps when you release block. Engine Guardian is an alternative from an easier dungeon, providing random Health, Magicka or Stamina returns when you use resource-costing abilities.
If your sustain is already comfortable, consider a Monster Set that adds more group support. Tremorscale reduces enemy Armor when you taunt, helping groups that need additional penetration. Archdruid Devyric applies Major Vulnerability after you damage an enemy with a Heavy Attack, increasing group damage when that debuff is not already covered. Alternatively, Bloodspawn provides additional Ultimate generation and temporary resistances when you take damage, helping you use Ultimates more frequently.
At this stage, refine your traits and enchantments around your needs. Harmony jewellery is useful when your group provides frequent synergies, while Prismatic Defence enchantments improve your maximum resources. Coordinate set choices with the other tank and healers in trials to avoid overlapping effects.
You are still learning, but this setup begins the transition towards endgame group support. Non-perfected trial sets are sufficient to start—you do not need to farm their Veteran versions before using this approach.
- Pearlescent Ward Looted: Dreadsail Reef Trial
- Lucent Echoes Looted: Lucent Citadel Trial
- Saxhleel Champion Looted: Rockgrove Trial
- Roksa the Warped Looted: Veteran Bal Sunnar & Urgarlag Chief-bane
- Engine Guardian Looted: Veteran Darkshade II & Maj al-Ragath.
- Bloodspawn Looted: Veteran Spindleclutch II & Maj al-Ragath.
- Lord Warden Looted: Veteran Imperial City Prison & Urgarlag Chief-bane.
Skill Bars by Class
Arcanist Skills


Dragonknight Skills


Necromancer Skills


Nightblade Skills


Sorcerer Skills


Templar Skills


Warden Skills


Arcanist Skill Information
Pierce Armor
Role: Main Taunt / Enemy Armor Reduction
Why You Use It: Keeps bosses and dangerous enemies attacking you. Major and Minor Breach reduce their resistances, helping your group deal more damage.
When to Use: When picking up a priority enemy, then refresh before the taunt expires—roughly every 12–14 seconds.
Goading Throw — Replaces Pierce Armor with Scribing
Role: Ranged Taunt / Healing / Damage Reduction
Why You Use It: This version combines a ranged taunt with healing over time and Major Maim, reducing the target’s damage. Elemental Susceptibility supplies Major Breach instead, while Cruxweaver Armor and Frost Blockade help cover Minor Breach.
When to Use: To pick up bosses or dangerous enemies from a distance. Refresh before taunt expires, and watch Major Maim’s timer when you need its protection.
Runic Sunder
Role: Enemy Armor Reduction / Crux Generator / Additional Taunt
Why You Use It: Steals Armor from the enemy, applies Minor Maim and generates Crux—the resource used by your Arcanist defensive skills. While slotted, each active Crux also reduces your damage taken.
When to Use: Maintain its debuffs on priority targets and use it when you need to rebuild Crux. It also refreshes taunt, so you do not need another taunt immediately afterwards.
Impervious Runeward
Role: Personal Shield / Self-Heal
Why You Use It: Provides a large Max Health–scaling shield and consumes available Crux to heal you. This helps you survive dangerous attacks without relying entirely on your healer.
When to Use: Just before a heavy hit or during sustained damage. Its strongest shield lasts only one second, so timing matters. With Crux available, it can also help recover lost Health.
Runeguard of Still Waters
Role: Defensive Buff / Automatic Heal / Add Control
Why You Use It: Grants group Minor Resolve and personal Minor Protection. Once active, it automatically heals you when you take damage below 50% Health. It also immobilises nearby susceptible enemies after a short delay.
When to Use: Before combat and when its buffs expire. Recast after the emergency heal consumes Minor Protection. During add pulls, use it once enemies are gathered together.
Tidal Chakram
Role: Shields / Healing Support
Why You Use It: Shields you or allies in front of you, consuming Crux to add healing while the shields remain. This is useful when your group is taking damage, particularly without a dedicated healer.
When to Use: Before group damage or when nearby allies need protection. Aim towards the players you want to shield. It consumes Crux rather than generating it, and costs whichever of your maximum resources is higher.
Destructive Clench — With a Frost Staff
Role: Ranged Taunt / Damage Reduction
Why You Use It: Frost Clench lets you taunt from your back bar while applying Major Maim and Chilled. These effects reduce incoming damage, with Chilled also supporting your Frost Blockade debuffs.
When to Use: When you need to secure an enemy from range without changing bars. Refresh Major Maim on dangerous targets when needed; its protection expires sooner than taunt.
Leashing Soul — Replaces Destructive Clench with Scribing
Role: Enemy Pull / Resource Return / Damage Reduction
Why You Use It: Pulls enemies directly towards you, restores Magicka and Stamina, and applies Major Cowardice to reduce their Weapon and Spell Damage. Goading Throw now covers ranged taunting, freeing this slot for a reliable pull.
When to Use: To bring scattered smaller enemies into your group’s damage area. Bosses and many elite enemies cannot be pulled; position those through taunt and movement instead.
Rune of Uncanny Adoration
Role: Enemy Grouping / Damage Support
Why You Use It: Charms susceptible enemies so they walk towards you, helping gather them without Scribing. It also applies Minor Vulnerability, increasing their damage taken.
When to Use: On smaller enemies outside your established stack. Allow time for them to reach you; the charm will not move bosses or enemies immune to crowd control.
Elemental Susceptibility — Replaces Rune of Uncanny Adoration with Scribing
Role: Enemy Armor Reduction / Additional Debuffs
Why You Use It: Supplies Major Breach after replacing Pierce Armor, while repeatedly applying elemental status effects that support damage reduction and group damage. Leashing Soul takes over enemy grouping.
When to Use: On bosses and important enemies, refreshing near the end of its duration. This skill does not taunt, so maintain your taunt separately.
Elemental Blockade
Role: Ground Debuffs / Weapon Enchantment Support
Why You Use It: Helps activate your Frost Staff’s Crusher enchantment, reducing enemy Armor even after you return to your front bar. Frost Blockade also applies Minor Breach to Chilled enemies.
When to Use: Keep it beneath the boss or your enemy stack. Refresh when it expires, or reposition it if the fight moves.
Cruxweaver Armor
Role: Main Armor Buff / Crux Generator
Why You Use It: Major Resolve increases your resistances, while incoming attacks generate Crux and receive Minor Breach. This supports both your defence and your Crux-consuming shields and heals.
When to Use: Before entering combat and before the buff expires. Keep it active whenever you are handling enemies.
Zenas’ Empowering Disc
Role: Group Damage / Recovery Support
Why You Use It: Provides Minor Courage for group damage and recovery buffs that help you and your allies sustain. Players retain the buffs briefly after leaving the area.
When to Use: Place it where you and your group can enter it safely. Maintain coverage during longer fights without moving enemies unnecessarily.
Shield Discipline
Role: Emergency Blocking / Resource Recovery Window
Why You Use It: Automatically blocks blockable attacks without spending Stamina for a short time. This gives you breathing room to recover resources, and your non-Ultimate One-Hand and Shield abilities become free while it lasts.
When to Use: When Stamina is dangerously low or you need help through a heavy blocking phase. You can use the window for a fully charged One-Hand and Shield Heavy Attack, but still respond to unblockable mechanics.
Resonating Glyphic
Role: Group Healing / Damage Support
Why You Use It: Creates an area of healing and additional Weapon and Spell Damage. You and your allies strengthen the glyphic by damaging it.
When to Use: During combat when your group can remain near it, especially against a boss or a difficult stacked pull. Place it somewhere accessible so allies can strengthen it and benefit from its effects.
Dragonknight Skill Information
Pierce Armor
Role: Main Taunt / Enemy Armor Reduction
Why You Use It: Keeps bosses and dangerous enemies attacking you. Major and Minor Breach reduce their resistances, helping your group deal more damage.
When to Use: When picking up a priority enemy, then refresh before taunt expires—roughly every 12–14 seconds.
Goading Throw — Replaces Pierce Armor with Scribing
Role: Ranged Taunt / Healing / Damage Reduction
Why You Use It: Combines a ranged taunt with healing over time and Major Maim, reducing the target’s damage. Elemental Susceptibility supplies Major Breach instead, while Frost Blockade applies Minor Breach to Chilled enemies.
When to Use: To secure bosses or dangerous enemies from range. Maintain taunt and refresh Major Maim when you need its protection.
Heart of Flame
Role: Resource Sustain / Additional Healing
Why You Use It: Restores a percentage of your missing Magicka and Stamina over four seconds, with healing that scales with Max Health. Its resource returns work while blocking.
When to Use: Once your resources have dropped, before they become critically low. Let the effect finish rather than repeatedly restarting it; the returns take time.
Igneous Shield
Role: Personal and Group Shields / Stronger Healing
Why You Use It: Shields you and nearby allies, with a stronger shield for you. It also grants Major Mending, increasing the healing you provide.
When to Use: Before incoming damage or immediately before Blood of the Green Dragon when you need a stronger heal. Avoid repeatedly casting it for Stamina gain—it no longer provides that return.
Warding Contingency — Replaces Igneous Shield with Scribing
Role: Shields / Damage Reduction / Additional Armor
Why You Use It: This version combines a damage shield, Gladiator’s Tenacity damage reduction and Minor Resolve. It adds protection alongside Earthshield Mantle’s Major Resolve, although you lose Igneous Shield’s Major Mending.
When to Use: Prepare it before incoming damage, then trigger it by using another resource-costing ability. You can follow it with your self-heal to activate the protection while recovering Health.
Blood of the Green Dragon
Role: Main Self-Heal / Defensive Buffs
Why You Use It: Provides a Max Health–scaling burst heal that becomes stronger as your Health falls, followed by healing over time. Minor Vitality improves healing received and shield strength.
When to Use: When you need to recover Health, and refresh its defensive buffs during longer fights. Do not deliberately wait until you are almost dead. Its Stamina Recovery buff helps when you release block.
Hearth and Home
Role: Area Healing / Personal Protection / Group Support
Why You Use It: Creates a healing area that heavily slows enemies, grants you Major Protection and supplies healed allies with Minor Heroism and Minor Fortitude. This supports survival and group Ultimate generation.
When to Use: Place it where you intend to hold enemies, ideally within reach of nearby allies. Maintain it during sustained damage and reposition it when the fight moves.
Destructive Clench — With a Frost Staff
Role: Ranged Taunt / Damage Reduction
Why You Use It: Frost Clench lets you taunt from your back bar while applying Major Maim and Chilled, reducing incoming damage and supporting your Frost Blockade debuffs.
When to Use: When an enemy needs securing from range. Refresh Major Maim on dangerous targets when needed; its protection expires sooner than taunt.
Leashing Soul — Replaces Destructive Clench with Scribing
Role: Enemy Pull / Resource Return / Damage Reduction
Why You Use It: Pulls enemies directly towards you, restores Magicka and Stamina, and applies Major Cowardice to reduce their Weapon and Spell Damage. Goading Throw now covers ranged taunting, freeing this slot for a reliable pull.
When to Use: To bring scattered smaller enemies into your group’s damage area. Bosses and many elite enemies cannot be pulled; position those through taunt and movement instead.
Chains of Dominance
Role: Enemy Pull / Damage Reduction
Why You Use It: Pulls enemies towards you, applies Burning and Major Cowardice, and refunds its Magicka cost if the target cannot be pulled. Burning can also support sustain through your Ardent Flame passives.
When to Use: Gather smaller enemies into the group’s damage area. It can taunt an enemy that is not already taunted, but use your dedicated taunt to maintain control of priority targets.
Elemental Susceptibility — Replaces Chains of Dominance with Scribing
Role: Enemy Armor Reduction / Additional Debuffs
Why You Use It: Supplies Major Breach after replacing Pierce Armor. Its repeated elemental status effects provide additional debuffs, while Leashing Soul takes over pulling enemies.
When to Use: Maintain it on bosses and priority enemies, refreshing near expiry. It does not taunt, so keep your taunt active separately.
Elemental Blockade
Role: Ground Debuffs / Weapon Enchantment Support
Why You Use It: Helps activate your Frost Staff’s Crusher enchantment, reducing enemy Armor even after switching to your front bar. Frost Blockade also applies Minor Breach to Chilled enemies.
When to Use: Keep it beneath the boss or enemy stack. Refresh when it expires or reposition it if the fight moves.
Earthshield Mantle
Role: Main Armor Buff / Personal Shield
Why You Use It: Grants Major Resolve for increased resistances and a short damage shield that scales with Max Health. This is your main defensive buff in both setups.
When to Use: Before combat and before Major Resolve expires. You can refresh early for its shield when necessary, but avoid wasting Magicka by repeatedly casting it without a reason.
Choking Talons
Role: Area Immobilisation / Damage Reduction
Why You Use It: Holds susceptible enemies in place and applies Minor Maim, reducing their damage. It also gives an ally an Ignite synergy for additional damage.
When to Use: After gathering enemies into the stack. Avoid immobilising them outside the group’s damage area; bosses and some elites are immune to the immobilisation.
Shield Discipline
Role: Emergency Blocking / Resource Recovery Window
Why You Use It: Automatically blocks blockable attacks without spending Stamina for a short time. Your non-Ultimate One-Hand and Shield abilities also become free while it lasts.
When to Use: When Stamina is dangerously low or during a demanding blocking phase. Use the breathing room for sustain skills or a fully charged One-Hand and Shield Heavy Attack, while still responding to unblockable mechanics.
Standard of Might
Role: Group Damage Support / Damage Reduction
Why You Use It: Increases Weapon and Spell Damage and reduces damage taken for players inside the banner, with additional benefits for you. Once unlocked, The Storm Voice passive also restores resources when you cast an Ultimate.
When to Use: During a boss damage window or a difficult stacked pull where you and your allies can stay inside its area. It supports both damage and survival, but loses value if everyone immediately needs to move.
Necromancer Skill Information
Pierce Armor
Role: Main Taunt / Enemy Armor Reduction
Why You Use It: Keeps bosses and dangerous enemies attacking you. Major and Minor Breach reduce their resistances, helping your group deal more damage.
When to Use: When picking up a priority enemy, then refresh before taunt expires—roughly every 12–14 seconds.
Goading Throw — Replaces Pierce Armor with Scribing
Role: Ranged Taunt / Healing / Damage Reduction
Why You Use It: Combines a ranged taunt with healing over time and Major Maim, reducing the target’s damage. Elemental Susceptibility supplies Major Breach instead, while Frost Blockade applies Minor Breach to Chilled enemies.
When to Use: To secure bosses or dangerous enemies from range. Maintain taunt and refresh Major Maim when you need its protection.
Agony Totem
Role: Damage Reduction / Add Control / Group Support
Why You Use It: Grants Minor Protection to you and nearby allies, while Major Cowardice reduces enemies’ Weapon and Spell Damage. It periodically fears susceptible enemies in place and provides a damage synergy for allies.
When to Use: Once enemies are gathered around you, or during sustained boss damage. Keep important targets inside its area; bosses still receive the debuff even when they cannot be feared.
Necrotic Potency
Role: Ultimate Generation / Additional Healing
Why You Use It: Consumes nearby corpses to generate Ultimate and provide healing over time. It also reduces your damage taken while slotted, helping you survive while rebuilding your next Ultimate.
When to Use: After enemies die or Spirit Guardian leaves a corpse. Casting Beckoning Armor in combat also periodically enables a corpse-consuming ability on yourself, giving you another opportunity to use it.
Hungry Scythe
Role: Main Self-Heal
Why You Use It: Provides a Max Health–scaling burst heal when you hit an enemy, with additional healing for extra targets and healing over time afterwards. It is particularly effective when several enemies surround you.
When to Use: When your Health drops or you need ongoing healing during a pull. You must hit an enemy to receive the healing, so keep a target within reach.
Mortal Coil
Role: Healing Over Time / Resource Sustain
Why You Use It: Connects you to a corpse, healing you and allies between you and that corpse while restoring Magicka and Stamina. These direct resource returns also help while blocking.
When to Use: When a corpse is available and you need sustained healing or resources. Stay within tether range and maintain a clear connection; moving too far away or breaking line of sight interrupts its value.
Binding Contingency — Replaces Mortal Coil with Scribing
Role: Area Immobilisation / Damage Support / Personal Protection
Why You Use It: Immobilises nearby enemies, applies Minor Vulnerability to increase their damage taken, and adds personal damage reduction through Gladiator’s Tenacity. This gives you more reliable control once enemies are stacked.
When to Use: Prepare it as enemies gather, then trigger it with another resource-costing ability. Root enemies inside the group’s damage area. Remember that this replaces Mortal Coil’s ongoing healing and resource returns.
Destructive Clench — With a Frost Staff
Role: Ranged Taunt / Damage Reduction
Why You Use It: Frost Clench lets you taunt from your back bar while applying Major Maim and Chilled, reducing incoming damage and supporting your Frost Blockade debuffs.
When to Use: When you need to secure an enemy from range. Refresh Major Maim on dangerous targets when needed; its protection expires sooner than taunt.
Leashing Soul — Replaces Destructive Clench with Scribing
Role: Enemy Pull / Resource Return / Damage Reduction
Why You Use It: Pulls enemies directly towards you, restores Magicka and Stamina, and applies Major Cowardice to reduce their Weapon and Spell Damage. Goading Throw now covers ranged taunting, freeing this slot for a reliable pull.
When to Use: To bring scattered smaller enemies into your group’s damage area. Bosses and many elite enemies cannot be pulled; position those through taunt and movement instead.
Silver Leash
Role: Enemy Pull
Why You Use It: Pulls susceptible enemies directly towards you, letting you gather enemies without waiting for Beckoning Armor’s automatic pull.
When to Use: On smaller enemies outside the group’s damage area. It costs Stamina, so avoid repeatedly casting it when you need that resource for blocking or dodging.
Elemental Susceptibility — Replaces Silver Leash with Scribing
Role: Enemy Armor Reduction / Additional Debuffs
Why You Use It: Supplies Major Breach after replacing Pierce Armor. Its repeated elemental status effects provide additional debuffs, while Leashing Soul takes over pulling enemies.
When to Use: Maintain it on bosses and priority enemies, refreshing near expiry. It does not taunt, so keep your taunt active separately.
Elemental Blockade
Role: Ground Debuffs / Weapon Enchantment Support
Why You Use It: Helps activate your Frost Staff’s Crusher enchantment, reducing enemy Armor even after switching to your front bar. Frost Blockade also applies Minor Breach to Chilled enemies.
When to Use: Keep it beneath the boss or enemy stack. Refresh when it expires or reposition it if the fight moves.
Beckoning Armor
Role: Main Armor Buff / Automatic Enemy Pull
Why You Use It: Grants Major and Minor Resolve for increased resistances. While active, it automatically pulls susceptible ranged attackers towards you, helping gather enemies while you manage other responsibilities.
When to Use: Before combat and before its buffs expire. Its automatic pulls help, but use your dedicated pull when you need an enemy moved immediately. Casting it in combat also periodically enables corpse consumption on yourself.
Spirit Guardian
Role: Damage Mitigation / Ongoing Healing
Why You Use It: Transfers 10% of your incoming damage to the spirit and regularly heals you or a nearby wounded ally. Once unlocked, Undead Confederate also increases your recoveries while the spirit is active.
When to Use: Before combat and refresh as it expires. It leaves a corpse when it dies in combat, giving your corpse skills another target. Its healing supports survival but does not replace Hungry Scythe when you need an immediate heal.
Shield Discipline
Role: Emergency Blocking / Resource Recovery Window
Why You Use It: Automatically blocks blockable attacks without spending Stamina for a short time. Your non-Ultimate One-Hand and Shield abilities also become free while it lasts.
When to Use: When Stamina is dangerously low or during a demanding blocking phase. Use the breathing room for a fully charged One-Hand and Shield Heavy Attack or other resource recovery, while still responding to unblockable mechanics.
Glacial Colossus
Role: Group Damage Support
Why You Use It: Applies Major Vulnerability to enemies it hits, increasing the damage they take from your whole group. Its area coverage makes it useful against both bosses and stacked enemies.
When to Use: Once enemies are positioned and your damage dealers are ready to attack. Aim carefully so its smashes hit the important targets, and coordinate with other Major Vulnerability sources where possible.
Nightblade Skill Information
Pierce Armor
Role: Main Taunt / Resistance Debuffs
Why You Use It: Keeps bosses and dangerous enemies focused on you while applying Major and Minor Breach, reducing their resistances so your group deals more damage.
When to Use: Taunt priority enemies as you engage them, then refresh every 12–14 seconds before the taunt expires.
Goading Throw — Replaces Pierce Armor with Scribing
Role: Ranged Taunt / Healing / Damage Reduction
Why You Use It: This version combines a ranged taunt with healing over time and Major Maim, reducing the target’s damage. Elemental Susceptibility supplies Major Breach instead, while Cruxweaver Armor and Frost Blockade help cover Minor Breach.
When to Use: To pick up bosses or dangerous enemies from a distance. Refresh before taunt expires, and watch Major Maim’s timer when you need its protection.
Sap Essence
Role: Area Healing / Damage
Why You Use It: Damages nearby enemies and heals you and nearby allies, with stronger healing when you hit more enemies. Hitting an enemy also grants Major Brutality, increasing your Weapon and Spell Damage.
When to Use: Use against groups of enemies when you or nearby allies need extra healing. Avoid repeatedly casting it when everyone is already healthy.
Siphoning Attacks
Role: Health, Magicka & Stamina Sustain
Why You Use It: While slotted on either bar, dealing damage restores Health, Magicka and Stamina. Casting it trades some Health for an immediate return of Magicka and Stamina.
When to Use: Keep it slotted for ongoing sustain. Cast when resources are running low and you have enough Health to safely pay the cost.
Dark Cloak
Role: Self-Healing / Damage Reduction
Why You Use It: Provides a short heal-over-time that scales with Max Health and becomes stronger while blocking. Keeping it slotted on either bar also grants Minor Protection, reducing your damage taken.
When to Use: Cast when taking damage or preparing to block a dangerous attack. Refresh as needed during sustained pressure.
Mass Hysteria
Role: Crowd Control / Major Cowardice
Why You Use It: Makes nearby enemies cower in fear and applies Major Cowardice, lowering their Weapon and Spell Damage to reduce incoming damage.
When to Use: Use in trash pulls to control nearby enemies and reduce pressure on your group. Refresh when the damage reduction is needed.
Binding Contingency — Replaces Mass Hysteria with Scribing
Role: Area Immobilisation / Damage Support / Personal Protection
Why You Use It: Immobilises nearby enemies, applies Minor Vulnerability to increase their damage taken, and adds personal damage reduction through Gladiator’s Tenacity. This gives you more reliable control once enemies are stacked.
When to Use: Prepare it as enemies gather, then trigger it with another resource-costing ability. Root enemies inside the group’s damage area. Remember that this replaces Mortal Coil’s ongoing healing and resource returns.
Destructive Clench
Role: Ranged Taunt / Damage Reduction
Why You Use It: With an Ice Staff equipped, Frost Clench taunts enemies at range and applies Major Maim to reduce their damage. It also guarantees Chilled for additional debuff support.
When to Use: Use to taunt enemies you cannot safely reach and maintain Major Maim on bosses. This tanking effect requires an Ice Staff.
Leashing Soul — Replaces Destructive Clench with Scribing
Role: Enemy Pull / Resource Return / Damage Reduction
Why You Use It: Pulls enemies directly towards you, restores Magicka and Stamina, and applies Major Cowardice to reduce their Weapon and Spell Damage. Goading Throw now covers ranged taunting, freeing this slot for a reliable pull.
When to Use: To bring scattered smaller enemies into your group’s damage area. Bosses and many elite enemies cannot be pulled; position those through taunt and movement instead.
Silver Leash
Role: Enemy Pull / Positioning
Why You Use It: Pulls enemies towards you so your group can damage them together. It also taunts enemies that are not already taunted.
When to Use: Pull ranged enemies into your stack during trash fights. Watch your Stamina and avoid wasting casts on enemies that cannot be pulled.
Elemental Susceptibility — Scribing Setup
Role: Major Breach / Status Effects
Why You Use It: Applies Major Breach to reduce enemy resistances and repeatedly applies Burning, Chilled and Concussion. This supplies Major Breach when Pierce Armor is replaced by a Scribed taunt.
When to Use: Apply to bosses and priority targets, then refresh before its 30-second duration expires. This skill does not taunt.
Elemental Blockade
Role: Enchantment Uptime / Area Support
Why You Use It: Helps maintain your staff’s Crusher enchantment to reduce enemy resistances, including while you use your front bar. With an Ice Staff, it also provides additional defensive support.
When to Use: Keep it placed beneath bosses and stacked enemies. Reposition it when enemies move out of the area.
Mirage
Role: Defensive Buff / Cheaper Dodge Rolls
Why You Use It: Grants Major Evasion to reduce damage from area attacks and Minor Resolve to increase your resistances. Taking direct damage while it is active also reduces the cost of your next dodge roll.
When to Use: Cast before engaging enemies and maintain during combat, especially when facing frequent area damage.
Refreshing Path
Role: Group Healing / Movement & Recovery
Why You Use It: Creates a healing area that grants you and your allies Major Expedition for movement speed, plus Minor Endurance and Minor Intellect for increased Stamina and Magicka Recovery.
When to Use: Place beneath your group during combat and refresh for ongoing healing and recovery. Use along your route when the group needs to move quickly.
Shield Discipline
Role: Defensive Ultimate / Resource Recovery
Why You Use It: Automatically blocks blockable attacks without a resource cost for eight seconds and makes your non-Ultimate One Hand and Shield skills free. This gives you breathing room to recover resources.
When to Use: Activate when Stamina is running low or incoming damage becomes difficult to manage. Use the protection to land a fully charged heavy attack and restore Stamina.
Soul Siphon
Role: Emergency Group Healing
Why You Use It: Provides an immediate heal followed by healing over time for you and nearby allies. It also grants Major Vitality, increasing healing received and damage shield strength, and offers allies a healing synergy.
When to Use: Activate when several group members are taking heavy damage or your healer needs support keeping everyone alive.
Sorcerer Skill Information
Pierce Armor
Role: Main Taunt / Resistance Debuffs
Why You Use It: Keeps bosses and dangerous enemies focused on you while applying Major and Minor Breach, reducing their resistances so your group deals more damage.
When to Use: Taunt priority enemies as you engage them, then refresh every 12–14 seconds before the taunt expires.
Goading Throw — Replaces Pierce Armor with Scribing
Role: Ranged Taunt / Healing / Damage Reduction
Why You Use It: This version combines a ranged taunt with healing over time and Major Maim, reducing the target’s damage. Elemental Susceptibility supplies Major Breach instead, while Cruxweaver Armor and Frost Blockade help cover Minor Breach.
When to Use: To pick up bosses or dangerous enemies from a distance. Refresh before taunt expires, and watch Major Maim’s timer when you need its protection.
Dark Deal
Role: Stamina Sustain / Self-Healing
Why You Use It: Converts Magicka into Health and Stamina, with additional Stamina restored over the following 10 seconds. This helps recover the resources you need for blocking and taunting.
When to Use: Cast when Stamina is running low and there is a safe gap between enemy attacks. Its cast time drops block, so avoid using it during dangerous incoming attacks.
Regenerative Ward
Role: Damage Shield / Group Recovery
Why You Use It: Shields you and your pets, provides a self-heal, and grants Minor Intellect and Minor Endurance to nearby allies for increased Magicka and Stamina Recovery.
When to Use: Cast before heavy incoming damage or when you need extra protection. Refresh during sustained pressure or to maintain the recovery buffs.
Warding Contingency — Replaces Regenerative Ward with Scribing
Role: Shields / Damage Reduction / Additional Armor
Why You Use It: This version combines a damage shield, Gladiator’s Tenacity damage reduction and Minor Resolve. It adds protection alongside Major Resolve, although you lose the benefits of your class shield.
When to Use: Prepare it before incoming damage, then trigger it by using another resource-costing ability. You can follow it with your self-heal to activate the protection while recovering Health.
Shattering Spines
Role: Area Immobilise / Major Maim
Why You Use It: Immobilises enemies in front of you and applies Major Maim, reducing their damage done. This helps keep enemies grouped and makes large pulls easier to survive.
When to Use: Use after gathering enemies together, making sure you face the targets you want to control. Refresh Major Maim when its damage reduction is needed.
Summon Unstable Clannfear
Role: Burst Self-Healing
Why You Use It: Once summoned, activating the skill again provides a strong heal that scales with your Max Health. Keep it slotted on both bars so your Clannfear remains summoned when you swap weapons.
When to Use: Summon before combat, then activate its heal when your Health drops. Resummon if the pet dies.
Destructive Clench
Role: Ranged Taunt / Damage Reduction
Why You Use It: With an Ice Staff equipped, Frost Clench taunts enemies at range and applies Major Maim to reduce their damage. It also guarantees Chilled for additional debuff support.
When to Use: Use to taunt enemies you cannot safely reach and maintain Major Maim on bosses when Shattering Spines is not already covering it. This tanking effect requires an Ice Staff.
Leashing Soul — Replaces Destructive Clench with Scribing
Role: Enemy Pull / Resource Return / Damage Reduction
Why You Use It: Pulls enemies directly towards you, restores Magicka and Stamina, and applies Major Cowardice to reduce their Weapon and Spell Damage. Goading Throw now covers ranged taunting, freeing this slot for a reliable pull.
When to Use: To bring scattered smaller enemies into your group’s damage area. Bosses and many elite enemies cannot be pulled; position those through taunt and movement instead.
Silver Leash
Role: Enemy Pull / Positioning
Why You Use It: Pulls enemies towards you so your group can damage them together. It also taunts enemies that are not already taunted.
When to Use: Pull ranged enemies into your stack during trash fights. Watch your Stamina and avoid wasting casts on enemies that cannot be pulled.
Elemental Blockade
Role: Enchantment Uptime / Area Support
Why You Use It: Helps maintain your staff’s Crusher enchantment to reduce enemy resistances, including while you use your front bar. With an Ice Staff, it also provides additional defensive support.
When to Use: Keep it beneath bosses and stacked enemies. Reposition it when enemies move out of the area.
Boundless Storm
Role: Major Resolve / Movement Speed
Why You Use It: Grants Major Resolve to increase your resistances and damages nearby enemies over time. Activating it also provides a short burst of Major Expedition for faster movement.
When to Use: Cast before engaging enemies and refresh before its 30-second duration expires. Use the initial speed boost to help reposition during mechanics.
Elemental Susceptibility — Scribing Setup
Role: Major Breach / Status Effects
Why You Use It: Applies Major Breach to reduce enemy resistances and repeatedly applies Burning, Chilled and Concussion. This supplies Major Breach when Pierce Armor is replaced by a Scribed taunt.
When to Use: Apply to bosses and priority targets, then refresh before its 30-second duration expires. This skill does not taunt.
Shield Discipline
Role: Defensive Ultimate / Resource Recovery
Why You Use It: Automatically blocks blockable attacks without a resource cost for eight seconds and makes your non-Ultimate One Hand and Shield skills free. This gives you breathing room to recover resources.
When to Use: Activate when Stamina is running low or incoming damage becomes difficult to manage. Use the protection to land a fully charged heavy attack and restore Stamina.
Summon Charged Atronach
Role: Group Damage Support / Area Damage
Why You Use It: Summons an Atronach that damages nearby enemies and guarantees Concussion. An ally can activate its synergy to grant nearby allies Major Berserk, increasing their damage done.
When to Use: Place near bosses or stacked enemies when your group can make use of the synergy. Choose a position where enemies will remain within its attack area.
Templar Skill Information
Pierce Armor
Role: Main Taunt / Resistance Debuffs
Why You Use It: Keeps bosses and dangerous enemies focused on you while applying Major and Minor Breach, reducing their resistances so your group deals more damage.
When to Use: Taunt priority enemies as you engage them, then refresh every 12–14 seconds before the taunt expires.
Goading Throw — Replaces Pierce Armor with Scribing
Role: Ranged Taunt / Healing / Damage Reduction
Why You Use It: This version combines a ranged taunt with healing over time and Major Maim, reducing the target’s damage. Elemental Susceptibility supplies Major Breach instead, while Cruxweaver Armor and Frost Blockade help cover Minor Breach.
When to Use: To pick up bosses or dangerous enemies from a distance. Refresh before taunt expires, and watch Major Maim’s timer when you need its protection.
Blazing Spear
Role: Area Immobilise / Group Sustain
Why You Use It: Immobilises enemies hit by the initial impact and damages the area over time. An ally can activate its synergy to restore Magicka or Stamina, depending on which maximum resource is higher.
When to Use: Place beneath stacked enemies after gathering them together. Position it within reach of allies so they can use the synergy.
Radiant Ward
Role: Damage Shield / Minor Maim
Why You Use It: Grants a damage shield that scales with your Max Health and becomes stronger for each nearby enemy hit. It also applies Minor Maim to those enemies, reducing their damage done.
When to Use: Cast before heavy incoming damage or during large trash pulls. Use close to enemies to strengthen the shield and apply Minor Maim.
Warding Contingency — Replaces Radiant Ward with Scribing
Role: Shields / Damage Reduction / Additional Armor
Why You Use It: This version combines a damage shield, Gladiator’s Tenacity damage reduction and Minor Resolve. It adds protection alongside Major Resolve, although you lose the benefits of your class shield.
When to Use: Prepare it before incoming damage, then trigger it by using another resource-costing ability. You can follow it with your self-heal to activate the protection while recovering Health.
Repentance
Role: Stamina Sustain / Group Healing
Why You Use It: Consumes nearby corpses to restore Stamina to you and Health to you and nearby allies. While slotted on either bar, it also increases your Health, Magicka and Stamina Recovery.
When to Use: Activate after enemies die whenever you need Stamina or your group needs healing. Keep it slotted for the recovery benefits, even when no corpses are available.
Living Dark
Role: Reactive Self-Healing / Group Armour
Why You Use It: Heals you when you take direct damage and snares attackers. With Illuminate and Prism unlocked, casting it also grants extra armour to your group and generates Ultimate for you.
When to Use: Keep active while taking frequent direct hits, especially during large pulls. Refresh when its 10-second duration expires if you still need the healing.
Destructive Clench
Role: Ranged Taunt / Damage Reduction
Why You Use It: With an Ice Staff equipped, Frost Clench taunts enemies at range and applies Major Maim to reduce their damage. It also guarantees Chilled for additional debuff support.
When to Use: Use to taunt enemies you cannot safely reach and maintain Major Maim on bosses. This tanking effect requires an Ice Staff.
Leashing Soul — Replaces Destructive Clench with Scribing
Role: Enemy Pull / Resource Return / Damage Reduction
Why You Use It: Pulls enemies directly towards you, restores Magicka and Stamina, and applies Major Cowardice to reduce their Weapon and Spell Damage. Goading Throw now covers ranged taunting, freeing this slot for a reliable pull.
When to Use: To bring scattered smaller enemies into your group’s damage area. Bosses and many elite enemies cannot be pulled; position those through taunt and movement instead.
Silver Leash
Role: Enemy Pull / Positioning
Why You Use It: Pulls enemies towards you so your group can damage them together. It also taunts enemies that are not already taunted.
When to Use: Pull ranged enemies into your stack during trash fights. Watch your Stamina and avoid wasting casts on enemies that cannot be pulled.
Elemental Blockade
Role: Enchantment Uptime / Area Support
Why You Use It: Helps maintain your staff’s Crusher enchantment to reduce enemy resistances, including while you use your front bar. With an Ice Staff, it also provides additional defensive support.
When to Use: Keep it beneath bosses and stacked enemies. Reposition it when enemies move out of the area.
Restoring Focus
Role: Major Resolve / Stamina Sustain / Healing
Why You Use It: Grants Major Resolve to increase your resistances, restores Stamina even while blocking, and provides healing that scales with Max Health. Standing inside the rune makes the healing stronger.
When to Use: Cast before engaging enemies and maintain throughout combat. Stand inside the rune when safe, and replace it when you need to change position.
Extended Ritual
Role: Group Healing / Cleanse
Why You Use It: Creates a large healing area and immediately removes up to five harmful effects from you. Allies can activate the Purify synergy to cleanse themselves and receive an additional heal.
When to Use: Keep beneath your group during sustained damage. Recast when you need to cleanse removable harmful effects, even if the healing area is still active.
Elemental Susceptibility — Scribing Setup
Role: Major Breach / Status Effects
Why You Use It: Applies Major Breach to reduce enemy resistances and repeatedly applies Burning, Chilled and Concussion. This supplies Major Breach when Pierce Armor is replaced by a Scribed taunt.
When to Use: Apply to bosses and priority targets, then refresh before its 30-second duration expires. This skill does not taunt.
Shield Discipline
Role: Defensive Ultimate / Resource Recovery
Why You Use It: Automatically blocks blockable attacks without a resource cost for eight seconds and makes your non-Ultimate One Hand and Shield skills free. This gives you breathing room to recover resources.
When to Use: Activate when Stamina is running low or incoming damage becomes difficult to manage. Use the protection to land a fully charged heavy attack and restore Stamina.
Solar Prison
Role: Area Damage Reduction / Group Synergy
Why You Use It: Applies Major Maim to enemies within its area, reducing their damage done while dealing damage over time. An ally can activate the Gravity Crush synergy for additional damage and a stun against susceptible enemies.
When to Use: Place beneath dangerous enemy stacks or bosses when your group needs extra protection. Position it where enemies will remain inside and allies can reach the synergy.
Warden Skill Information
Pierce Armor
Role: Main Taunt / Resistance Debuffs
Why You Use It: Keeps bosses and dangerous enemies focused on you while applying Major and Minor Breach, reducing their resistances so your group deals more damage.
When to Use: Taunt priority enemies as you engage them, then refresh every 12–14 seconds before the taunt expires.
Goading Throw — Replaces Pierce Armor with Scribing
Role: Ranged Taunt / Healing / Damage Reduction
Why You Use It: This version combines a ranged taunt with healing over time and Major Maim, reducing the target’s damage. Elemental Susceptibility supplies Major Breach instead, while Cruxweaver Armor and Frost Blockade help cover Minor Breach.
When to Use: To pick up bosses or dangerous enemies from a distance. Refresh before taunt expires, and watch Major Maim’s timer when you need its protection.
Budding Seeds
Role: Group Healing / Healing Synergy
Why You Use It: Creates a healing area that provides healing over time before blooming for a larger heal. Allies can use the Harvest synergy for additional healing. With Maturation unlocked, your healing also grants Minor Toughness to increase the target’s Max Health.
When to Use: Place beneath your group during combat. Activate again to trigger the bloom early when you need the larger heal immediately.
Deceptive Predator
Role: Area Damage Reduction / Mobility
Why You Use It: Grants Minor Evasion while on your active bar, reducing damage taken from area attacks. Casting it grants Major Expedition for faster movement and temporary immunity to snares and immobilisations.
When to Use: Keep slotted for its defensive benefit. Activate when you need to reposition quickly or move through mechanics that slow or immobilise you.
Warding Contingency — Replaces Deceptive Predator with Scribing
Role: Shields / Damage Reduction / Additional Armor
Why You Use It: This version combines a damage shield, Gladiator’s Tenacity damage reduction and Minor Resolve. It adds protection alongside Major Resolve.
When to Use: Prepare it before incoming damage, then trigger it by using another resource-costing ability. You can follow it with your self-heal to activate the protection while recovering Health.
Polar Wind
Role: Main Self-Heal / Ally Healing
Why You Use It: Provides an immediate self-heal followed by healing over time, with both scaling from your Max Health. The initial cast also heals a nearby ally.
When to Use: Cast when your Health drops or incoming damage becomes difficult to manage. Refresh the healing over time during sustained pressure.
Bull Netch
Role: Stamina Sustain / Cleanse
Why You Use It: Restores Stamina over time without costing resources and removes one negative effect every five seconds. It also grants Major Brutality, increasing your Weapon and Spell Damage.
When to Use: Summon before combat and refresh before its 25-second duration expires. Keep active throughout fights for consistent Stamina sustain and automatic cleansing.
Destructive Clench
Role: Ranged Taunt / Damage Reduction
Why You Use It: With an Ice Staff equipped, Frost Clench taunts enemies at range and applies Major Maim to reduce their damage. It also guarantees Chilled for additional debuff support.
When to Use: Use to taunt enemies you cannot safely reach and maintain Major Maim on bosses. This tanking effect requires an Ice Staff.
Leashing Soul — Replaces Destructive Clench with Scribing
Role: Enemy Pull / Resource Return / Damage Reduction
Why You Use It: Pulls enemies directly towards you, restores Magicka and Stamina, and applies Major Cowardice to reduce their Weapon and Spell Damage. Goading Throw now covers ranged taunting, freeing this slot for a reliable pull.
When to Use: To bring scattered smaller enemies into your group’s damage area. Bosses and many elite enemies cannot be pulled; position those through taunt and movement instead.
Frozen Device
Role: Enemy Pull / Immobilise / Major Maim
Why You Use It: Places a portal that teleports an enemy to you when triggered, immobilises them and briefly applies Major Maim to reduce their damage. You can place up to three devices at once.
When to Use: Place beneath ranged enemies or at predictable spawn locations. Allow for its 1.5-second arming delay, and taunt dangerous enemies once they arrive.
Elemental Blockade
Role: Enchantment Uptime / Area Support
Why You Use It: Helps maintain your staff’s Crusher enchantment to reduce enemy resistances, including while you use your front bar. With an Ice Staff, it also provides additional defensive support.
When to Use: Keep it beneath bosses and stacked enemies. Reposition it when enemies move out of the area.
Expansive Frost Cloak
Role: Group Defensive Buff
Why You Use It: Grants Major Resolve to you and grouped allies across a wide area, increasing Physical and Spell Resistance to reduce incoming damage.
When to Use: Cast before engaging enemies and refresh before its 20-second duration expires. Keep active throughout combat to protect yourself and your group.
Gripping Shards
Role: Area Immobilise / Enemy Control
Why You Use It: Immobilises nearby enemies when cast, then damages and snares enemies in the area. It also has an increased chance to apply Chilled for additional debuff support.
When to Use: Cast after gathering enemies around you to help keep them stacked. Refresh during longer trash fights for continued damage and snaring.
Elemental Susceptibility — Scribing Setup
Role: Major Breach / Status Effects
Why You Use It: Applies Major Breach to reduce enemy resistances and repeatedly applies Burning, Chilled and Concussion. This supplies Major Breach when Pierce Armor is replaced by a Scribed taunt.
When to Use: Apply to bosses and priority targets, then refresh before its 30-second duration expires. This skill does not taunt.
Shield Discipline
Role: Defensive Ultimate / Resource Recovery
Why You Use It: Automatically blocks blockable attacks without a resource cost for eight seconds and makes your non-Ultimate One Hand and Shield skills free. This gives you breathing room to recover resources.
When to Use: Activate when Stamina is running low or incoming damage becomes difficult to manage. Use the protection to land a fully charged heavy attack and restore Stamina.
Enchanted Forest
Role: Emergency Group Healing
Why You Use It: Immediately heals the most injured friendly target, then provides healing over time to you and allies inside the area. It returns 20 Ultimate if the initial heal reaches a target below 50% Health.
When to Use: Place beneath your group during heavy incoming damage or when someone needs urgent healing. Position it where allies can remain inside for the follow-up healing.
Scribed Skills
- Wield Soul
- Pull
- Druid’s Resurgence
- Cowardice
Pulls enemies together, restores Magicka and Stamina, and applies Major Cowardice to reduce incoming damage.
- Shield Throw
- Taunt
- Sage’s Remedy
- Maim
Ranged taunt that also heals you and applies Major Maim, reducing enemy damage.
- Ulfsild’s Contingency
- Damage Shield
- Gladiator’s Tenacity
- Minor Resolve
Provides a strong damage reduction, additional resistances from minor resolve and a group damage shield that scales with max health.
- Ulfsild’s Contingency
- Immobilise
- Gladiator’s Tenacity
- Vulnerability
An alternative version of Contingency used by classes that don’t have a built in Immobilise for crowd control, also adds an additional AoE Minor Vulnerability to make adds die faster.
Champion Points
Slottable Champion Points (use 4)
- Ironclad
- Duelist’s Rebuff
- Bulwark
- Enduring Resolve (DoT damage fights)
- Unassailable (AoE damage fights)
Slottable Champion Points (use 4)
- Boundless Vitality
- Fortified
- Rejuvenation
- Bracing Anchor (Boss Fights)
- Celerity (Add Pulls)
How to Play a Tank
These steps apply to every class setup in this guide. Your exact healing, crowd control and sustain skills will change by class, and some gear effects only apply when you have that set equipped. Focus on what the pull needs rather than trying to cast every skill in a fixed order.
Tank Rotation
As a beginner Tank, your role is to hold aggro, control enemies, survive, and manage resources.
Pre-Buff & Engage
- Activate Major Resolve before every fight and maintain it throughout.
Add Pulls (Group Fights)
- Place Elemental Blockade for AoE damage.
- Immobilize melee enemies & Pull in ranged enemies.
- Recast Immobilize, then taunt remaining enemies with Pierce Armor.
Boss Fights (Taunting & Debuffing)
- Pierce Armor – Taunt & reduce boss resistances (recast every 15s).
- Heroic Slash – Reduces boss damage & boosts your Ultimate gain.
- Destructive Clench – Major boss debuff, use frequently.
- Elemental Blockade – Applies your weapon enchant, gives a group projectile shield and debuffs (recast every 15s).
Staying Alive
- Keep Healing-over-Time & Shields active.
- Use burst heal if low on health.
- Roll dodge sparingly to conserve stamina but evade taking damage.
Managing Resources
- Use potions & recovery skills regularly.
- Follow “Heavy After a Heavy” – When a boss heavy attacks, follow up with a heavy attack for sustain.
Emergency Survival
- Low resources? Use Shield Discipline + 3x Heavy Attacks.
- Survival emergency? Stack heals, shields, and your back-bar Ultimate.
Progressing Beyond Beginner Tanking in ESO
This build is designed to give you stability while you learn. It prioritises survivability, sustain, and simplicity so you can focus on mechanics, positioning, and understanding your role without being overwhelmed by optimisation.
As you grow more comfortable, you’ll naturally begin shifting from survival-focused gear into sets that provide stronger group buffs and debuffs. Tanking in ESO evolves over time, you start by staying alive, then progress into controlling fights and accelerating them for your group.
Remember that gear does not make a strong tank. Awareness, taunt uptime, positioning, and resource management will always matter more than perfect optimisation.
Once you feel confident in normal dungeons and early veteran content, begin exploring more advanced tank builds, trial gear, and subclass combinations. ESO continues to adjust class balance and reduce reliance on subclassing alone, so your base class will remain a meaningful foundation as you progress.
Master the fundamentals first.
The optimisation can come later.
Take Your Tanking Further
🔹 Try Another Class → Explore all ESO Tank Builds
🔹 New to the Role? Start with the Beginner Guide
🔹 Optimising Gear? Read the Tank Gear Guide
🔹 More ESO Content → Visit the ESO Hub
🔹 Playing on Console? See the Best MMORPGs for 2026
Want My Best Tank Builds Before Everyone Else?
Get early access builds, exclusive setups, and direct input on future content.