The RavenQuest Complete Beginners Guide
Welcome to the Ultimate Beginner’s Guide for RavenQuest—the game that’s setting a new standard for MMORPGs!
In this guide, I’ll cover everything you need, from creating your account and understanding the fundamentals, all the way to mastering combat, exploring the world, and dominating in PvE and PvP. Whether you’re completely new or looking to sharpen your skills, we’ve got you covered with clear, concise information to make your RavenQuest journey smooth and enjoyable.
Let’s dive into the pixel-art MMORPG that’s redefining player freedom, in-game asset ownership, and immersive gameplay.
Getting Started in RavenQuest
RavenQuest is a free-to-play, top-down pixel art sandbox MMORPG that seamlessly blends traditional gaming with Web3 technology, offering countless hours of engaging content, limitless player freedom, and a genuine player-driven economy. Unlike typical crypto games, RavenQuest feels like a true MMORPG experience first, allowing you to own your in-game assets and even earn without any mandatory commitments.
Start your RavenQuest journey by heading to RavenQuest.com and creating your account. Remember to use my Referral Link during sign-up for exclusive in-game rewards!
RavenQuest is currently available on Windows and will soon launch as a fully playable mobile game (not just a companion app). Plans are also in place to bring the game to Epic Games and Steam in the future.
After creating your account, download the RavenQuest launcher from your account page. Open the launcher, and install the game from there.
⚠️ Important: Ensure you install the launcher and the game in separate folders, or you’ll have to reinstall.
RavenQuest currently supports English and Portuguese, with additional languages coming soon.
Before logging in, click the cog icon to adjust settings:
- Limit frame rate to match your PC and monitor capabilities.
- Disable effects like screen shake for smoother gameplay.
- You can add extra action bars, though this won’t be necessary initially.
- Disable threat indicators until later levels.
- Enable “Click-to-Move”. This helps fix movement issues when your character gets stuck using WASD.
- Customize hotkeys to suit your playstyle.
When logging in, select a Regional Channel that provides the lowest ping based on your location. You can freely switch between regional channels at any time, allowing you to play seamlessly with friends worldwide.
RavenQuest is completely free-to-play and offers an optional subscription called Patron, along with purchasable cosmetics and helpful items like summonable bankers and RavenPacks.
Patron subscribers enjoy exclusive benefits:
- Custom chat badges and colours
- Priority login during peak times
- Reduced marketplace fees
- Free fast travel across the game world
- Extra North Star quest rewards
- Boosted rested experience to speed up levelling
Creating Your RavenQuest Character
When creating your character, you’ll select a name, gender, and initial archetype. Additional appearance customizations become available later.
Your character’s appearance is determined primarily by the weapons equipped—initially, there are no direct appearance options at character creation.
RavenQuest uses a flexible Archetype System rather than fixed classes. Initially, you’ll choose one archetype, unlocking a second at Level 7, and a third at Level 15. You can freely combine and switch between any of the 8 available archetypes to adapt to different playstyles or situations.
![]() Archery: Ranged physical damage, speed, damage over time (DoT), and area-of-effect (AoE) skills.
Archery: Ranged physical damage, speed, damage over time (DoT), and area-of-effect (AoE) skills.
![]() Witchcraft: Magic damage, curses, debuffs, DoTs, and health-leeching abilities.
Witchcraft: Magic damage, curses, debuffs, DoTs, and health-leeching abilities.
![]() Wizardry: Elemental magic with powerful fire and ice spells for AoE damage and crowd control.
Wizardry: Elemental magic with powerful fire and ice spells for AoE damage and crowd control.
![]() Spiritual: Support archetype offering wind-based magic for barriers, movement boosts, mana restoration, and healing.
Spiritual: Support archetype offering wind-based magic for barriers, movement boosts, mana restoration, and healing.
![]() Shadow: Stealthy assassin type, specializing in critical hits, quick attacks, and poison effects.
Shadow: Stealthy assassin type, specializing in critical hits, quick attacks, and poison effects.
![]() Protection: Tank archetype, excelling in damage mitigation, ally protection, and party buffs.
Protection: Tank archetype, excelling in damage mitigation, ally protection, and party buffs.
![]() Holy: Primary healer archetype providing strong healing, protective spells, and holy damage.
Holy: Primary healer archetype providing strong healing, protective spells, and holy damage.
![]() Warfare: Aggressive melee archetype focusing on sustained damage, self-healing, and mobility.
Warfare: Aggressive melee archetype focusing on sustained damage, self-healing, and mobility.
Early-game archetype choice doesn’t drastically impact gameplay, but the following are recommended for beginners:
- Warfare (melee) or Witchcraft (magic) provide solid damage output with self-healing.
- Archery (physical ranged) and Wizardry (magical ranged) offer high damage without built-in healing but are strong beginner-friendly options.
At Level 15, you gain the freedom to swap archetypes anytime. Press K to open the skill menu, choose your new archetype then select an archetype you’d like to replace. This flexibility allows you to easily adapt your character to different roles and challenges.
By combining three archetypes, you create one of 56 unique classes. Your selected class is shown in the top-left corner of the skill tree menu (K). For an effective build, select archetypes that complement each other by balancing damage, survivability, and healing. For example:
- Physical Build: Warfare (damage/self-heal), Archery (ranged damage), Protection (tank/buffs).
- Magic Build: Witchcraft (magic damage/self-heal), Wizardry (AoE damage), Spiritual (support/heals).
RavenQuest UI & Menus
RavenQuest provides crucial game information through its intuitive UI. Here’s a quick breakdown of the essential elements:
Located in the bottom-left corner, the chat box enables communication with other players. You can switch between different channels (Local, Guild, Party, etc.) and customise it to display only the chats you prefer.
Displayed in the top-left corner and directly above your character, these bars help track your health and mana for quick reference.
Appearing on the middle-left side of the screen, this list can be customised to show specific enemy types or players, and sorted by distance, health, level, name, or type. Adjust these preferences via the settings icon at the top of the list.
Located beneath your ability bar, this clearly shows your current Legacy Level and experience progress at a glance. Hovering on the bar shows your experience total and your rested experience bonus available.
Clicking the RavenQuest icon at the bottom-right corner opens the main menu, providing access to essential tools:
- Character, Inventory, Infusions, Ravencards, Archetypes
- Professions, Reputation, Aether Rifts, Transport
- World Map, Quest Log, Adventurer’s Board, Rangers Company
- Trade Pack List, Journal, Guild, Social List
- Tutorial, Redeem Rewards, RavenStore, and Settings
The main map displays valuable information, such as:
- Current PvP rules for each zone
- Enemy level ranges for each area
- Icons for crafting stations, respawn shrines, quests (orange exclamation mark), and dynamic events (yellow crossed arrows).
Located at the top-right corner, the Mini Map provides quick navigation:
- Zoom: Use your mouse wheel.
- Displays current zone and in-game time.
- Quick access to toggles for PvP Mode, House Mode, Enemy List, and Quest Tracker.
At the top of the Mini Map, you can switch between Peaceful Mode and Offensive PvP Mode, affecting combat penalties.
PvP Zone rules still apply regardless
- Peaceful Zones prevent player attacks.
- Warzone/Conflict Zones enable PvP combat, potentially earning Infamy when attacking players.
Server channels split players across instances for optimal population management. Switch channels by clicking the Channel Selector near the Mini Map, selecting your preferred channel, and confirming.
- 15-minute cooldown between switches.
- Channel switching is only possible within protected areas like Ravencrest.
War Mode Channel: Open-world PvP without penalties. Offers bonus experience and increased tradepack values.
Plunder Channel: High-risk PvP area. Entry requires a silver fee (scales by level). Defeated players drop their fee as loot. Also Offers bonus experience and increased tradepack values.
The House Mode button (top-right) displays information on your crops’ growth timers and provides quick access for fast travel to your house. (Detailed later in the guide.)
Toggle floor navigation icons (red arrows for downward paths, green arrows for upward paths) to ease exploration across vertical levels.
Skill bars at the screen’s center allow you to drag and manage skills, abilities, and consumables conveniently.
Represented by the purple orb in between your skill bar, this indicates your Aether resource. Some abilities build Aether, while others spend it for enhanced effects, higher damage, or reduced cost.
This menu allows you to claim Twitch drops and special in-game rewards directly into RavenQuest.
RavenQuest Character & Levels
Move your character using the WASD keys. For diagonal movement, hold two directional keys together (e.g., W + A to move northwest). You can also enable Point & Click movement by navigating to Settings (O) → Misc → Point & Click and clicking directly on the ground or mini-map to move.
Note: RavenQuest uses a fixed top-down camera view without adjustable camera controls.
Engage enemies by right-clicking them or selecting from the Enemy List. Your character will auto-attack, but you can use abilities by pressing your assigned hotkeys. You can also quickly cycle through enemy targets using the Tab key.
RavenQuest uses multiple levelling systems to track your progress:
- Legacy Level: Reflects your total experience across all archetypes. Determines gear eligibility and quest access. (Visible on the main UI.)
- Archetype Level: Each archetype levels individually, providing skill points and attribute boosts. Switch archetypes regularly to maximize these benefits. Viewed on the Skill menu (K).
- Effective Level: Calculated from your three active archetypes’ combined average level, representing your overall combat strength. It helps you identify suitable enemy difficulty. (Located next to your class on the Skill menu.)
Experience in RavenQuest is gained through defeating enemies, completing quests, crafting, and gathering.
Legacy level has a soft cap of 75, after which the amount of experience required to level up increases significantly. While there is no hard cap, further progression provides diminishing returns.
Archetype levels follow a similar system, with each archetype hard capped at level 75, after which they cannot be levelled up any further.
During launch week, starting zones may become crowded. To avoid bottlenecks:
- Focus initially on essential quests granting critical items (mount quests, ships, wagons).
- Consider grinding enemies at locations linked to crafting professions like Barrendon Mines, Witches Crag, or Leapwater Marsh for Blacksmithing materials.
- Early valuable cosmetics drop from enemies in areas like Salkdusk Keep.
Early on, single-target combat is most efficient due to limited gear and skills. However, teaming up for small-group AoE farming significantly boosts experience gain, especially once better gear and skills become available.
When logging out or resting in safe zones (e.g., Ravencrest), your character accumulates Rested Experience, displayed as a percentage up to 100%. Rested XP grants a temporary double XP bonus until the bonus is fully consumed. Rested XP accumulation caps at 100%. You can only earn rested experience if you are level 20+ and a Patron subscriber.
Enemies have different levels, shown clearly on the world map:
- Grey Enemies: Weak; grant minimal XP.
- Green Enemies: Level-appropriate; standard XP.
- Orange Enemies: Stronger and tougher; provide bonus XP but pose increased risk.
Always choose enemies close to your effective level for optimal progression, or Orange Enemies when hunting in groups.
Looting in RavenQuest is fully automatic. Items from defeated enemies are instantly placed in your inventory.
For special objects that are shining or chests, simply click to interact by pressing F, your character will quickly channel to gather loot.
As you earn experience through combat, crafting, or gathering, you’ll receive Supply Bags, containing valuable rewards such as:
- Silver
- Occasionally, rare drops like Aether Echo Scrolls.
Open supply bags regularly to make the most of these bonuses.
If your character dies, you’ll be sent to a Respawn Shrine and accrue an Experience Debt:
- Debt must be cleared before you can earn new experience again.
- Debt scales with your level; higher-level deaths incur more debt.
- Debt can be cleared by earning XP normally or paying a silver fee, which increases with your character level.
RavenQuest Gear & Weapons
Your inventory stores all collected items from quests, combat, and gathering. Additional slots can be purchased directly at the bottom of the inventory window. Special quest-related items, such as keys, documents, and tradepack certificates, are stored in the separate Quest Tab. Further organisation is possible by purchasing extra inventory tabs.
Equip gear by clicking items directly from your inventory or dragging them onto their respective slots in the equipment tab, located on your Character screen (X).
RavenQuest features 11 weapon types. Each weapon scales with one of three stats which will determine the amount of damage you do from auto attacks when you are targeted onto an enemy.:
- Weapon Power
- Spell Power
- Adaptive Damage (whichever stat—Weapon or Spell Power—is higher)
Weapons options include:
- Two-Handed
- Dual Wield (two one-handed weapons)
- One-Handed + Shield
Each weapon provides a unique weapon skill, granting additional combat benefits.
Two-Handed Weapons:
- Greataxe (Weapon Power): AoE damage skill.
- Greatsword (Weapon Power): Temporarily increases skill and attack damage but also increases damage received.
- Hammer (Weapon Power): Cone-shaped AoE attack.
- Light Blade (Adaptive): Removes slows, stuns, and snares.
- Stave (Spell Power): Temporarily increases skill damage at an increased mana and health cost.
- Bow (Weapon Power): Temporarily boosts attack speed.
One-Handed Weapons:
- Axe (Weapon Power): Throwing axe skill causing damage, bleed (DoT), and slow.
- Sword (Weapon Power): Grants a temporary damage shield.
- Club (Weapon Power): Single-target damage and slow.
- Dagger (Weapon Power): Temporarily increases critical hit chance.
- Sceptre (Spell Power): Provides a damage shield for you or an ally.
Shields (no skills but provide stat bonuses):
- Buckler Shield: Increases healing and damage.
- Tower Shield: Enhances defense.
All weapons are viable, but here are some top beginner-friendly options:
- Light Blade (Two-Handed, Adaptive): Fast hard hitting melee attacks, hybrid damage weapon, ideal for PvP and crowd-control situations.
- Bow (Two-Handed, Weapon Power): Strong ranged attacks, reducing the damage you take by keeping distance.
- Stave (Two-Handed, Spell Power): Powerful ranged magic weapon; skill provides a significant damage boost every 45 seconds.
- Greatsword (Two-Handed, Weapon Power): Melee version of the Stave, enhancing skill and auto-attack damage temporarily.
- Sceptre + Buckler Shield: Balanced combination offering good damage output and survivability, particularly useful in PvP.
Armor comes in three types, each providing specific bonuses:
- Plate: Increased health, healing received, and weapon defense.
- Leather: Improved critical hit chance and reduced crowd-control effects on you.
- Cloth: Increased attack speed, spell defense, and reduced casting time.
Equipping 2 or 4 pieces of the same type grants additional bonuses.
Recommended: Plate is generally ideal for PvE, while Cloth is often preferred in PvP.
Gear in RavenQuest is divided into 7 tiers:
- Tier 1: Basic gear (no attributes).
- Tier 2: Recommended around Level 15.
- Tier 3: Recommended around Level 30.
- Tier 4: Recommended around Level 45.
- Tier 5: Recommended around Level 55.
- Tier 6: Recommended around Level 65.
- Tier 7: Endgame gear (Level 75+).
Higher-tier gear provides more defensive benefit, primary attributes as well as sub-stats. All gear in the game is crafted by players.
Important: You can equip gear beyond your level, but doing so reduces its stat benefits until your character level matches.
Gear quality is graded 1 to 11, indicated by the item’s border color. Higher grades boost primary stats (Attack Power, Defense Power) and secondary attributes.
Use Infusions (loot drops) and silver to upgrade gear quality:
Access via the Infusions menu (U).
Select gear, choose infusions, and confirm.
Old gear can also be used as infusion materials.
⚔ Tip: Save soulbound infusions until you obtain at least Tier 3 gear, then upgrade to Purple or Gold for maximum early-game benefit.
Enchantments are powerful runes applied to gear to provide additional bonuses:
- Obtainable from Journal-related NPCs (access via Journal (J)).
- The first enchantments become available at Harbor Island after obtaining the
- Lost Earring artifact (NPC: Greedy Jackson).
- For the first runes each one costs 9,000 silver, this increases for higher tier runes later.
- Only one enchantment per equipment piece—applying a new one replaces the existing enchantment.
Augmentation permanently enhances your gear, improving Defense (armor) or Attack Power (weapons):
- Earn Augmentation Stones from Aether Echo bosses.
- Use Augmentations via the Infusions menu (U) under the Augmentation tab.
- Augmenting consumes stones and silver, making the gear soulbound.
- Augmentation levels progressively require more stones per upgrade.
Warforging is an advanced endgame upgrade method:
- Obtain Warforging Shards from participating in Guild Wars.
- Upgrade gear using these shards at a War Forge.
- Warforged items become soulbound and require significant silver—only upgrade the best highest-level gear.
Trinkets are unique accessory items that provide special effects:
- Obtainable through quests and from the Rangers Company shop.
- Effects include battle summons, stat boosts, healing, or niche utility.
⚔ Tip: Early-game recommendation Ewin’s Lucky Charm (Level 33 quest: Merchant’s Misfortune in Hadarak Desert). It frequently grants +100 silver per enemy defeated—a powerful early-game advantage.
Your character can equip 1 amulet and 2 rings, providing considerable stat improvements. These items are primarily acquired from quests, with some purchasable from the Rangers Company.
- Amulets: Often offer significant Attack Power boosts—prioritize these early. The Rangers Company options are usually very good.
- Rings: Avoid early-game rings that combine incompatible stats (e.g., Wisdom + Might). You also cannot equip two identical rings.
Legendary Rings (Level 75+)
Legendary rings offer exceptional power but require extensive effort to obtain:
- Collect Aether Marked Runes from Aether Rifts.
- Reach Rank 9 with Rangers Company to obtain an Experimental Mould.
- Gather Ring Fragments from high-level enemies and dynamic events.
- Combine these components by visiting Lorekeeper Lizdeika.
RavenQuest Stats & Attributes
Often when levelling up, you’ll receive 2 attribute points. These need to be distributed among vitality, might, intelligence, dexterity, and wisdom in your Character Tab (X) on Stats. It’s best to match your stat allocation to your chosen weapon and abilities damage type so either Weapon Power or Spell Power.
Early on, focus primarily on one stat typically either Might or Intelligence, but later on, you need to diversify as you gain more attributes from levelling up and the bonuses gained from equipment. For later game and PvP you’ll need Vitality, Dexterity is a useful stat for offense and defense. Wisdom plays its part for builds that use healing.
As you scroll further down the stats page you’ll see all of your sub stats such as Spell/Weapon Power and Spell/Weapon Defense as well as many others. This is a detailed breadown of how strong your character is from all things combined.
When a stat is orange it means you are at the current limit for your level and get a minor penalty for being over the cap.
Some of the key stats you need to look at and try to increase are
- Weapon or Spell Damage, try to obtain gear with one of these stats on.
- Weapon Defense – Most PvE enemies cause weapon defense so its a really useful stat to increase.
- Spell Defense – Provides value for PvP
- Precision – Very useful substat for increasing critical chance
- Impact – Increases critical damage boost the damage you do from critical hits
- Haste – Improves your combat speed with increased attack speed, reduced cooldowns and cast times.
Your health is represented by the red bar above your character’s head and in the top left of the screen. Some abilities may also require a portion of your health to be used.
Mana, represented by the blue bar above your character’s head and in the top left of the screen, is used to cast magic abilities.
Aether is the purple orb between you skill bar and can be turn on to appear above your character to track when you have aether which buffs up some of your skills, while other skills will build up aether, others will spend it to unlease increased damage, lower skill cost, additoanl effects and more.
Visible on your character screen (X) these are vital stats that indicate your damage and defensive capability. You ideally want both of these to be as high as possible and this will progressively happen as you use stronger higher tier gear and upgrade it.
RavenQuest Combat
Combat
In RavenQuest, combat uses a tab-target tile system. To engage in combat, you need to right-click on enemies to begin auto-attacking or press tab to target a nearby enemy. From there, you can use abilities to deal additional damage, protect yourself, heal, or apply crowd control effects to enemies. For faster targeting, you can enable Quick Targeting in the Settings menu (O), which helps you automatically target enemies that are attacking you.
Melee Combat
Melee combat involves using close-range weapons and abilities to deal damage or defend against enemies. Positioning is key, and many melee abilities will have area-of-effect (AoE) components or buffs that enhance your survivability.
Magic and Ranged Combat
Magic and ranged combat allow you to attack from a distance, using spells or ranged weapons to damage enemies before they get close. Magic users can harness elemental forces, while ranged combatants, such as archers, can keep enemies at bay using disengage abilities and snares.
With RavenQuest’s multi-archetype system, you can choose from a variety of skills and passives to create your ideal playstyle. As you level up each archetype, you’ll earn skill points that can be used to unlock abilities and upgrade existing abilities. Stronger skills require more skill points to unlock, so managing your points is key to unlocking powerful abilities and the best builds.
You can spend a maximum of 50 skill points buying skills and passives with any extra skill points being used to upgrade those abilities.
The choice of abilities is entirely up to you or the build you are following. To maximise your effectiveness, you will need to focus on abilities that synergise with your weapon and character playstyle, this is typically either weapon damage or spell damage.
The first skill of every archetype is the “spammable” skill. You are forced to buy this for each archetype, but since its your spammable skill theres not often much reason to use more than one of them.
In the early stages of your character, focus on picking up multiple second line abilies, thats because these are cheap at only 2 skill points and also have the shortest cooldowns, meaning you will be able to cast strong skills much more often meaning more damage output and potential utility. In the long term you will want to unlock other abilities but this will be much easier when you are higher level and have access to more skill points.
Upgrading abilities allows you to use additional skill points to improve the strength of equipped skills. Doing this will reduce the cooldown of the upgraded skill, but also it will buff the rarity of your equipped ravencard giving strong additional strength to your skill. Each skill upgrade adds a bigger requirement for the next upgrade, doublling the amount of skill points needed and each skill can be upgraded a maximum of 4 times.
Once you unlock an ability, usually automatically get placed on your skill bar. If its not gone onto the bar, simply go to the skill tree menu (K) and double click on the skill to make it appear on the bar.
If you have more abilities than can fit on one bar, you can add additional hotbars by going to Settings (O) > Windows and Ability Bars and selecting more bars for better organisation.
For every 6 skill points spent in a single archetype, you can unlock passive abilities, which cost 2 skill points each. Passives offer permanent or conditional bonuses that activate automatically, such as increased damage, reduced cooldowns, or defensive buffs.
Legacy Spells are powerful endgame ultimate style abilities that have long cooldowns which provide additional reason to continue levelling above the level 75 softcap by giving you a strong ability. Every level achieved above 75 earns a legacy skill point, this can be used to unlock a legacy skill. An additional 2 legacy skill points can be placed into a legacy skill to make it stronger.
You can unlock more than 1 legacy skill but it requires a significant amount of experience to level up and earn more skill points and you must fully upgrade a legacy skill before you can unlock another.
Legacy skills have a 5 minute cooldown, if you posses more than 1 legacy skill, the others will get a 60s cooldown atfer you use one so you cant use them back-to-back
As mentioned already each weapon has an associated skill. These have no cost and have a 45s cooldown and vary with each different weapon type equipped. When gear is warforged these weapon abilities also get adjusted and changed into more powerful weapon abilities. Weapon abilities also do no run on the global cooldown like all other abilities.
Taunt, Threat and Aggro in RavenQuest revolves around taunt skills which specifically force enemies to attack you, these are all obtained via the Protection archetype – the skill Provoke is an AoE taunt which forces enemies to attack you, and the shield throw skill with a minotaur warden ravencard attached works as a single target taunt.
Outside of this, every abilty in the game has some level of threat, this can be seen by hovering over a skill. This is especailly important in group content where a tank will need to use a combination of high threat abilities and taunts to keep aggro of enemies, while teammate will want to avoid high threat abilities.
You can turn on the ingame threat metre by pressing settings (O) – windows – threat indicators ON, this helps you to track who has aggro of an enemy and what your threat is
Some skills can interrupt enemies while they are casting, allowing you to disrupt their attacks. Additionally, many abilities offer crowd control options like slows, snares, or even stuns. These are essential when dealing with groups of enemies. Certain crowd control effects can also be enhanced by equipping specific RavenCards.
In RavenQuest, there is no active blocking mechanic. Instead, you must rely on abilities, buffs, and passives that reduce incoming damage or absorb it. Dodging is not a general mechanic either, but it can be done through specific abilities, such as the Illusive ability available to the Shadow Archetype.
To survive you need to combine the use of defensive power alongside using potions, wards/shields and then healing abilities. Life leeching is possible with certain archetypes allowing you to output damage and recover health at the same time. Health is recovered when out of combat and consumables such as beer can be used to speed up this process.
There are multiple types of consumables that can be combined to gain a variety of buffs
Consumables: Make sure to use all consumables including Baked Goods with Increase Attack Power, Drinks to Boost Mana and Health Regeneration, Meals to enhance your Primary Attributes and Whetstones to Increase Attack Power.
The main potions you use are Health and Mana, but as you progress there are powerful Tonics and Elixiers crafted in the Alchemy profession that provide buffed stats and other benefits. There are also some strong potion options available at the Rangers Company shop.
RavenQuest RavenCards
RavenCards enhance your abilities by modifying or significantly upgrading their effects. Each skill in RavenQuest has two unique RavenCards, but you can only equip one RavenCard per skill, allowing you to customise and adapt abilities to your preferred playstyle.
RavenCards come in 7 rarities, with higher rarities providing greater benefits and significantly improved skill effects.
RavenCards can be acquired by:
- Opening RavenCard Packs, purchasable with Dawn Essence.
- Levelling up, North Star Quests, Twitch Drops, Special Events and referrals.
- Participating daily in Feeding the Munk at Ravencrest to earn additional Dawn Essence.
- Bought from the ingame store using $QUEST or RavenCoins.
Earn Dawn Essence through:
- Opening Supply Bags obtained from gaining experience.
- Participating daily in Feeding the Munk at Ravencrest. Each day, the Munk requests specific items—contributing these items awards you tickets. Your share of daily Dawn Essence depends on your total tickets relative to other players.
Every skill has two RavenCard options, but you must choose only one to equip at a time:
- Open the Skill Menu (K).
- Press the slider at the bottom of the window to switch from the skill view to the RavenCard view.
- Select a skill to see its two available RavenCards.
- Equip your preferred RavenCard to morph and enhance your skill.
- Easily switch between the two options to experiment and optimise your build.
If you obtain duplicate RavenCards, you can disenchant them:
- Open the RavenCard Menu (G), find the RavenCard and disenchant duplicates by pressing the purple icon next to the card to obtain shard materials.
- Use these materials to increase the rarity and effectiveness of your existing RavenCards in the RavenCard menu, find the RavenCard you wish to upgrade and press the sparkles icon.
- Ascendable RavenCards can be minted onto the blockchain as NFTs, making them tradeable or sellable on supported marketplaces.
- In-Game RavenCards remain locked to your character and cannot be traded or sold.
RavenQuest Quests & NPCs
Quests are essential in RavenQuest, offering experience, silver, gear, reputation, infusions, and unlocking valuable items. Some quests require specific Legacy Levels to access.
Quests are indicated by an orange exclamation icon on the map and mini-map. Interact with NPCs marked by this icon to receive quests.
Approach an NPC and press F to interact. Follow dialogue prompts to begin quests or receive crucial progression information.
After accepting a quest, your next destination will be marked clearly. Check your Quest Log (L) for specific details, as some objectives may require navigating tunnels, upper levels, or underground areas.
Once you’ve completed the task, return to the NPC to claim your rewards.
Jensens Key
In one of the early quests, Jensen loses his key. You can find the key by interacting with the bush nearby, which will allow you to continue with the quest.
Quest rewards typically include:
- Silver, experience, and reputation
- Infusions, gear, and consumables
- Special items like trinkets or mounts
Some quests let you choose your reward at completion, which affects reputation gains and item usefulness. Always carefully select rewards to match your needs and reputation alignment.
If you accidentally choose the wrong item or lose/delete a quest reward, visit NPC Mercier at Glademire Fort. He allows you to repurchase quest items with silver and bounty marks. Additionally, unwanted quest items can be exchanged here for bounty marks, helping you manage inventory space.
Unlocked at Level 15, the Rangers Company offers repeatable enemy-hunting tasks through mission boards found at various world outposts.
- Tasks require defeating specific enemies and earning experience.
- Completing missions earns Prestige Points (ranking up your Rangers Company level), Bounty Marks (used to buy gear), and Creature Expertise (increasing damage/defense, etc against specific enemy types).
- Access your progress, rank, and weekly leaderboards via the Rangers Company menu (B).
Higher Rangers Company ranks unlock powerful gear at the associated NPC store.
Automatically triggered every 5 Legacy Levels, North Star Quests provide clear progression objectives.
Completing these milestones grants valuable rewards like:
- Silver, Infusions, Dawn Essence, and Ravenpacks
Throughout the world, you may discover Secret Quests or hidden items. These don’t appear in your quest log but offer hidden treasures and rewards if you successfully uncover them.
Reputation affects your interactions with NPCs and quest options. You build reputation through:
- Completing quests and dynamic events
- NPC dialogue choices
- Journal entries and hidden treasures
Your reputation alignment (Order, Mercenary, or Criminal) unlocks specific quests, dialogue, and rewards.
Access the Reputation menu (H) to spend reputation points on perks. To unlock higher-tier perks, you must first choose perks from the previous tier:
- Tier 1: Scavenger I, Ring & Amulet Mastery I (wait until you have strong jewelry)
- Tier 2: Recommended—Ranger’s Valor, Artisan’s Touch
- Tier 3: Choose any perk matching your playstyle
- Tier 4: Weapon Mastery, Diplomatic Exaltation (ideal for farming materials)
- Tiers 5–7: Upgrade to higher versions (II) of your chosen perks from Tiers 1–3.
You can reset your reputation perks in your Reputation Menu in the top right by spending Dawn Essence. The cost increases with each additional perk you want to reset.
Dynamic World Events are timed, activated or occur randomly around the world and require player cooperation. Events are indicated by a crossed-arrows icon on your map when nearby. You’ll receive a UI notification when events start within your region.
You can temporarily scale your character’s level to the event by clicking the green arrow icon, allowing participation regardless of your actual level. Rewards depend on your contribution, displayed by a green progress bar, alongside other players’ contributions (purple bar).
Ravencrest Emblems are special items awarded upon first-time completion of certain activities:
- Dynamic Events
- First-time crafting or gathering a specific item
- Hidden treasures in caves, dungeons, and hunting areas
These emblems are essential for upgrading your house, unlocking new rooms and character buffs.
Your Journal (J) tracks zone-specific objectives including creature hunting, item collection, and event completions. Completing objectives rewards you with Artifacts, unlocking:
- Access to new trading areas and special NPC vendors
- New docks, respawn shrines, and fast travel options
- Unique cosmetic items and powerful rune enchantments
Cosmetic outfits in RavenQuest can be unlocked by collecting specific creature materials and turning them in to the corresponding NPC. To check available cosmetics:
- Open your Character menu (X) and select Customisation → Outfits.
- Click the icon next to each outfit to locate the NPC and required materials.
- For more detailed information, refer to our RavenQuest Cosmetics Guide and RavenQuest Cosmetic Material Guide.
Items can be stored safely by speaking to the Bank NPC in Ravencrest or by using a storage chest at your personal house.
Sell unwanted or junk items to earn extra silver:
- NPC Xeniad (located in Ravencrest, near the Slums entrance) buys junk creature materials without other uses.
- Munk Quartermaster NPCs at Rangers Company bounty boards also purchase junk items throughout the world.
RavenQuest Professions
RavenQuest offers a rich crafting and gathering system, allowing you to create gear, consumables, housing items, and more. Professions are divided into two main categories:
Crafting Professions
- Weaving: Cloth and leather gear, housing decorations, Moa gear, and ship modules.
- Blacksmithing: Plate armor, weaponshousing items, Moa equipment.
- Carpentry: Housing items, ship modules, and furniture.
- Cooking: Food for buffs and Moa rations.
- Alchemy: Potions and elixirs providing strong buffs and breeding items.
- Breeding: Raising new Moa mounts.
Gathering Professions
- Woodcutting, Mining, Fishing, Farming, and Husbandry.
Each provides materials required for crafting items.
Gathering materials is essential for crafting and significantly reduces costs.
- Woodcutting & Herbalism: Easy to level, widely available on overland areas.
- Mining: Limited to mines/caves, highly competitive due to fewer nodes.
- Fishing: Requires a rod and fishing spots; common near water areas.
- Farming & Husbandry: Involve cultivating crops and raising animals on your land.
Gathering Tips:
- Look for specific map locations marked as “Mine” for mining nodes or general underground areas.
- Trees for woodcutting are abundant and easy to find. Planting trees on your own land accelerates levelling.
- When gathering, a simple mini-game appears:
- Complete it successfully by stopping the bar in the green section to speed up gathering time.
- Failing or ignoring it doesn’t stop you gathering—it just slows the process slightly.
- Higher-quality materials (with coloured borders) yield better crafting results.
Before crafting, materials usually require refining:
- Ores → Ingots
- Logs → Planks
- Hair/Hide→ Cloth/Leather
To start crafting:
- Approach a crafting station (found on your map).
- Press F to open the crafting interface.
- Refine raw materials first, then craft the desired item.
When crafting an item, you must manage several mechanics:
- Progress: Fill this meter to complete the crafting process.
- Quality: Improves the item’s final stats.
- Durability: Decreases with each action; if it reaches zero, crafting fails.
- Condition: Affects the effectiveness of your crafting actions.
- Normal, Good, Excellent: Enhances action effectiveness.
- Poor: Reduces effectiveness.
You’ll have a set of crafting-specific skills in your hotbar during crafting:
- Synthesis: Advances item crafting progress.
- Touch: Improves the item’s final quality.
- Shine: Increases current condition quality.
- Mend: Restores durability to continue crafting safely.
Labour
- Each crafting action consumes Labour.
- More labour allows more actions and better-quality items.
- Increase labour via crafting gear, passives, and trinkets.
When crafting, filling the Quality meter generates additional bonuses known as Quality Crystals, granting items extra random stats and sub-stats.
- Higher-tier gear allows multiple Quality Crystals, greatly increasing the item’s effectiveness.
- Labour consumption increases significantly for higher-quality crafts.
- Equip crafting gear (crafted via Weaving and upgraded with infusions) and select labour passives to maximise crafting efficiency.
Optimise your profession skills by carefully choosing passives.
Crafting Passives – Priority order for crafting:
- Labour increases your maximum labour (essential).
- Synthesis improves crafting progress efficiency.Touch boosts quality-gain effectiveness.
- Experience Gain (less important long-term but useful initially).
Gathering Passives – Prioritize passives increasing your gathering efficiency and profitability:
- First choose Double Material Chance (increases your yield).
- Afterward, choose passives that increase experience gained and increased rare item chance.
Mass Crafting is great for both making a lot of something and levelling your skill but you will reach an oversupply limit if doing it too much. When you reach different oversupply thresholds, the crafting tax to make an item keeps increasing. This is to stop the game being flooded with too many items and the market prices crashing.
If you have unwanted or excess gear, you have several options:
- Deconstruct: Use gear as infusion materials to upgrade other gear (press U).
- Feed the Munk: Donate crafted items to the Munk in Ravencrest. Each day, the Munk accepts items related to a specific profession (Alchemy, Blacksmithing, Carpentry, Weaving, or Cooking).
Feeding the Munk:
- Each day focuses on one profession.
- Craft items related to that profession and donate them by interacting with the Munk.
- Donations grant tickets, determining your share of the next day’s Dawn Essence rewards.
- The more players donate, the more total Dawn Essence becomes available, benefiting all contributors.
- Hold Left Shift and click on the stack in your inventory.
- Choose the desired amount and confirm to split the stack.
Fishing provides cooking materials, items and silver, depending on fish rarity and size. Fishing involves an interactive mini-game where you “damage” the fish using fishing skills.
How to Fish:
- Equip a fishing rod and hook and approach a fishing spot.
- Right Click the spot and wait for a fish to be hooked. Once hooked, fishing skills appear in your hotbar.
- Progress Bar (Green): Fill the green bar to successfully catch the fish.
- Rod Durability (Red): Avoid fully filling this bar or letting it touch the white bar or you’ll fail the catch.
- Line Tension (White): Acts as your fishing time limit don’t allow it to reach the end or touch the red bar.
Fishing Timers (Buffs):
- Green timer: Use high-damage fishing abilities (Big Reel).
- Red timer: Use “Give Slack” followed by lower-damage skills (Basic Reel) to avoid rod breakage.
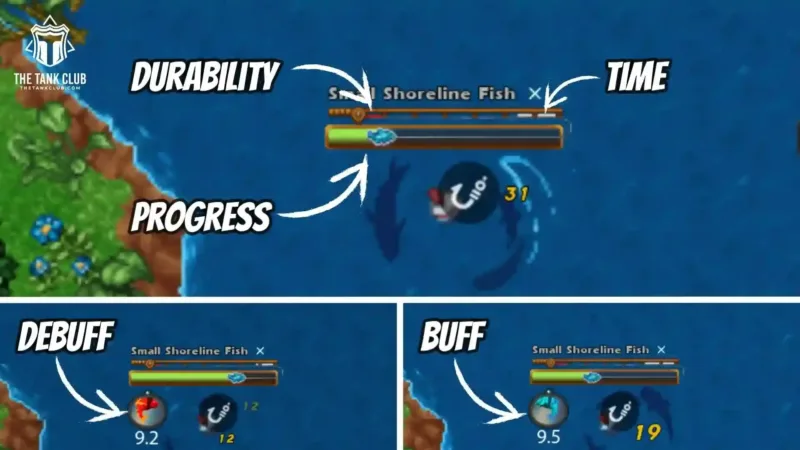
Recommended Fishing Skill Rotation:
- Start with Big Reel for initial progress.
- Use Basic Reel when rod durability meter is too high (red).
- Use Give Slack to restore durability when necessary.
Players without personal land can utilise Community Land in Ravencrest for Farming and Husbandry:
- Accessible from Legacy Level 15 onwards.
- Initially limited, but fully accessible at Legacy Level 25.
- To start planting, activate House Mode near your minimap.
- Plant crops, trees, or animals by selecting items and placing them in available spaces. Each action costs Effort Points and silver.
After planting:
- Perform maintenance (watering, fertilising) to improve yield and chance for rare items (Three-Leaf Clovers).
- Harvest fully-grown items for resources used in various crafting professions.
- Community land supports multiple professions, such as planting crops for Cooking and farming wood for Carpentry.
Farming and Husbandry are passive professions, ideal for progression even while offline:
Farming
- Highly profitable, easy to manage, and effective even when offline.
- Focus on crops needed for your cooking profession or those with high resale value.
- Example: Potatoes—quick to grow, profitable, and used frequently in cooking.
Optimising Farming:
- Short-duration crops when actively playing.
- Long-duration crops overnight or when offline for extended periods.
- Invest in gathering passives for increased yields.
Husbandry
Husbandry involves raising and caring for animals:
- Animals mature over several hours, then periodically provide resources.
- Two harvesting options:
- Gather: Periodically gather materials every few hours (e.g., wool, eggs).
- Butcher: Immediately harvest materials, receive less materials and remove the animal from your farm but gains more experience.
Husbandry Tips:
- Choose animals based on profitability or materials you specifically need.
- Regular harvesting maximises long-term profitability versus immediate butchering.
Breeding Moa mounts allows you to produce rarer, higher-tier mounts with special abilities, traits, and unique appearances. However, breeding is a lengthy, involved process.
How to Breed Moas:
- Obtain 1 Male and 1 Female Moa and a stable (built on your land).
- Visit NPC Jebediah (south exit of Ravencrest) to purchase Moas and required items (basic Moa Rations and Moa Remedies).
- Place both Moas into your stable, press the Heart to start breeding and start a 12 hour timer.
- After 12 hours, feed them the correct Moa rations (matching the highest Moa tier), and a Moa egg appears and starts another 12-hour timer.
- After the next 12 hours, immunise the Moa chick using a Moa Remedy (matching the highest Moa tier).
- The final growth stage takes 36 hours, but you can feed the Moa rations every 3 hours to reduce maturation time by 4 hours each feeding (up to 3 times total).
- Once complete, the Moa becomes usable or tradable. Moas have limited breeding uses, so choose your breeding pairs wisely.
Land activities require Effort Points, which are earned by killing enemies and completing quests. Every 100 XP earned equals 1 effort point, which can be used for farming and other activities.
The total supply of 4,000 land plots in RavenQuest is now sold out. To obtain land, players must purchase from others via blockchain marketplaces.
Your land is managed via Housing Mode while on your land, accessible via the icon near your mini-map. Use it to:
Place decorations, build and upgrade rooms.
Manage crops, animals, and professions.
While at the community farm or your own land, you can place cosmetic items and decorations, build rooms, upgrade your house and plant crops, trees, breed moa and raise animals by using the Toggle House Mode button located on the side of the mini-map.
Upgrading your house improves storage, unlocks rooms, and provides character buffs. You need:
- Ravencrest Emblems
- Crafting materials (e.g., planks, bolts, stone)
To upgrade or customise your house:
- Press the Housing Mode icon (near mini-map).
- Use Rooms tab (bottom-left) to select, build, or upgrade rooms.
- Use Decorations tab to place cosmetic items.
Plentiful Harvest is unlocked after your first house upgrade. It provides a 20% chance to yield 50% additional materials each harvest on your land. This significantly increases resource gathering profitability.
Housing Trophies grant powerful passive buffs and are rare drops from:
- Aether Rifts
- Aether Echoes (higher difficulty increases drop chance)
- Rare drops from creatures/events
Another way to obtain Trophies is by collecting Glory Shards:
- Glory Shards randomly drop from defeated enemies worldwide.
- Combine Glory Shards to craft trophies by speaking with the appropriate NPC (Lorekeeper Lizdeika).
- Place trophies in your home to activate these powerful buffs.
RavenQuest Travel & Transport
RavenQuest provides several fast travel options to quickly move around the world:
Waypoints (Respawn Shrines):
- Stand on a waypoint and press F to select a fast travel destination.
- Some waypoints are locked behind Legacy Levels or Artifact Journals.
Teleport to Ravencrest:
- Click the teleport button near your Mini Map to return instantly to Ravencrest (4-hour cooldown).
Teleport to Your House:
- If you own land, teleport directly to your house by opening the Housing Menu and selecting teleport (separate cooldown).
Moas are the only mounts currently available in RavenQuest. They’re essential for traveling quickly and efficiently.
Managing & Equipping Your Moa
- Open the Transport Menu (Y) and navigate to the Moa section.
- Click the first box below your active Moa to view or swap between available mounts.
Moa Gear
- Craft Moa equipment at a Weaving station.
- Bring crafted materials to NPC Jareer (south outskirts of Ravencrest) to finalize gear.
- Equip gear by selecting the middle box under your active Moa in the Transport Menu.
Breeding Moas
Breed Moas on your land to acquire higher-tier, unique-coloured mounts with better stats and abilities.
Obtaining Your First Moa
- Complete the “Mortal Enemies” quest chain starting at Level 9 in Barrendon Mines (Rohna Woods).
- Quest completion rewards you with a Moa Egg, which hatches into your first mount.
- Your Moa has a Bond Level, increasing stats and bonuses as it levels up.
- Increase Bond Level by feeding your Moa Moa Rations and Moa Treats while riding.
- Your Moa has a green stamina meter that appears while riding. Stamina depletes over time, and you must feed your Moa again to continue earning Bond XP.
Wagons transport multiple tradepacks between tradeposts for silver, but are vulnerable to attacks and theft.
Obtaining Your First Wagon
- Complete the “Lighthouse Keeper” quest in Barnsley available from Level 11.
- Quest rewards provide Wagon Parts, which you can use to build a wagon at the Wagon Crafter NPC in Ravencrest or Barnsley.
Using & Managing Your Wagon
- Spawn your wagon by holding CTRL + Left-Click on your character and select “Create Wagon”.
- To attach and ride your wagon, hold CTRL + Left-Click on the wagon and select “Get on Wagon”.
- Tradepacks automatically load onto your wagon when you create more than one at a tradepost.
- Detach or remove your wagon from the game world by repeating the CTRL + Left-Click method (only possible without tradepacks onboard).
Upgrading Wagons
- Visit the Wagon Crafter NPC to upgrade wagons using the Carpentry profession.
- Upgraded wagons have increased speed, health, and tradepack capacity.
Ships are essential for exploring ocean content, transporting tradepacks, ocean fishing, and naval combat.
Obtaining Your First Ship
- Complete “The Reliant Shipwright” quest from Level 18, available after defeating The Mountain King near Glademire Fort (Tarnag Mountains).
Entering & Using Your Ship
- To board your ship, approach a dock and simply walk off the pier to automatically board your vessel.
Upgrading & Customizing Your Ship
- Ships require individual part upgrades, each improving specific features:
- Hull: Increases ship health, tradepack capacity, and auxiliary slots.
- Sails: Improves sailing speed.
- Cabins: Customise your ship’s role (combat, fishing, tradepack transport).
- Cargo: Adds extra abilities and buffs to your ship.
- To upgrade, visit a Ship Builder NPC located at docks in Ravencrest.
- Manage and equip ship parts via the Transport Menu (Y).
Ocean PvP & Sea Creatures
Ships can engage in open-world PvP when sailing ocean areas—stay alert!
While exploring, you may encounter aggressive sea creatures, so always be prepared.
RavenQuest Social
Using Chat
Access the chat window at the bottom-left corner by pressing Enter:
- Default chat is set to General → Local, visible only to nearby players.
- Customise chat visibility by clicking the cog icon:
- Switch to Global chat or select a different language.
- Disable channels you don’t wish to see, such as Trade or LFG.
Open the Social Menu (N) to manage friends and parties.
- Add/Remove friends: Simply enter a player’s name to add or remove them.
- Party Management:
- Invite players to a group by typing their name, or by holding CTRL + Right-click their character and selecting Invite to Party.
- Ensure you’re on the same server channel when grouping. If needed, switch channels from within the group windown while in Ravencrest or a safe zone.
Guilds in RavenQuest provide numerous opportunities for teamwork and progression, including:
- Group PvE: Completing challenging content like Aether Echo bosses, final quest bosses, and group hunting.
- PvP: Engage in Open World PvP, Guild Wars, and upcoming PvP objectives.
- Guild Wars: Participate to earn Warforging Shards to enhance your gear.
- Guild Crest & Fame: Guild members can collectively earn $QUEST tokens through guild-owned crests by gaining Fame.
Future Guild Features (Coming Soon):
- Guild Housing & Guild Bank: Centralised guild storage and housing features.
- World Bosses & PvP Objectives: Cooperative challenges for guild prestige and rewards.
Joining a guild significantly enriches your experience in RavenQuest, providing benefits for PvE, PvP, progression, and community engagement.
RavenQuest Trading
The Marketplace in Ravencrest allows you to buy and sell items directly to other players.
Selling Items on the Marketplace
- Visit a Munk Broker NPC (central Ravencrest) and select “My Order” at the top of the window.
- Click Create, then drag the item from your inventory to the box.
- Before listing, check current market prices by clicking the icon next to your item—this displays existing listings, helping you set a competitive price.
- Set your price, confirm the listing, and the item becomes available for purchase.
Buying Items
- Visit the Munk Broker NPC and browse categories or use the search bar at the top.
- Use filters like Tier, Type, or Quality to quickly find what you need.
To trade directly:
- Approach the player, hold CTRL + Right-Click them, and select Trade.
- Drag items into the trade window, review the offer carefully, then confirm to complete the trade.
Tradepacks are crafted bundles of items that can be transported between trade posts to earn silver. They’re created from materials gathered or purchased, and their value increases based on delivery distance and current multipliers.
How to Create & Deliver Tradepacks
- Collect required materials as seen in the tradepack menu (T).
- Visit a Tradepost NPC and select “I want to create a Tradepack”.
- Choose your desired tradepack, craft it (costs Effort Points), and it’s ready to deliver.
- Tradepack visibility is public, so you may be targeted by other players, especially in PvP zones.
Delivery Tips:
- Always check current multipliers in the Tradepack Menu to maximise profits.
- Deliver to distant tradeposts or locations with high multipliers for greater rewards.
- Deliver your tradepack by speaking with the NPC at your destination.
Tradepack Risk (PvP)
- Other players can see and attack you for your tradepack in:
- Warzones & Plunder Channels
- Ocean zones (always in conflict)
- Death results in dropping your tradepack, so plan safe delivery routes carefully.
Tradepack Certificates
Tradepack Certificate as rare items awarded from Supply Bags or special events.
Allows crafting tradepacks without materials, significantly boosting your profitability.
Tradepack Priming Certificates (Landowners Only)
Landowners automatically receive Tradepack Priming Certificates each week.
These are used alongside the materials for a normal tradepack. When you deliver these packs you will earn Merchant Influence which adds another multiplier to your weekly $QUEST earnings.
RavenQuest PvE
The Adventurer’s Board is designed as a catch-up mechanic, helping new players gain experience quickly. Veterans can also benefit from experience boosts and valuable drops.
Accepting & Completing Tasks
- Open the Adventurer’s Board and select tasks to accept.
- Tasks are straightforward objectives like hunting enemies, crafting items, gathering resources, fishing, or participating in events.
- Some rewards are automatically delivered upon task completion, make sure to go onto the Adventure Board UI (CTRL+B) and press the complete button.
Rerolling Tasks
- Accept all tasks you want, then click “Reroll” to refresh remaining unwanted tasks.
- Useful if you prefer certain tasks or want better rewards.
Spirit Boosts
Completing Adventurer’s Board tasks awards Spirit Boosts.
Aether Stones are random PvE events that reward valuable loot:
- Find Aether Stones randomly spawning around the world.
- Activate by interacting (F), defeat the summoned creatures, then quickly interact again to claim rewards.
Note: Only one player or group can claim rewards—act quickly or risk losing rewards to others nearby.
Aether Echoes are challenging PvE arenas for 1–4 players, accessed by using Echo Scrolls.
How to Start an Aether Echo:
- Obtain Echo Scrolls from:
- Aether Stones (Level 40+).
- Completing three Adventurer’s Board tasks.
- Patrons receive an additional scroll as a bonus.
- Opening Supply Bags.
- Form a party (each member must have an Echo Scroll).
- Visit Lorekeeper Songaila in the westside of Ravencrest and select the Echo Scroll you wish to activate.
Echo Rewards:
- Augmenting Stones (gear upgrades)
- Binding Aether (Legacy 75+ only)
- Special Housing Trophies
Certain quests and encounters, like the Shark Boss and the dragon Myrdyr, require teamwork due to their difficulty. Forming groups for these challenging encounters is strongly recommended.
Group Hunting
Grouping for enemy hunting is an effective way to level faster:
- Pull larger enemy groups for increased XP gains.
- Focus on AoE damage for maximum efficiency.
- Grouping increases both XP rate and loot potential.
RavenQuest supports traditional MMORPG roles:
- Tank (Protection): Taunts, high threat, and defensive skills.
- Healer (Holy/Spiritual): Vital healing and party support abilities.
- DPS (Various): Damage-focused archetypes such as Warfare, Archery, Witchcraft, or Wizardry.
These roles become particularly important in group content like Aether Echoes, future raids, and world bosses.
Exciting future PvE updates include:
- Expeditions: 1 Player + AI Munk Companion rogue-like, dynamic survival dungeon system with rewards for further progress.
- Raids: Large-group content with unique encounters planned for future expansions.
- World Bosses: Dynamic, challenging bosses appearing in the open world, requiring cooperation.
RavenQuest PvP
In a standard channel the PvP rules will regularly change and areas will sometimes be peaceful and other times under conflict. Players under level 20 cannot be killed in PvP
Zone rules include:
- Peace – No PvP possible
- Conflict – PvP is possible but Infamy will be gained for killing players
- Warzone – PvP enables and infamy wont be earned when killing players
Players can set their PvP status next to their mini map
Allows you to select if you want to play as Peaceful, (does not engage fight with other players), Defensive (damage engages fight with other players who attacked you before) or Offensive (any damage engages fight with other players)
By using the channel switch near your mini-map you can access the Warmode channel which has constant PvP conflict and then there is the Plunder Channel where you pay a silver fee to enter, this is under constant conflict also but players who die drop the silver fee for others to pick up.
The open world ocean is under constant conflict so there is always potential danger apart from close to the docks where it becomes a protection zone, you cannot use the protection zone for a certain amount of time if you’ve attacked another player.
To maintain balance and discourage excessive aggression, RavenQuest implements an Infamy system
- Infamy Points: gained when attacking innocent players (those not flagged for PvP).
- Consequences of High Infamy:
- Reduced damage output against other players
- Increased death penalties, including higher experience loss
- Temporary lockouts from peaceful zones, lasting 3 to 20 minutes depending on severity
How to reduce Infamy: Kill players who have attacked innocents to lower your infamy
Balancing the thrill of open-world PvP with the risks of the infamy system adds a strategic layer to player interactions
In RavenQuest, Culling Spawns will appear as random, temporary enhancements to existing Level 40+ spawns. These enhancements will cause them to drop a new item called Culled Eyes. Deliver Culled Eyes to a nearby Rangers Company Munk to obtain experience and dawn essence.
Aether Rifts are challenging PvPvE balanced arenas that test your combat skills in solo or duo matches against enemies and potentially other players, culminating in a boss fight.
Earn Aether Rift charges by:
- Completing tasks from the Adventurer’s Board (CTRL+B).
- Successfully completing Aether Stones in the world (defeat waves of enemies for rewards).
Rift Mechanics:
- Character Stats: Gear passives apply, but character accessories, trinkets, and Warforge bonuses are disabled.
- Trinkets, Accessories, and Warforge bonuses don’t apply.
- Rifts can be played solo (1v1) or in duos (2v2).
- Defeating all enemies and reaching the center to beat the Rift Boss grants rewards.
Important: Dying during a Rift sends you back to a safe zone with no rewards.
Entering Aether Rifts
- Requires at least one saved Rift Build.
- At least one Aether Rift Charge.
Creating Your Rift Build:
- Open your Skill Tree (K) menu.
- Click the drop-down at the top and select “Create Aether Rift Build.”
- Allocate skills, attributes, and gear, then save your build.
- You must have at least one saved Rift build to enter a Rift.
- Additional Rift build slots can be purchased later for silver.
How to Enter an Aether Rift
- Confirm you have at least one Aether Rift Charge in your Inventory (Quest Tab) or press Z.
- Travel to a safe area (Waypoints or Ravencrest).
- Press Z or select the Aether Rift icon on your hotbar.
- Choose your preferred Rift (Solo or Duo).
- Confirm your build and begin matchmaking.
Aether Rift Rewards
- Three-Rift System: You can complete up to three consecutive Rift stages, each stage increasing difficulty and rewards.
- Rewards scale with difficulty and successful completions. General Rewards: Experience, Aether Marked Runes, Silver, Infused, Rift Trophies (place in your house for attribute buffs):
Guild Wars are intense 15v15 PvP battles where guilds compete strategically for control and rewards.
Bidding Phase
- Guilds must place a minimum bid of 5,000,000 Silver to participate.
- Higher bids can be placed at any time; you cannot reduce or withdraw your bid.
- The top 20 guilds with the highest bids enter the Guild War.
- Guilds gain combat bonuses based on their bid ranking.
- If your guild doesn’t qualify (outside the top 20), any amount above the minimum bid is refunded to the Guild Bank.
Guild War Rules
- Matches take place in an arena with two teams of 15 players each.
- Only guild members ranked Officer or higher can participate.
- Teams battle to earn points by controlling objectives and defeating enemy players.
How to Earn Points:
- Control Towers: 5 points every 15 seconds per tower held.
- Capture Golden Flag: 100 points per successful capture.
- Player Kills: 5 points per enemy defeated.
- Match Victory: 2500 bonus points.
Matches take place in an arena with two teams of 15 players each:
Rewards
- Winning Guild: 250 Warforging Shards for each team participant. 50 Shards for all other guild members.
- Losing Guild (Participation Reward): If you lose, participants receive 50 Warforging Shards.
- Non-participating guild members still earn a smaller reward (50 shards) if their guild participated.
- Additionally, guilds participating in Guild Wars gain Guild Fame, contributing to weekly $QUEST token earnings.
RavenQuest Web3 & Earning
While many players are scared or nervous about Web3 Gaming and Crypto, RavenQuest aims to bridge the gap in the Web3 Gaming scene by leading the way with a content rich, player focussed game where players can earn and obtain assets and simply enjoy playing the game. For large portions of the game you could be mistaken that its not even a Web3 game, its not forced upon you and can be played without any Web3 or crypto connection. You can link you wallet on the RavenQuest website should you want to.
MMORPGs are well known for requiring many hours of gameplay with players obtaining many items, RavenQuest does provide a number of solutions – removing the value of standard MMORPG gold sellers by having a safe marketplace ingame to buy and sell currency but also allowing you to physically own your assets with real value and do as you please with them, giving you value for your time investment alongside the enjoyment of playing, and earn just by playing the game for free.
Renown is a permanent measure of your legacy in RavenQuest that does not reset weekly. You will have a renown rating based on the following:
- Unlocking rare cosmetics
- Leveling up in RavenQuest
- Expanding your RavenCard Collection
- Increasing your characters reputation in RavenQuest
- Completing Journal Entries by finding rare Artifacts
- Completing Achievements
- By having Patron
- and by Owning a Munk NFT
Renown is an important element to ensure that the biggest rewards go to RavenQuest’s most active players.
Fame measures your daily in-game activities and directly impacts your weekly $QUEST Token earnings.
How Fame Works:
- Earned daily by regular playing activities (Dynamic Events, Aether Rifts, Echoes, Tradepacks, etc.).
- Each Tuesday at server reboot, your weekly accumulated Fame translates into your share of the weekly $QUEST token pool.
- Your total earned Fame is multiplied by your Renown multiplier.
Activities Increasing Fame:
- Completing Adventure Boards
- Obtaining Culled Eyes, through killing creatures or other Adventurers
- Conquering opposing Adventurers in Aether Rifts
- Delivering valuable Tradepacks around the world of RavenQuest
- Completing Hidden Expeditions
- Slaying Aether Echo Bosses
- Participating in Dynamic Events around the game world
- Naturally while gaining experience.
- Competing with your Guild in Guild Wars, with increased rewards to the victors.
- Opening RavenPacks through your journey
Each activity provides different Fame values—high-risk activities (Guild Wars, Aether Rifts) offer larger Fame rewards, while daily tasks (Tradepacks, farming) provide steady, smaller amounts.
- $QUEST Tokens: Main blockchain currency for RavenQuest used to purchase in-game items.
- Players can earn $QUEST Tokens just by actively playing RavenQuest, especially through Guild activities and weekly Fame rewards.
- NFT Assets: Certain items (Ascended RavenCards, Outfits, Housing, Land) can be minted onto the blockchain, traded, or sold externally.
- For detailed information about $QUEST Tokens and Earning, please consult the RavenQuest Whitepaper.


