SWTOR Defense Guardian Tank Build
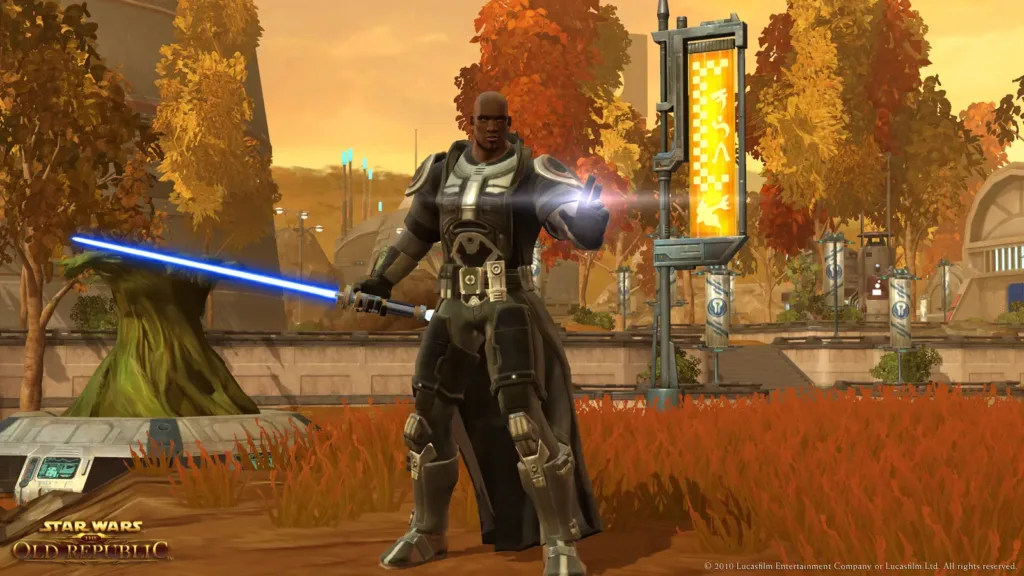
In this comprehensive guide, we will cover everything you need to master as a Defense Guardian Tank in Star Wars: The Old Republic. From gear selection to understanding your abilities, this build is tailored to equip you with the knowledge required to excel in Flashpoints and Operations. We have included all the essential information on how to obtain the necessary items, ensuring you know exactly where to find everything you need.
The Guardian is a shadow class of the Juggernaut and they are basically identical aside from the names of their skills. If you are looking for a really strong Tank class then the Defense Guardian is a great choice. They are very well built for dealing with all of the challenges you’ll find as you progress through the end game inside SWTOR.
Prepare yourself to become an unyielding force on the battlefield, protecting your allies and dominating your enemies. With The Tank Club’s expert guidance, you’ll be unstoppable as a Defense Guardian Tank in Star Wars: The Old Republic! May the Force be with you on your thrilling journey ahead!

SWTOR Defense Guardian Abilities
| Icon | Skill | Description |
|---|---|---|
 | Strike | Inflicts damage and generates focus. Decent free ability early game and good for the focus generation but diminishes later as you unlock more powerful abilities. Always use it if other abilities are on cooldown and you lack Focus. |
 | Slash | Deals damage and inflicts Trauma. It’s a nice damage ability because it doesn’t have a cooldown but it will burn through your Focus if you overcast it. |
 | Riposte | Very strong damage skill because it’s off the global cooldown due to the Lunge passive. This means that when it’s off the 6s cooldown you can cast it in with other skills. You have to proc the skill to get it to work, this is done by defending a melee or ranged hit, or by having your melee hit parried, dodged or miss. This can be combined with a Retaliator Implant, this removed the 6 second cooldown altogether. You can proc it so much that it will equate to a LOT of easy damage. |
 | Blade Storm | Does a wave of damage to the target but also knocks and stuns weak enemies. |
 | Blade Barrage | Decent damage ability. |
 | Warding Strike | 20 seconds of increased damage reduction and shield absorption with just a 12s cooldown, which also generates a lot of Focus and deals damage. It’s an extremely important skill for a Tank which you’ll be using a lot. |
 | Guardian Slash | Big damage skill, instantly enables your Riposte ability, reduces the damage of enemies hit by 5%. When used after Warding Strike it hits multiple enemies which also get knocked down and it generates high threat. This is a really important skill that does a lot, we always use it after Warding Strike and use Taunts after it, make sure to use Riposte before AND after casting it for the extra easy damage. |
 | Dispatch | Damage ability which can be used when an enemy is under 30% health and you throw your lightsabre at them. It will also be available at other times such as right after a Force Leap regardless of the enemies health. |
 | Hilt Bash | Damage and stun that also generates a lot of threat, good skill to use in your rotation. |
 | Saber Throw | Throw your lightsaber to do damage and build focus. |
| Icon | Skill | Description |
|---|---|---|
| Force Sweep | Area of Effect damage and Stun, really useful when dealing with multiple targets, especially weaker enemies. | |
 | Cyclone Slash | Slashes up to 8 enemies and applies Trauma. Not typically a skill that is part of your rotation but it’s great when dealing with a stack of enemies, not really worth using against any less than 3 enemies. |
| Icon | Skill | Description |
|---|---|---|
| Saber Ward | Increases melee and range defences by 50% and absorbs 25% of the damage you receive from Force and Tech attacks. This is a really important defensive cooldown and to gain the best value out of it you’ll want to combine it with the Grit Teeth Tactical, this will reduce cooldown of Saber Ward much faster and give you a more reliable defensive cooldown. | |
 | Focused Defense | Basically this makes you immortal and gives you a huge heal. Use it at under 70% health and you can get up to 12 heal ticks within its 15s duration to go from almost dead back to full health. Really important for emergency situations when you are going to die with a heal or if your healer has died. |
 | Warding Call | Reduces all damage by 40% for 10s with a 2m 30s cooldown. You should really time this for big attacks or when you need a big survival boost. |
 | Saber Reflect | Reflects damage back to the attacker and is a high threat generator. Really useful and important defensive cooldown especially for add pulls when fighting multiple enemies. |
| Icon | Skill | Description |
|---|---|---|
 | Guard | Allows you to guard another player reducing their incoming damage by 5% and makes them generate 25% less threat. You also receive 50% of the transferred damage from that player. This is generally a good ability to use at the start of a Flashpoint or Operation and apply it to either a healer or a high AoE damage dealer to help keep them alive and stop them gaining aggro of enemies. |
 | Force Leap | Jump to a target, builds Focus and deals damage, immobilises and interrupts the target. This is a good opener and will also allow you to use Dispatch via the Battlefield Command passive. |
 | Introspection | Big healing when out of combat, use it to recover in-between fights if it’s needed. |
| Resolute | Purges incapacitating and movement-impairing effects. This is great for dealing with enemies or boss mechanics where you get pinned or held in the air, you get instantly broken free. | |
 | Taunt | Makes the enemy focus onto you and reduces the damage they do to allies. It has a 6s duration and 15s cooldown, the cooldown can be reduced by the Threatening Focus ability. This is a good ability to help you maintain aggro of bosses, you will need to use high threat skills before taunting or else it won’t be effective. Using it after Warding Strike and Guardian Slash will help you keep virtually 100% aggro of a single boss. |
| Threatening Focus | Generates a lot of Focus and reduces the cooldown of both of your taunt abilities by 5 seconds. You’ll use this on cooldown as a Focus builder and to reduce the cooldown on Taunt but it’s especially helpful for the cooldown reduction of Challenging Call which has a 45s cooldown. Also does a lot of free damage to all taunted enemies. | |
 | Force Kick | Interrupts enemies which is needed for dealing with a variety of mechanics in the game. |
 | Challenging Call | AoE Taunt with a 6s duration and 45s cooldown which also reduces the amount of damage enemies do to your allies. It’s a good way to pick up multiple enemies and will work best when used after other AoE skills such as Cyclone Slash and Force Sweep. |
 | Force Stasis | Subdues an enemy for 4 seconds, deals damage and builds Focus. This doesn’t work on many enemies in Flashpoints or Operations, in those situations just cast it when all other abilities are on cooldown. |
 | Guardian Leap | Jump to a friendly target. Not often used during combat but quite useful for keeping up with your group while running between fights, if used in combat it will reduce the threat and damage taken of someone in your group so it can be helpful sometimes. |
 | Enure | Increases your max health by 30% for 20s, I don’t even slot this skill because when testing it, there seemed to be no real value in using it and it made things worse when the ability ends. |
| Force Push | Deals damage, pushes the enemy and immediately ends the cooldown of Force Leap. Can make some killing some weaker enemies faster if you just push them off a platform to instantly kill them but this doesn’t work on too many enemies in harder content. Mostly useful for the extra bit of damage when all other abilities are on cooldown, and to reduce the cooldown on Force Leap so you are able to use it faster, especially when you are moving quickly through content. |
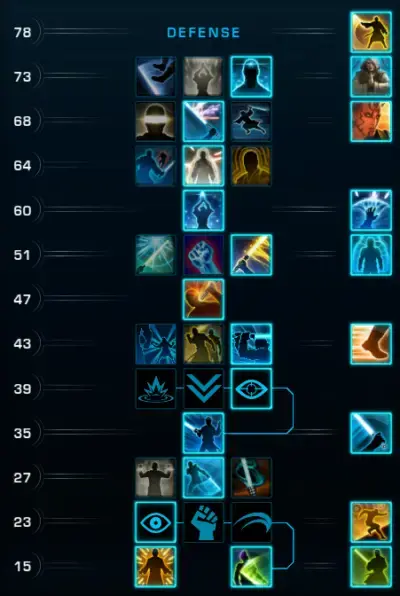
SWTOR Defense Guardian Ability Tree
Ability Tree Choices
Recommended Choice: Antagonizing Assault or Warding Shield
- Antagonizing Assault (passive): Increases damage, crit chance and threat of Warding Strike. This is helpful in a number of ways due to Warding Strike being your primary focus builder and being used on cooldown ever 12s it will boost your threat, take this in most cases.
- Defensive Assault (passive): Further buffs the damage reduction from Warding Strike by 2%, to a total of 5%. When you want maximum survival then this is the great option to choose.
- Warding Shield (passive): Warding Strike now grants a barrier of protection for up to 8 allies within 10m for 6s, essentially a 50% uptime if you use Warding Strike on cooldown. It’s really useful to boost survival especially when dealing with challenging group damage mechanics, but this passive was recently moved from to level 39 choice which make the decision much harder due to the other 2 passives here also being good.
Recommended Choice: Cyclone Smash
- Debilitating Slashes (passive): Blade Barrage generates 1 focus and immobilises the enemy. If you know you’re in mostly a single target situation then you can use this to increase focus building.
- Cyclone Smash (ability): Slashes 8 enemies within 5m in front of you and inflicts Trauma reducing their healing received by 20%. Generally a really good spammable AoE ability so take this in pretty much all situations, costs 2 focus per cast.
- Blade Burst (passive): Blade Storm does damage extra damage but it’s a very small cone so typically not that useful.
Recommended Choice: Critical Slash
- Crushing Mark (passive): 50% more damage to taunted targets, it can be really good but can be quite difficult if you are burning out your taunts at the wrong time to benefit from this passive and then you don’t have a taunt available when it’s needed.
- Stasis Mastery (passive): Dealing damage with Guardian Slash reduces the cooldown of Force Stasis by 2s per enemy hit and generates 1 Focus. Force Stasis is a really good ability since it does decent damage, focus and threat generation along with stunning the enemy,
- Critical Slash (passive): Guardian Slash critical chance and threat generated is increased by 20% and cooldown reduced by 1s when it crits. Really good for extra threat generation and DPS.
Recommended Choice: Critical Defense
- Marked Focus (passive): Dealing direct damage to taunted targets generates 1 focus and heals you for 1% of your max health ever 1s. Don’t use this in group content especially when you have a healer, but it can be useful when you are doing anything without a healer.
- Thwart (passive): Guardian Leap grants Thwart increasing the damage of the next melee ability by 20%, reduces cooldown on Guardian Leap and reduces threat and damage taken by 10% for each friendly target in the Leaps radius. Doesn’t seem that useful in PvE due to the combination of the cooldown of Guardian Leap and the range needed to activate the ability, would be difficult to maintain it on a boss for example when you need to be at leap 10m away and you’re pulling a boss out of position just to re-leap on it, might be useful when you can use Guardian Leap on cooldown however.
- Critical Defense (passive): Crit hitting with a direct attack reduces the cooldown of Threatening Focus by 1s. Threatening Focus now becomes even more useful as a defensive cooldown ability increasing melee and ranged defense chance by 10% along with purging.
Recommended Choice: Battlefield Command
- Unyielding Justice (passive): Increases range of Blade Storm to 30m but makes it deal reduced damage beyond 10m. Force Push deals 20% more damage and grants Unyielding Justice allowing the next Blade Storm to deal full damage. Not bad if you need additional ranged damage.
- Defiance (passive): You generate 4 focus when crowd controlled. This can be excellent as a focus builder but it’s situational for fights where there are a lot of crowd control effects.
- Battlefield Command (passive): Getting attacked reduces the cooldown on Force Leap by 1s and enables Dispatch or Whirling Blade to be used at any time regardless of the enemies remaining health. Improved mobility through add pulls and useful as a gap closer on bosses.
Recommended Choice: Stalwart Defense
- Front Line Veteran (passive): Force Leap finishes the cooldown of Force Kick and grants Remitting which makes you immune to interrupts, stuns, knockdowns, incapacitating and movement-impairing effects that push or pull. The immunity to the many effects make this a pretty useful passive.
- Stalwart Defense (passive): All damage is reduced by 30% while stunned. Situational for fights with a lot of stuns especially where you are unable to use the Resolute ability.
- Second Wind (passive): Reduces the cooldown of Resolute by 30s and causes it to heal for 10% of your max health. Really good as it lowers the Resolute skill to a 1m 30s cooldown but only useful when using Resolute is an option.
Recommended Choice: Saber Reflect
- Awe (ability): Cofounds, which prevents all actions of up to 8 enemies for 6 seconds. Targets also do 15% less melee and range damage and enemies that can’t be Cofound get the damage reduction immediately, 1m cooldown. In the rare situation where Saber Reflect doesn’t have any use then you could use it otherwise it’s not as strong as the other two options.
- Saber Reflect (ability): Reflects all direct single target ranged, force and tech attacks back to the attacker for 5s and it a big AoE threat generator. You do need to have some fight knowledge to make the most of this ability so that it’s used when an enemy is doing a reflectable attack.
- Blade Blitz (ability): Rush forward 20m dealing damage and increasing defense chance by 100%, basically purges movement-impairing effects also. Only useful if you have no use for Saber Reflect but again, needs fight knowledge to benefit from the defensive buff and works well for an extra purge if it’s needed.
Recommended Choice: Through Peace
- Purifying Sweep (passive): Force Sweep slows the target it damages by 60% for 10s.
- Gather Strength (passive): When your movement is impaired you gain 10% damage bonus on the next focus costing ability, it stacks up to 5 times and lasts 15s. Not really that useful unless you have a lot of effect applied to you often and quickly.
- Through Peace (passive): Reduces the cooldown of Focused Defense by 30s. Reduces the cooldown to 1m 30s and it’s the most useful option for PvE, Focused Defense is a really useful ability to get you out of difficult situations.
Ability Tree
SWTOR Defense Guardian Ability Rotation
For a Defense Guardian you can use a somewhat set rotation of abilities. This is because you’ll want to have skills to build Focus and skills to spend it. This rotation is aimed at helping newer players especially and it will become more dynamic as you evolve as a Tank in SWTOR.
Defensive cooldowns should not be used within a rotation but used as and when needed.

Your combat opener includes
- Force Leap
- Warding Strike
- Guardian Slash + Riposte
- Force Sweep
- Taunt + Threatening Focus
This will not be possible to maintain throughout a regular battle because you won’t be far enough away from a boss to use Force Leap again. This opener helps you generate enough initial threat and then applies the taunt, helping you to maintain great aggro of a boss.
For Area of Effect situations
- Force Leap (Gap Closer & Focus Builder)
- Guardian Slash (Threat Builder, Big AoE Damage & Enemy Debuff)
- Blade Storm (Knocks weak enemies)
- Force Sweep (AoE Damage and Stun)
- Saber Reflect (Reflects Damage & Big AoE Threat Generator)
- Challenging Call + Threatening Focus (AoE Taunt + Big AoE Damage)
- Cyclone Slash (AoE Damage Spammable)
This AoE rotation helps you generate AoE threat and then applies an AoE Taunt if needed. While all your abilities are on cooldown you simply spam Cyclone Slash. Saber Reflect is a great AoE fight skill, when you are being hit by multiple enemies it will reflect the damage back at them for 5s and generates a lot of threat, so if you are taking a lot of damage use it before Challenging Call.
SWTOR Defense Guardian Ability Rotation/Priority
This is a list of the order in which you should try to cast abilities for single target situations. Included here is Taunt to help with maintaining aggro of a boss, and you want to make sure you’re casting skills such as Warding Strike and Guardian Slash as fast as possible when they are off cooldown as they are your shortest cooldown defensive abilities. You’ll also see below abilities that are not on the rotation, that’s because these skills have different functionality where it doesn’t make sense to include them in a rotation.
- Force Leap (Gap Closer + Focus Builder)
- Warding Strike (Defensive Cooldown, Focus Builder & Buffs Guardian Slash)
- Guardian Slash + Riposte (Defensive Cooldown, AoE Damage + Knock Down, High Threat, Enables Riposte)
- Taunt
- Blade Storm (Damage + Knock Back)
- Threatening Focus (Reduces Taunt Cooldown & Damage to Taunted Enemies)
- Blade Barrage (Damage)
- Force Sweep (AoE Damage + Stun)
- Hilt Bash (Damage, Stun + Threat Generator)
- Slash (Damage, Debuff + No Cooldown)
- Dispatch (Execute Damage Skill, Extra Damage When Highlighted)
- Saber Throw (Damage + Focus Builder)
- Force Stasis (Stun, Damage, Threat + Focus Builder)
- Force Push (Knock Back + Damage)
- Strike (Damage, Focus Builder, No Cooldown)
*Challenging Call – save this for when adds enter a boss fight or if you have a tough time maintaining aggro use it after Hilt Bash.
- Riposte – You must use on cooldown as soon as it lights up, huge damage potential.
- Saber Ward – You need to use this at the start of a fight and then on cooldown to benefit from your Grit Teeth Tactical.
- Sabre Reflect – Time this for incoming damage that can be reflected and especially AoE situations, it’s a huge AoE threat generator.
- Warding Call – Save this defensive cooldown for high damage mechanics, massive 40% damage reduction.
- Focused Defense – Use this as an emergency heal when you’re below 30% health.
- Guard – Place this on your healer or highest AoE DPS at the start of your Flashpoint or Operation.
- Resolute – Use this to break free of any crowd control effects that a boss puts on you.
- Force Kick – Doesn’t work in all situation but useful for interrupting enemy attacks that are interruptible.
Taunting
Taunting in Star Wars: The Old Republic is an important part of your rotation to solidify your aggro on an enemy. A taunt skill essentially pushes you to the top of the threat metre for a short time. To make taunts most effective you should always use one after a high threat ability. This means you instigate combat, use a few abilities that have high threat and then use a taunt and this will help you to maintain aggro of enemies even when the taunt expires. It’s wise to space out your two taunts to assist, especially with mechanics where a boss changes target.
Defensive Cooldowns
To survive you need to balance your Defensive Cooldowns, this means keeping some of them active as much as possible and with others you need to time them for dealing with high damage mechanics. Something like Saber Ward is a very strong cooldown, when using the Grit Teeth Tactical you’ll want to keep it active quite often because your Tactical will reduce the cooldown which is useless if you don’t use the ability. But Saber Reflect, Warding Call and Focused Defense are better saved for when they are needed.
SWTOR Defense Guardian Gear
For more information on how to obtain all of the Tank Gear you need for this build – look at our in depth SWTOR Tank Gear Guide.
Your priority for a Guardian Tank is to increase your Shield to 6k, once you hit 6k Shield then move your focus in Absorb.
Lightsaber, Shield, Head, Arm, Chest, Hands, Feet, Waist, Legs.
Use Bulwark gear to begin with.
For your Adaptive Gear use Warding Mods 103B, Resistive Hilt 103, Resistive Armoring 103 and Bastion Enchantment 103.
The best Relics for a Defense Guardian are:
- Shield Matrix
- Avoidance
- Ear: Bastion or Bulwark
- Augments: Shield and/or Absorb
- Color Crystals: Indestructible
SWTOR Defense Guardian Implants
![]()
Elemental, Internal, Kinetic and Energy damage reduction is increased by 3%.
Stats: Mastery, Endurance, Absorption Rating, Defense Rating.
This implant will improve your survivability which is always useful when playing as a Tank.
![]()
Riposte has no cooldown.
Stats: Mastery, Endurance, Shield Rating, Defense Rating.
This Implant allows you to use Riposte with no cooldown so you’re able to cast Riposte every time you get hit by a melee or ranged attack. This implant also provides Shield Rating which is useful for Tanking.
SWTOR Defense Guardian Tacticals
![]()
The active cooldown of Saber Ward is reduced by 2 seconds when you are attacked. This effect cannot occur more than once per second.
Since Saber Ward is one of your strongest defensive cooldown abilities with a 12 second duration and a 150 second cooldown, using Grit Teeth makes it possible to have this available much more frequently meaning you boost your ability to survive by a large amount. Unfortunately this is a crafted Tactical so you’ll either need to purchase it from the GTN or wait for the schematic to be available from Kai Zykken who occasionally appears in the Supply area of the Fleet.
![]()
Guardian Slash generates stacks of Crushing Defense for every enemy it hits, granting 2.5% increased damage reduction per stack for 10 seconds. Stacks up to 8 times.
Another good Tactical although not as good as Grit Teeth. This one gets better the more enemies you hit with your Guardian Slash, so in those fights where it’s just you vs a boss it’s not going to perform as well as it will in the fights where you have multiple enemies or bosses with a lot of add waves. This one is much more obtainable as it can be bought from the Tactical vendor.
Conclusion
Mastering the Defense Guardian Tank in Star Wars: The Old Republic requires a solid understanding of your abilities, effective threat management, and strategic use of defensive cooldowns. By following this guide, you’ll be well-equipped to handle the toughest encounters, protect your allies, and dominate in both Flashpoints and Operations. Remember to optimise your gear, refine your rotations, and adapt your playstyle to different scenarios for maximum effectiveness. With The Tank Club’s expert guidance, you’re now prepared to stand strong as an unyielding guardian on the battlefield. May the Force be with you!


