Ravendawn Professions Guide
Welcome to the complete Ravendawn Professions Guide! Crafting is at the heart of Ravendawn — all gear, weapons, and items are created by players, making it essential to master professions if you want to succeed.
This guide will walk you through everything from gathering materials and unlocking professions to advanced crafting strategies and levelling tips. Whether you’re forging weapons, farming crops, or breeding Moas, this guide will help you become a master crafter in Ravendawn!
Introduction to Ravendawn Professions
You don’t need anything to start developing your professions in Ravendawn as some of them can be utilised straight away.
Once you pass the tutorial phases of the game you can begin seeking out harvestable nodes for Woodcutting and Mining, these are distinctly obvious as you’ll see an axe symbol on choppable trees and a pickaxe symbol on mineable rocks.
Fishing is slightly different as you will need to obtain a fishing rod and hook, these will come from a quest or bought from the market.
Farming and Husbandry requires you to unlock the Community Land which you gain access to after leaving the slums quests at the start of the game. Once you unlock your farm you can begin growing crops, trees, plants or animals in a more passive profession which can also be very profitable.
Crafting requires materials which you can gather yourself or purchase from other players on the market.
Finally Breeding can be done if you have player owned land, although this might change soon due to the lack of available land. This allows you to breed Moa mounts in the hope of creating higher tier and rarer mounts.
Ravendawn Professions
- Blacksmithing
- Carpentry
- Weaving
- Alchemy
- Cooking
- Breeding
- Mining
- Woodcutting
- Herbalism
- Farming
- Husbandry
- Fishing
Gathering Resources in Ravendawn
Gathering relates to Fishing, Mining, Woodcutting, Farming and Husbandry where you will obtain a range of materials.
Gathering is typically straightforward, you need to seek out gatherable materials which are identified by the Pick Axe icon on stone for mining, Axe icon on trees for Woodcutting and a Hook icon in water for Fishing. The higher your level in a gathering profession, the more likely you are to obtain higher level materials.
When gathering a mini game will appear, stopping the meter in the green section will simply speed up the gathering time.
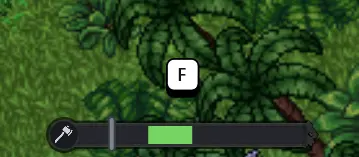
It’s vital to utilise your gathering to obtain materials so you can craft useful items with the materials, it becomes very expensive to craft otherwise.
Woodcutting is by far one of the easiest to level up, you’ll find cuttable trees located all over Ravendawn on the overland areas. Due to it being “easier” its also the slowest to level up due to how easy the materials are to find. To speed up your Woodcutting skill, you can place trees in your community farm land which provides considerable more profession experience.
Mining is far more difficult. You’ll need to find specific mines and caves which have mining nodes, these are highly contested with other players due to the fact there are far fewer mining nodes in the game. Look out for any locations on your map named “Mine” and always check around grey rock areas for potential mining node locations, these are always typically underground.
Gathering Weaving materials is not a profession but is still an essential task, you’ll need to kill enemies that provide resources such as Hair and Hide which can then be used for Weaving. Weaving materials are also part of Farming.
When farming materials, you’ll gain items of different qualities, these are highlighted by the colour around the item. Higher quality items are much more useful for crafting which we’ll talk more about in the crafting part of this guide.
Gathering Passives
- The only correct answer for all gathering professions is to take the increased chance to gain double materials. This significantly increases your profit, gives you much better value for your gathering and is absolutely essential to pick all of these passives as soon as possible.
- I personally like going for increased experience next since gathering professions are really slow to level up, it helps get you levelled up but also start getting the more valuable materials. Experience is typically not valuable long-term however.
- All gathering skills include a bonus to gain extra rare items (gems, dense log, three-leaf clovers) these are much more useful later in the game, so might be worth saving this passive until 3rd.
- Faster gathering speed is really not useful in most cases since you have the mini game to speed it up – for Mining it may be good if you consistently have problems with enemies and other players while mining. For this you also have the option of the Diplomatic Exaltation Reputation Passive which can help.
Ravendawns Community Farmland
You’ll unlock your community farmland on “The City of Ravencrest” quest at level 6, and as you increase your legacy level you’ll access more of the available land, at level 25 the whole land area will be available to use.
In this area you need to press the “Toggle house mode” button near your mini map to plant items. Next you select the item you wish to plant, select the location and you will spend silver and effort points to plant the item. You’ll then have to wait an amount of time before you can harvest these items.
Every time you earn 100 experience by killing enemies, you’ll gain 1 effort point and this can be increased with the purchase of Patron. Each item requires effort and silver to be placed in the farmland.
After a period of time, you’ll have the option to do certain actions with your farm items such as watering which increase the chance to get a three-leaf clover or using fertiliser to increase the yield of your harvest.
Once an item is fully grown you can then press to harvest it. All farming actions will bring up the gathering mini game which only speeds up your gathering time.
This farmland is not just used for Farming and Husbandry, you can also plant trees which level up your Woodcutting substantially faster than regular trees and you’ll find certain plants and animals that provide useful Weaving materials so this farmland can impact many of your other professions.
Ravendawn Farming & Husbandry
Some of the easiest professions to develop are Farming and Husbandry, due to being able to utilise them while offline, and not requiring a lot of effort to do them.
Farming
Farming is a very profitable task, especially if you have the passives which increase your chance at gaining double materials. Planting Potatoes is one of the best profits as you spend 85 silver to gain anywhere from 2 to 8 potatoes which sell for 60-70 silver each. If you can do this every hour and have the full sized farmland that’s 64 to 254 potatoes per hour depending on if you have the extra resource passives and how lucky you are.
Farming can also be used to your advantage to help you with levelling up your cooking skill. Combining both Farming with Cooking allows you to level up an additional profession easily, and it’s a great way to gain a ton of extra experience for your archetypes.
You should always keep an eye on which foods people are buying and which tradepacks are available and selling well because there are many farming items that will sell very well based on that and you can gain huge profits from growing the right crops, also utilising your time well by planting items that will grow while your offline and planting shorter duration items when you can login more frequently.
Husbandry
Husbandry can also be very profitable but also has some items that are currently not very valuable and it can be quite costly to do. The main benefits from Husbandry are the much larger amount of experience you gain but also you will gain crafting items that can be used for weaving such as hide and wool, rather than just food items for cooking.
When you place an animal, you have a period of time where it needs to mature before it will provide any resources. You might need to place it and wait for 8 hours but then you can harvest materials from it every 3 hours. With animals, you usually have options on what to do with them. You can gather off them or you can butcher them. Butchering means they will instantly be done and you’ll no longer gain anymore benefit from that animal. If you harvest instead you can do so 3 times before they are gone.
Depending on what you want to do, the best strategy is to harvest twice and butcher if you are more focussed on exp. If you want more profit or materials then harvesting 3 times is the best option.
Husbandry Passives
- The best passives are up to you but with Husbandry being very high experience gain you might want to take the experience however the increased chance of double materials is essential if you want to make more profit.
- Increased chance to gain fertilizer is also really good as these can be sold or used to increase the amount of food items you get from Farming so its another thing that increases your profit.
- Again the increased harvesting speed is last as I don’t really think having 22% increased total harvest speed is that useful in the farm land especially with the mini game.
Farming Passives
- You have to take the increased chance of double materials, since it can mean huge extra profits.
- Increased experience seems like the next most valuable, especially if you stay on top of farming activities you’ll gain a lot of extra experience.
- Additional three-leaf clover would be next but they only appear to be used in two cooking ingredients; Rich Flour and Spicy Seasoning so it’s not overly important but can be useful for some of the higher level cooking meals.
- Increased harvesting speed is last as I don’t really think having 22% increased total harvest speed is that useful in the farm land especially with the mini game.
Getting Started with Crafting in Ravendawn
To start crafting you will need materials and you’ll need to find a usable crafting station. You will always find stations located in Ravencrest, look for the blue symbols on your map.
For more information on finding crafting materials go to the gathering section of the guide.
When you approach a crafting station you press F to interact and bring up the crafting menu for that specific craft. If you have raw materials, you’ll now need to refine these, so if you have copper ore, this will need refining into copper ingots before you can create anything with it.
Select the item you want to craft and then you’ll now see the crafting bar.
How To Craft in Ravendawn
Crafting an item is split into 5 parts.
To successfully craft an item you need to fill the progress bar without reaching zero on both Labour and Durability.
Crafting requires you to use crafting skills to complete a craft. As soon as you begin crafting, you skill bar will change to a crafting based skill bar. Depending on your skill level, you’ll gain more and more usable craft skills as you develop your crafting further.
- Progress – This is the metre which shows your progress towards successfully completing the craft.
- Quality – This metre shows the quality level of the item, fill the metre to improve the quality of the final item.
- Durability – This is the durability of the materials, if this runs out then the craft will be unsuccessful. There are craft skills which can give additional durability.
- Labor – This is your characters total labor which will decrease each time a crafting skill is used, the more labor you have the more you can do during the crafting process. Additional labor can be gained via passives, crafting gear and trinkets.
- Condition – This is the current condition and this will make a difference on the progress and upgrading of a crafted item. When you use a crafting skill at “Normal Condition” it will give you the 100% value of progress that it’s supposed to. Poor gives 50%, Good is 110%, Great is 120% and Excellent is 150%. Better quality materials give you higher condition. You shouldn’t use Synthesis or Touch crafting skills when the condition is Poor.
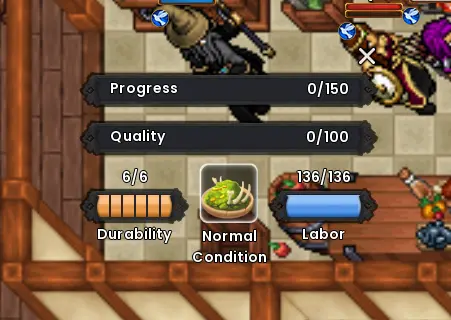
Crafting Skills
All crafting skills cost labor to use. You have to balance using your skills with making sure you do not run out of labor.
- Synthesis – This is used to increase your progress towards completing the craft of the chosen item.
- Shine – Improves the condition quality. This helps you to maximise your synthesis and quality usage.
- Touch – Increases the quality of the item.
- Mend – Restores durability.
As you gain a higher level, you will unlock better crafting skills. The Apprentice Synthesis for example does 25% progress and is guaranteed to succeed for 10 labor. At level 35 you’ll unlock Master Synthesis which does 75 progress with an 80% success chance for the cost of 20 labor.
Crafting Passives
Blacksmithing, Carpentry, Weaving, Alchemy and Cooking all share a similar set of passives.
- The most essential should be the Labor passives.
- This is ideally followed by increased Synthesis.
- Increasing touch would be next as this is more essential with higher level crafting.
- Finally is increased experience. This has the least value on long term crafting however the experience gains from crafting can be huge especially with multi-crafting so it’s up to you if you choose this sooner.
Useful Crafting Info
- Labor – You can increase your Labor with passives but also gear which can be upgraded and trinkets. The more labor you have the better you can craft.
- Item Quality – Noticed some items have different colour borders around them? This is the item quality. You can craft using higher quality items by ticking the boxes to use higher quality items. Using higher quality items improves the Condition while crafting, making crafting either faster or allowing you to craft higher quality items more easily.
- Mass Crafting – As you increase your level in a craft, you’ll be able to mass craft. As you increase your skill level you’ll be able to mass craft more and more of each item.
- Oversupply – Mass Crafting is great for both making a lot of something and levelling your skill but you will reach an oversupply limit if doing it too much. When you reach different oversupply thresholds, the crafting tax to make an item keeps increasing. This is to stop the game being flooded with too many items and the market prices crashing.
- Crafting Tax – You have to pay a silver fee each time you craft something alongside the materials.
- Quality Crystals – When crafting gear and weapons, once you fill the Quality metre you’ll gain 1 Quality Crystal which will add a random extra stat to the item. You can add multiple Quality Crystals which just mean the item will have more stats, the Primary and Secondary stats are still the most valuable but the Quality Crystals will become more and more important with higher tier gear and it also requires a lot of labor to do this.
Crafting Gear
Trinkets
By doing quests you’ll find a range of useful trinkets that are good for crafting. I would personally always take a crafting trinket where possible since other combat related trinkets are easily replaceable in the early stages of the game, but having extra labor from a crafting trinket will make it much easier to do crafting.
Gear
In the weaving menu there are craftable gear for all of the crafting professions Cooking, Weaving, Blacksmithing and Carpentry. They are not useful in the very early stages as many items can be crafted easily. As you get upwards of level 30 in a craft and begin making higher tier items and also wanting to increase the quality of these items, you will need the crafting gear as it will add a nice bonus to your Labor, especially if you have a full set.
Crafting gear can be upgraded with Infusions making it even stronger. Tier 1 gear starts with a +2 Labor bonus and increases by 2 with each infusion per piece.
Advanced Crafting Strategies
To craft like a Pro you need to make sure you’re wearing crafting gear and trinkets along with having Labor passives. You also need to use the best materials to improve the condition of items to make it easier to craft the highest quality items.
- Use the highest level Synthesis skill – keep using it until you are one away from completing your progress.
- Now you know exactly how much Labor you have remaining. Begin to use your Touch abilities to increase quality.
- If the Condition becomes Poor do not use Synthesis or Touch abilities. Use a Shine ability to improve the Condition.
- Increase the quality as high as you can until you fill the quality metre (as many times as you can) then use your final Labor to Synthesise and complete the craft.
Ravendawn Fishing
Fishing in Ravendawn has a lot of potential at providing a nice source of Silver, cooking materials and possibly more. Ravendawns Creative Director Knighter has previously mentioned that the Fishing “end game” will be lucrative. We currently don’t know what is in store for the latter stages of fishing, but in the early phases it’s a fairly relaxed activity and you can quite easily gain 10k+ silver for an hour or so of fishing depending on your current skill level.
Fishing has a number of parts to it. Your fishing level will determine the kind of fish you have potential access too. You then have different weights of each fish. By catching rarer and larger fish will net a much higher value. Fishing is completed by “damaging” a fish until it is caught.
When doing fishing you need to look in water or the ocean for the hook symbol. Once pressing on this you begin fishing in that spot. You then have to wait for the “Waiting for fish” bar to fill, sometimes this will be really fast and other time it can take a while, this usually depends on the type of fish, the weight and your fishing skill level.
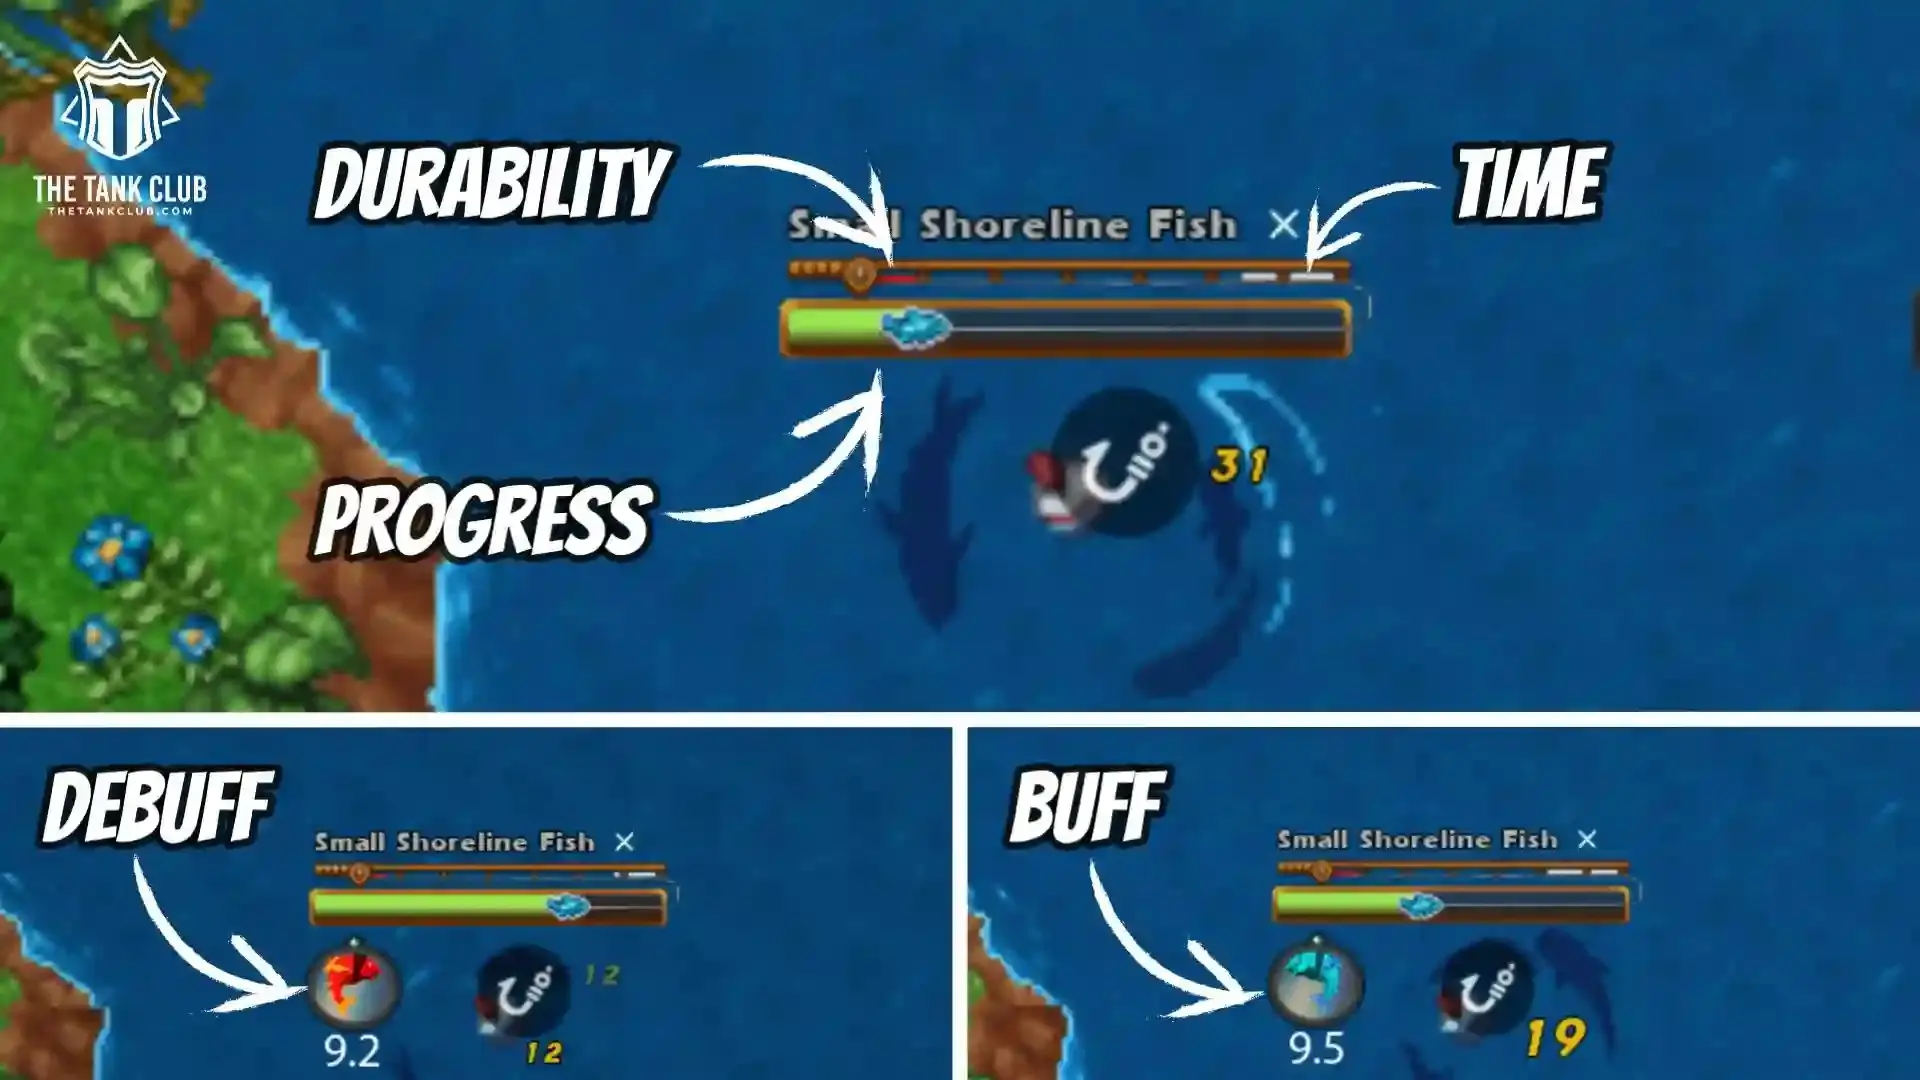
Once a fish is hooked, a fishing rod will appear on the screen and on this is a lot of information. You now need to begin damaging and trying to catch the fish.
Fishing
- Firstly is the progress bar in the middle, once the fish reaches the end and this is fully green the fish is caught.
- Red metre on the left, this is the rod durability. If this touches the white metre from the opposite side then you won’t catch the fish.
- The white metre to the right is your line tension aka time, you are limited on time with catching fish.
- Blue Fish timer – this is basically a buff, while this is active you should use your highest damage fishing abilities. These can also gain a multiplier like x2 or x3 and do even more damage.
- Red Fish timer – this is a debuff, while this is active you should use the “Give Slack” and your weaker fishing abilities.
Fishing Strategy
- Start with a Big Reel
- 2x Basic Reel
- One of the timers will typically appear – if its red, use Give Slack followed by Basic Reel, if its green use Big Reel as much as possible.
- If red metre is too close to white, use Give Slack, otherwise alternate Big and Basic Reel.
Fishing Passives
- The main priority should be the increased damage. This definitely helps to have this early on as it will make it easier to catch fish.
- Once you have that, increased fish weight will start to give you a lot more value of your fish so you’ll make more silver.
- Fortune Fisher or Swift Angler could be an option after that, with my personal preference on Swift Angler.
- Going for the increased speed of getting fish on the line would be my next choice
- Follow finally by increased experience. There’s nothing wrong with the increased experience but since you cannot change your fishing passives, the experience gain is a waste long term, even though you’ll level up your fishing slightly faster, when you consider the other passives increasing your damage and speed it should be fairly balanced out.
Breeding in Ravendawn
Breeding is a very lengthy and time consuming profession in which you breed Moa mounts to try and gain better Moa mounts. Moas can have special abilities and traits, combined with rare colours and higher tier which means they will have significantly better stats so that is the general aim of breeding but it will take a very long time.
Moas can be sold to other players on the market or you can reuse them for breeding. Moas do have breeding limits however, and it’s also worth noting that even if you breed a Tier 2 Moa with another Tier 2, it’s possible to get a Tier 1 Moa in return, so the results of Breeding can sometimes be underwhelming.
Breeding
The main things you are looking for when breeding Moa include:
- Higher Tier – These will have higher stats.
- Rare Colour – There are rare Moa colours, some of which have a 1/10000 chance.
- Speed – The general movement speed of your Moa, the higher the better.
- Strength – Improves the speed your Moa moves when pulling a Wagon.
- Traits & Skills – Some Moas will have special traits or usable skills.
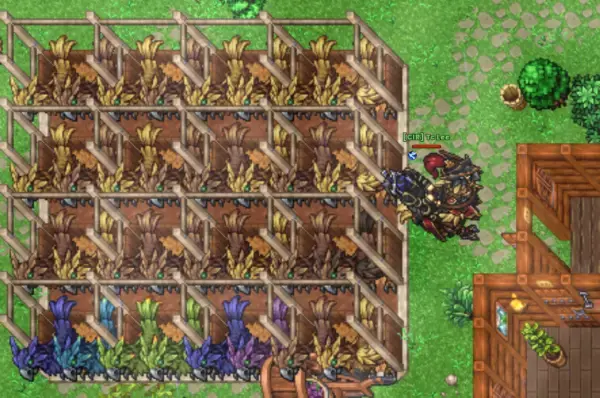
How to Breed
- Go to your land and enter the housing editor screen and you need to place a Moa Stable.
- Next you go to Jebediah, the NPC on the south exit of Ravencrest and you’ll need 1 Male and 1 Female Moa which cost 7500 Silver each.
- Go back to the Moa Stable and select breeding with your male and female Moa and you’ll now have a 24 hour timer.
- After the 24 hours your Moas will create an egg, this will then have a 36 hour timer until the egg with hatch.
- After 36 hours the egg hatched, now have to take care of the Moa every 2 hours and do this 6 times.
- Taking care of the Moa requires one random action such as feeding them Moa Rations, Moa Medicine (buy from Jebediah) or Petting them. Once this is completed you will gain a new Moa.
Breeding Passives
- Increased Maximum Tier Swing – This should help you to obtain higher tier Moas when breeding.
- Decrease hatching timer – Picking this up second allows you to hatch new Moa faster.
- Moa Trait increase – Having Moas with traits will make them better and also more valuable so take this third.
- Increase Experience – Moa breeding gives a ton of experience but the other passives are much stronger typically.
Leveling Your Crafting Skill
- Mining – For lower levels go to Barrendon Mines in Rohna Woods, Bear Cave in Witches Crag in Glademire. On Sajecho Island seek out the Goblin Caves and on Harbor Island you have Turtleshell Hills. Mining in general is just the most difficult to level up so you’ll need to commit to purposely farming the nodes and levelling it up.
- Woodcutting – To level up fast, chop down trees in Sajecho Island or Rhona Woods overland areas and while you’re offline plant trees in your Community Farmland such as Fir trees which take 8 hours to grow, always plant trees that will take the same amount of time you’ll be offline.
- Fishing – This is a great semi-AFK Profession that you can do while watching a show or playing minimal attention, when doing this do fishing on land and try to focus on zone that don’t have active conflict. If you want to level faster, its much easier to find fishing nodes while doing Ocean fishing, but if you are killed while doing this you will drop some of your fish. Fishing is generally a very slow profession to level up.
- Farming – Farming is only levelled up by growing crops on your farmland. Try to manage your time well by planting items relative to your play time and schedule. If you’re going to be online for 3 hours, plant potatoes every hour for 3 hours, then if you’re going offline and at work for 12 hours plant some Corn. if you’re away for the weekend get those 28.5 hour peppers growing. Farming is all about maximising your time.
- Husbandry – Pretty much the same as farming although requires slightly more effort because you need to place your animals and let them mature so take that into account and try to work that into your timing. An animal might take 8 hours to mature then need harvesting every 3 hours so they do require a lot more timing and effort especially to maximise efficiency. Always harvest three time if you want more profit or harvest twice and butcher the 3rd time if you want a bigger experience gain.
- Cooking – Cooking relies heavily on materials but if you manage your farm to provide the materials then you can level this up easily but at a material cost. To begin with it’s super slow to level as you do one item at a time. Once you unlock mass crafting you can level up extremely quickly. Multi crafting items you use a lot is ideal such as Moa Rations, Cookies, Regen Drinks and more. It’s almost impossible to make a profit from cooking since the farming materials needed are more valuable than the end product of crafting so this is very much a big loss craft. The benefit of cooking is when you start making high level items and multi craft them, you might lose a ton of silver but its giving you more Archetype and Legacy experience than killing enemies, you could mass craft 50 Moa Rations to gain 32,000 experience in basically 5 seconds (more with Rested Experience) in a few minutes doing this you could easily gain 320k exp mass crafting, but the value of these items are now very low.
- Blacksmithing – In the early stages this is a wasted craft if you start putting all of your materials into making gear. To begin with it can be better to just turn your Ore into Ingots and sell them for a profit, once its unlocked also do this by mass crafting and also using your Stone to mass craft Whetstones. Once you are able to make T2 gear, look which is the most valuable on the market and do that to level up and use any lower level materials. You can do the same as you keep progressing but once you get to T3 you can start to make a decent amount of silver from making items however you get the factor of random stats included now where an item could be worth 20k or 200k depending on the stats so its very much a risk of resources. There’s also a lot of value in certain items like Fishing Hooks and other none gear items which are worth considering.
- Carpentry – Because farming logs is so easy, so is levelling carpentry which also means these are some of the lowest value items to begin with. It’s probably better to farm logs, refine them into Planks, sell the planks and continue until you can make T3 weapons or higher value items like Fishing Rods and Ship/Wagon parts.
- Weaving – This is one of the most expensive crafts since the materials are expensive even the low level materials. But again its best to just refine materials for the lower levels and save the materials for crafting more valuable stuff later. Making Craftman’s Cloth and Craftman’s Thread is useful even though its low level stuff since the crafting gear is all really useful and fairly valuable. Crafted gear from Weaving is worth a lot if its made with good perks and there’s some nice ship parts made in Weaving too. You can grow materials needed for weaving in your Community Farmland if you want to level this faster and also hunt enemies like Wolves and Bears which drop hide in their loot table.
- Breeding –


