Tarisland Paladin Tank Build
The Paladin Tank in Tarisland is a resilient and versatile tank designed for mitigating damage, sustaining through tough fights, and supporting the group with defensive buffs. With high sustain, powerful shielding, and defensive cooldowns, this class is ideal for players who prefer a balanced tanking playstyle that combines durability with group utility.
In this comprehensive build guide, you’ll find:
- Best skills and rotations to optimize aggro and survivability
- Recommended stats, gems, and gear for a durable tank setup
- Key talents, inscribe nodes, and emblem choices to enhance performance
- Essential consumables and ultimate abilities for peak efficiency
Whether you’re new to Tarisland or a seasoned tank looking to refine your Paladin build, this guide will equip you with everything you need to master tanking in dungeons, raids, and elite content.

Tarisland Paladin Skills
Guardian specialization
Holy Hammer
Attack a target with the Divine Hammer to deal Physical DMG equal to 76% of your ATK+140, and increase your Glancing Chance by 4% for the next 13sec.
Holy Hammer deals 15% more base DMG and grants 7.5% higher glancing chance.
Holy Shield Bash
Use a shield to strike a target and enemies within 4m of the target, dealing Physical DMG equal to 25% of your ATK+63, and boosting your Physical DEF by 5%+14 for the next 56sec.
Casting Holy Shield Bash gives you 9 Aegis Energy. If at least 3 targets are hit, it also grants 3 more Aegis Energy.
The additional effects if Holy Shield Bash last 2sec longer. While active, you take 4% less DMG.
Flying Shield
Throw an Enchanted Aegis at the target, dealing Physical DMG equal to 194% of your ATK+357.
If the skill hits a target, you will be granted a Shield that absorbs DMG equal to 12% of your max HP+3360.
Flying Shield deals 15% more base DMG and its Shield absorbs 45% more DMG.
Holy Fire
Be surrounded by Divine Energy to deal Magic DMG equal to 4% of your ATK+60 per sec for 112sec to enemies 6m of you.
Holy Regen
Guide Divine Power to recover 19% of your max HP+4928.
This skill can’t deal Crit. hit or count as Combo.
Holy Regen heals 20% more, and its base cooldown is reduced by 20sec.
Ardent Guardian
Divine Power protects you in the next 12sec, reducing the DMG taken by 20% and increasing Physical DEF by 910.
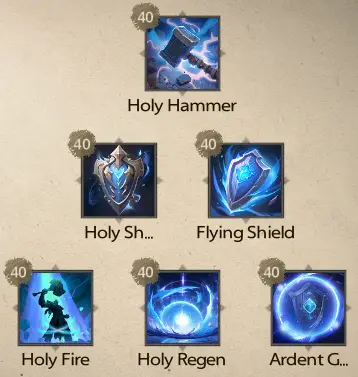
Skill Rotation
Holy Fire → Flying Shield → Holy Shield Throw → Holy Hammer
Save Holy Regen & Ardent Guardian to deal with mechanics.
Tarisland Paladin Stats
Focus on the following key stats to optimize your tank build:
- Resilience: Makes you immune to critical hits, varies by boss. Adjust using gauntlets, leather gauntlets, accessories, and blue and colorful gems.
- Stamina: Increases HP and Health Recovery, essential for tanking. Stack as high as possible.
- Focus: Boosts armor rate, reducing incoming damage. Crucial for minimizing damage taken.
- Glancing: Increases the chance to reduce incoming damage by 25%. Soft capped at 42%, easily achievable with gear, attributes, and gems, especially from Elite Raids set gear. The Glancing Effect can be further enhanced via Inscribe Nodes to provide more than the 25% damage reduction.
- Cooldown Rate: Reduces global cooldowns, skill cooldowns, and increases cast speed. Prioritize for faster skill execution.
- Omni: Reduces damage and grants damage immunity. Effective once it exceeds 1855. Initially, focus on other stats and build Omni later to maintain balanced overall stat levels.

Tarisland Paladin Gear
For optimal performance, aim to equip the Guard set gear combined with the Sturdy set gear and the unique Badge. These items are obtained from Elite Raids or Arcane Realm Weekly Rewards. By using set gear, you’ll gain a range of additional stats and unique benefits that complement your aptitudes and attributes.
Make sure to:
- Fill all gem slots on your gear to maximize stats.
- Empower each piece to enhance its effectiveness.
- Use the Tempering system to transfer favourable aptitudes and stats from non-set gear onto your set gear.
- Combine 8 pieces of set gear from raids with 2 set pieces from the Arcane Realm weekly rewards and a unique Badge from Forest Gemini Elite.
- Utilize colourful gems in Red Gem slots to maximize tankiness.
| Piece | Set Gear | Enchanted Attribute | Gem / Empower |
|---|---|---|---|
| Helmet | Synthesis Doctor Elite | Stamina & Cooldown/Omni | Empower – Stamina |
| Shoulder Guards | Forest Gemini Elite | Glancing/Focus & Stamina | Empower – Strength |
| Armor | Ancient Tree Elite | Glancing/Focus & Stamina | Empower – Stamina |
| Belt | Archdruid Elite | Glancing/Focus & Stamina | Blue Gems – Stamina/Resilience |
| Greaves | Ancient Tree Elite | Glancing/Focus & Stamina | Empower – Stamina |
| Boots | Synthesis Doctor Elite | Stamina & Cooldown/Omni | Empower – Strength |
| Ring | Synthesis Doctor Elite / Arcane Realm Weekly Chest | Stamina & Cooldown/Omni | Red Gems – Strength |
| Necklace | Ancient Tree Elite / Arcane Realm Weekly Chest | Glancing/Focus & Stamina | Red Gems – Strength |
| Badge | Forest Gemini Elite → Archdruid Elite | Glancing/Focus & Stamina | N/A |
| Cape | Forest Gemini Elite | Glancing/Focus & Stamina | Blue Gems – Stamina/Resilience |
| Gauntlets | Merfolk Raid Elite | Strength & Resilience | Blue Gems – Stamina/Resilience |
| Leather Gauntlets | Merfolk Raid Elite | Stamina & Resilience | Empower – Strength |
| Accessories | Merfolk Raid Elite / Arcane Realm Weekly Chest | Stamina & Resilience | Red Gems – Strength |
| Combat Axe | Shadow Witch Raid → Archdruid Elite | Glancing & Strength | Yellow Gems – Glancing Empower – Focus |
Tarisland Paladin Special Aptitude
Aim to have a Special Aptitude on all gear pieces. The most beneficial aptitudes enhance your short cooldown skills. For a Paladin prioritize aptitudes that boost Holy Hammer, Holy Shield Bash, and Flying Shield, as these skills are frequently used.
Special Aptitudes provide varying benefits depending on the gear piece they are on, allowing you to utilize one of each aptitude across your gear. They also stack, so you can use multiple of the same aptitude for added effect.
All Special Aptitudes offer some benefit, except for Holy Sword. Avoid using this aptitude, as you won’t be utilizing that skill.
When you see the Special Aptitude mention “Echo of Destiny,” it refers to the Fatuina Echo, which is triggered via your Inscribe Stone system. Check the starting node for more information.
Special Aptitude 1
These are the available Special Aptitude for these gear slots: Leather Gauntlets, Chest, Ring, Shoulder Guards, Cape and Belt.
- [Flying Shield]’s Shield effect +131/262; Each time Echo of Destiny is gained, there is a 30% chance to increase the Shield effect of the next [Flying Shield] by 42%
- [Holy Shield Bash]’s Physical DEF +59/118; Each time Echo of Destiny is gained, there is a 30% chance to increase the Physical DEF effect of the next [Holy Shield Bash] by 124%
- [Holy Hammer]’s Glancing Level +24/47 additionally
- [Flying Shield]’s Shield Effect +131/262
- [Holy Regen]’s HP recovery effect +559/1119
Special Aptitude 2
These are the available Special Aptitude for these gear slots: Accessories, Gauntlets, Greaves, Necklace, Helmet, Boots and Badge. Unlike the Barbarian Warrior, Paladin also include Weapons into this set.
- [Holy Hammer]’s Glancing Level +24/47 additionally; 9% chance [stackable] to increase Echo Recharge by 1
- [Flying Shield]’s Shield effect +131/262; 20% chance [stackable] to increase Echo Recharge by 1
- [Holy Shield Bash]’s Physical DEF +59/118; 14% chance [stackable] to increase Echo Recharge by 1
- [Holy Hammer]’s Glancing Level +24/47 additionally
- [Flying Shield]’s Shield Effect +131/262
- [Holy Regen]’s HP recovery effect +559/1119
Tarisland Paladin Talents
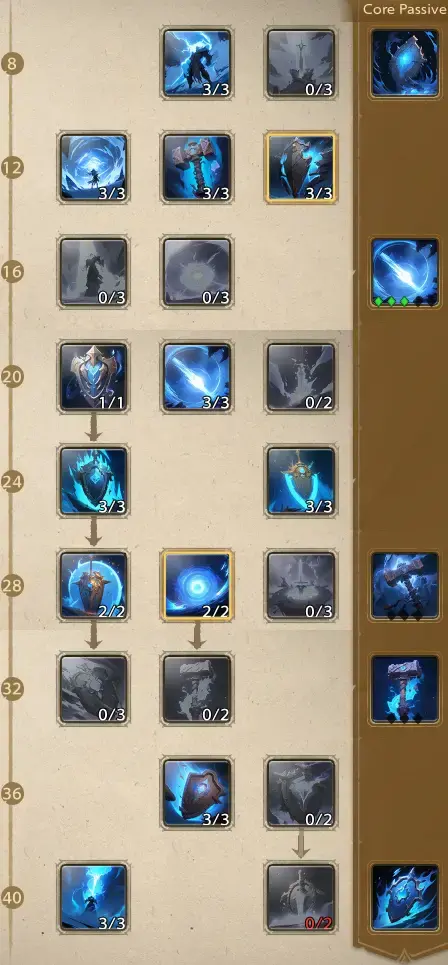
Tarisland Paladin Inscribe Stone
Emblems
- Barrierguard
- Reversal
- Tribal Ode / High Energy Potion
- Warlike Surge
- Potential
Each emblem in Tarisland has randomly generated (RNG) perks that you gain as you upgrade your emblem. Some perks, like +12 Stamina or +1 ATT, are not very beneficial, so you might need to upgrade multiple emblems of the same type to get a “good” one.
Key Perks to Focus On:
- +50% Stat Increases: This perk boosts a nearby Stat node by 50%, significantly enhancing your overall stats.
- +1 Emblem Level: This increases the power of the emblem by 1, making your emblem more effective.
To maximise your build, aim to upgrade emblems that have only these two types of bonuses. By focusing on these perks, you can ensure that your tank build is as powerful and efficient as possible.
Nodes
When selecting nodes for your inscribe stone system, start by placing just one point into each node to advance further upwards. This approach is more efficient since the first point in a node provides more stats compared to the second and third points.
Focus on progressing up one side of the inscribe system, prioritizing essential stats such as:
- Stamina
- Cooldown
- Focus
- Main Attributes
- Specialization Attributes & Effects
- Unlocking emblem slots
The first priority is unlocking all 5 emblem slots. Ensure that your emblems are levelled up, as they become significantly more powerful at higher levels, with a maximum level of 10. This strategy will help you maximize your build’s effectiveness early on.
Once you’ve unlocked all emblem slots, focus on unlocking your Core nodes as these enhance your Fatuina Echo, offering strong benefits. Afterward, pick up other useful nodes but pay close attention to nodes with bonuses such as +50%; increase these to level 2 or 3 as well as the Specialization Attribute nodes.
Enhancing the nodes around your Core nodes will increase the Core level so do that next. Finally just fill in the nodes that provide other useful stats.
Tarisland Paladin Ultimates
- Guardian Order – Single target taunt skill, good for grabbing bosses at the start of a fight.
- Challenge Guardian – AoE taunt skill, good for AoE aggro in harder content but worth dropping if you need a different Ultimate in dungeons.
- Punishment – Interrupts enemies, mostly needed for specific boss fights where a boss has an interruptible mechanic.
- Breakout – Although not exactly useful for Tanking, it helps you to stay ahead of your group which is idea for clumping during add pulls.
Tarisland Paladin Consumables
- Potions – Always have the highest level potions you can use available to top up your health after a big hit from a boss
- Burst Potions – Use the Shield burst potions to increase Glancing and Physical DEF
- Fish – Fish gained by fishing offer increased stats or other benefits such as life leach and damage shield. Use these before starting a raid as the effect usually have a long duration.
- Food – Food obtained from the Food Festival provides some strong buffs
- Sea Food Flavoured Beef Soup: +Glancing
- Fish Stew with Eggs: +Defence
- Sour Wild Wolf Soup: +HP
- Premium Stew: Group Buff +Glancing, Defence & HP


