Tarisland Barbarian Fighter Tank Build
The Barbarian Fighter Tank in Tarisland is one of the best choices for players who enjoy a durable, high-survivability tank that can control the battlefield. This class thrives in both group PvE and solo play, offering strong defensive cooldowns, reliable sustain, and crowd-control abilities.
In this comprehensive build guide, we break down:
- Best skills and rotations for optimal tanking
- Recommended stats, gems, and gear to maximize survivability
- Key talents, inscribe nodes, and emblem selections for min-maxing performance
- Essential consumables and ultimate choices to enhance your build
Whether you’re new to Tarisland or refining your Barbarian Fighter Tank, this guide will help you master your role and dominate dungeons, raids, and elite content.
Tarisland Barbarian Fighter Skills
Frozen specialization
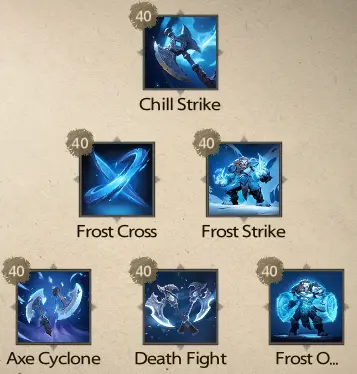
Chill Strike
Obtain 5 Frozen Runes, deal DMG equal to 76% of your ATK+140 to the target, and increase Physical DEF by 2.4%+70. Its effect is stackable and can recharge twice.
Frost Cross
Condense Chill and obtain 10 Frozen Runes to launch a ranged [Cross Slash], dealing DMG equal to 47% of your ATK+119 to the target and reducing the DMG equal to the target’s next attack against you by 5%. Can be recharged twice.
Frost Strike
Obtain 15 Frozen Runes, dealing DMG equal to 107% of your ATK+203 to the target, and granting 5% DMG Reduc to yourself. After 5sec, a HP Shield will be returned according to the number of Frozen Runes, up to 13% of Max HP+2744, lasting 10sec.
Axe Cyclone
Surround yourself with flying axes, dealing DMG twice every sec, inflicting a total damage equal to 48% of your ATK+91 to nearby enemies.
Death Fight
Increase Physical DEF by 8 and gain DMG Immunity effect for 203 sec. The lower the HP, the higher the DMG Immunity.
Frost Outbreak
Activate frost energy, improving Glancing Chance by 15%, increasing Glancing Effect by 10%, Physical DEF by 70, and Frozen Runes slowly for 8sec.
Skill Rotation
Frost Strike → Frost Cross → Chill Strike → Axe Cyclone
The reason why this is your main rotation is because Frost Cross reduces the cooldown of Frost Strike and Chill Strike reduces the cooldown on Frost Cross. Always cast in this order, but if the skill is on cooldown, cast the next one along. When all 3 skills are on cooldown use Axe Cyclone to increase your DPS output.
For AoE situations always start with Axe Cyclone and keep it active 100% of the time.
Death Fight and Frost Outbreak are defensive cooldowns, use them when taking high damage, Death Fight is good for big add pulls.
Tarisland Barbarian Fighter Stats
The Barbarian Fighter Tank in Tarisland is one of the best choices for players who enjoy a durable, high-survivability tank that can control the battlefield. This class thrives in both group PvE and solo play, offering strong defensive cooldowns, reliable sustain, and crowd-control abilities.
In this comprehensive build guide, we break down:
- Best skills and rotations for optimal tanking
- Recommended stats, gems, and gear to maximize survivability
- Key talents, inscribe nodes, and emblem selections for min-maxing performance
- Essential consumables and ultimate choices to enhance your build
Whether you’re new to Tarisland or refining your Barbarian Fighter Tank, this guide will help you master your role and dominate dungeons, raids, and elite content.

Tarisland Barbarian Fighter Gear
For optimal performance, aim to equip the Frozen set gear combined with the Sturdy set gear and the unique Badge. These items are obtained from Elite Raids or Arcane Realm Weekly Rewards. By using set gear, you’ll gain a range of additional stats and unique benefits that complement your aptitudes and attributes.
Make sure to:
- Fill all gem slots on your gear to maximize stats.
- Empower each piece to enhance its effectiveness.
- Use the Tempering system to transfer favorable aptitudes and stats from non-set gear onto your set gear.
- Combine 8 pieces of set gear from raids with 2 set pieces from the Arcane Realm weekly rewards and a unique Badge from Forest Gemini Elite.
- Utilize colourful gems in Red Gem slots to maximize tankiness.
| Piece | Set Gear | Enchanted Attribute | Gem / Empower |
|---|---|---|---|
| Helmet | Synthesis Doctor Elite | Stamina & Cooldown/Omni | Empower – Stamina |
| Shoulder Guards | Forest Gemini Elite | Glancing/Focus & Stamina | Empower – Strength |
| Armor | Ancient Tree Elite | Glancing/Focus & Stamina | Empower – Stamina |
| Belt | Archdruid Elite | Glancing/Focus & Stamina | Blue Gems – Stamina/Resilience |
| Greaves | Ancient Tree Elite | Glancing/Focus & Stamina | Empower – Stamina |
| Boots | Synthesis Doctor Elite | Stamina & Cooldown/Omni | Empower – Strength |
| Ring | Synthesis Doctor Elite / Arcane Realm Weekly Chest | Stamina & Cooldown/Omni | Red Gems – Strength |
| Necklace | Ancient Tree Elite / Arcane Realm Weekly Chest | Glancing/Focus & Stamina | Red Gems – Strength |
| Badge | Forest Gemini Elite → Archdruid Elite | Glancing/Focus & Stamina | N/A |
| Cape | Forest Gemini Elite | Glancing/Focus & Stamina | Blue Gems – Stamina/Resilience |
| Gauntlets | Merfolk Elite | Strength & Resilience | Blue Gems – Stamina/Resilience |
| Leather Gauntlets | Merfolk Elite | Stamina & Resilience | Empower – Strength |
| Accessories | Merfolk Elite / Arcane Realm Weekly Chest | Stamina & Resilience | Red Gems – Strength |
| Combat Axe | Shadow Witch Elite → Archdruid Elite | Glancing/Focus & Stamina | Yellow Gems – Glancing Empower – Focus |
Tarisland Barbarian Fighter Special Aptitude
Aim to have a Special Aptitude on all gear pieces. The most beneficial aptitudes enhance your short cooldown skills. For a Barbarian Fighter, prioritize aptitudes that boost Chill Strike, Frost Cross, and Frost Strike, as these skills are frequently used.
Special Aptitudes provide varying benefits depending on the gear piece they are on, allowing you to utilize one of each aptitude across your gear. They also stack, so you can use multiple of the same aptitude for added effect.
All Special Aptitudes offer some benefit, except for Storm Flying Axe. Avoid using this aptitude, as you won’t be utilizing that skill.
When you see the Special Aptitude mention “Echo of Destiny,” it refers to the Fatuina Echo, which is triggered via your Inscribe Stone system. Check the starting node for more information.
Special Aptitude 1
These are the available Special Aptitude for these gear slots: Leather Gauntlets, Chest and Ring.
- [Frost Strike]’s Shield Absorption +89/179; Triggering Echo of Destiny increases the Shield effect of the next Frost Strike by 47%
- [Death Fight]’s Physical DEF effect +365/730; Triggering Echo of Destiny increases the Physical DEF effect of the next [Death Fight] by 116%
- [Frost Cross] recovers 81/161 HP additionally; Triggering Echo of Destiny increases the DMG Reduction effect of the next [Frost Cross] by 70%.
- [Frost Strike]’s Shield Absorption +89/179
- [Death Fights]’s Physical DEF effect +365/730
- [Frost Outbreak]’s Glancing Rate +29/59 additionally
Special Aptitude 2
These are the available Special Aptitude for these gear slots: Accessories, Greaves, Helmet.
- [Chill Strike]’s Physical DEF effect +59/118; [Chill Strike]’s Physical DEF effect +32% during Echo of Destiny
- [Death Fight]’s Physical DEF effect +365/730; [Death Fight]’s Physical DEF effect +116% during Echo of Destiny
- [Frost Cross] recovers 81 HP additionally; [Frost Cross]’s DMG Reduction effect +20% during Echo of Destiny
- [Chill Strike]’s Physical DEF effect +59/118
- [Frost Strike]’s Shield effect +89/179
- [Death Fight]’s Physical DEF effect +365/730
Special Aptitude 3
These are the available Special Aptitude for these gear slots: Shoulder Guards, Ring and Belt.
- [Frost Strike]’s Shield effect +89/179; Each time Echo of Destiny is gained there is a 30% chance to increases the Shield effect of the next [Frost Strike] by 157%
- [Frost Cross] recovers 81/161 HP additionally; Each time Echo of Destiny is gained there is a 30% chance to increases the DMG Reduction effect of the next [Frost Cross] by 240%.
- [Chill Strike]’s Physical DEF effect +59/118
- [Frost Strike]’s Shield effect +89/179
- [Death Fights]’s Physical DEF effect +365/730
Special Aptitude 4
These are the available Special Aptitude for Weapons, Gauntlets, Necklace, Boots and Badge.
- [Chill Strike]’s Physical DEF effect +59/118; 9% chance [stackable] to increase Echo Recharge by 1
- [Frost Strike]’s Shield Absorption +89/179; 15% chance [stackable] to increase Echo Recharge by 1
- [Frost Cross] recovers 81/161 HP additionally; 17% chance [stackable] to increase Echo Recharge by 1
- [Chill Strike]’s Physical DEF effect +59/118
- [Frost Strike]’s Shield Absorption +89/179
- [Death Fight]’s Physical DEF effect +365/730
Tarisland Barbarian Fighter Talents
Tarisland Barbarian Fighter Inscribe Stone
Emblems
- Warlike Surge
- Barrierguard
- High Energy Potion
- Reversal / Steelbone
- Potential
Each emblem in Tarisland has randomly generated (RNG) perks that you gain as you upgrade your emblem. Some perks, like +12 Stamina or +1 ATT, are not very beneficial, so you might need to upgrade multiple emblems of the same type to get a “good” one.
Key Perks to Focus On:
- +50% Stat Increases: This perk boosts a nearby Stat node by 50%, significantly enhancing your overall stats.
- +1 Emblem Level: This increases the power of the emblem by 1, making your emblem more effective.
To maximise your build, aim to upgrade emblems that have only these two types of bonuses. By focusing on these perks, you can ensure that your tank build is as powerful and efficient as possible.
Nodes
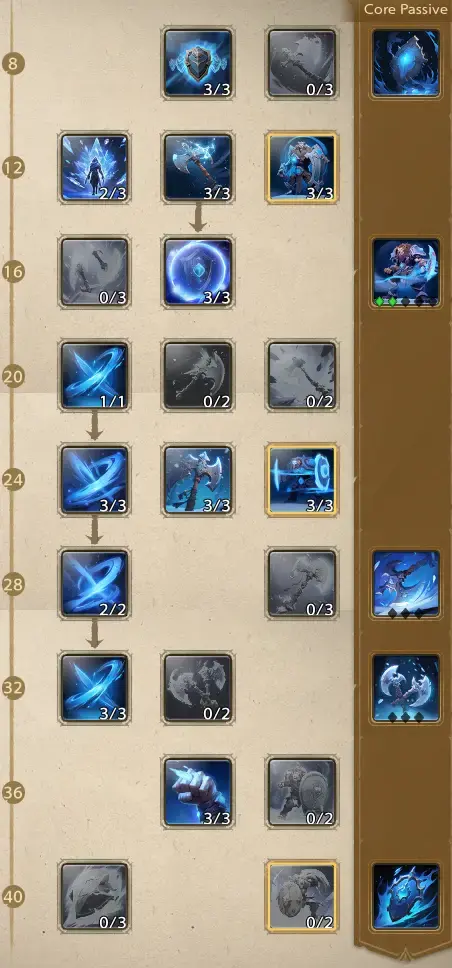
When selecting nodes for your inscribe stone system, start by placing just one point into each node to advance further upwards. This approach is more efficient since the first point in a node provides more stats compared to the second and third points.
Focus on progressing up one side of the inscribe system, prioritizing essential stats such as:
- Stamina
- Cooldown
- Focus
- Main Attributes
- Specialization Attributes & Effects
- Unlocking emblem slots
The first priority is unlocking all 5 emblem slots. Ensure that your emblems are levelled up, as they become significantly more powerful at higher levels, with a maximum level of 10. This strategy will help you maximize your build’s effectiveness early on.
Once you’ve unlocked all emblem slots, focus on unlocking your Core nodes as these enhance your Fatuina Echo, offering strong benefits. Afterward, pick up other useful nodes but pay close attention to nodes with bonuses such as +50%; increase these to level 2 or 3 as well as the Specialization Attribute nodes.
Enhancing the nodes around your Core nodes will increase the Core level so do that next. Finally just fill in the nodes that provide other useful stats.
Tarisland Barbarian Fighter Ultimates
- Mockery – Single target taunt skill, good for grabbing bosses at the start of a fight.
- Contempt – AoE taunt skill, good for AoE aggro in harder content but worth dropping if you need a different Ultimate in dungeons.
- Slam – Interrupts enemies, mostly needed for specific boss fights where a boss has an interruptible mechanic.
- Beast Sprint – Although not exactly useful for Tanking, it helps you to stay ahead of your group which is idea for clumping during add pulls.
Tarisland Barbarian Fighter Consumables
- Potions – Always have the highest level potions you can use available to top up your health after a big hit from a boss
- Burst Potions – Use the Shield burst potions to increase Glancing and Physical DEF
- Fish – Fish gained by fishing offer increased stats or other benefits such as life leach and damage shield. Use these before starting a raid as the effect usually have a long duration.
- Food – Food obtained from the Food Festival provides some strong buffs
- Sea Food Flavoured Beef Soup: +Glancing
- Fish Stew with Eggs: +Defence
- Sour Wild Wolf Soup: +HP
- Premium Stew: Group Buff +Glancing, Defence & HP


