The Ultimate New World Tank Build
Welcome to The Tank Club: New World Tank Build! This is a Tank Build designed for completing PvE content in the New World MMO as a Tank and can be used for completing the hardest content including Mutated level 3 expeditions. For a more Beginner friendly setup take a look at the New World Beginner Tank Build.
Table of Contents
New World Tank Build Introduction
For a more Beginner friendly setup take a look at the New World Beginner Tank Build.
There are many ways to Tank in New World with a variety of gear, weapon and ability options. In this guide you’ll find information on some of the most effective Tank setups for completing New World content.
New World Tank Build Attributes
The ideal setup for most PvE tanks is 300 Constitution (CON) with remaining points in Strength (STR).
- 300 CON grants Grit on Heavy Attacks, helping you avoid being staggered and maintain position, particularly useful as Tanks must Light and Heavy Attacks regularly for Stamina sustain due to the difficulty of maintaining a permanent block in New World. Though Grit has been removed from Light Attacks, it remains valuable for cooldown reduction on abilities through the Refreshing Move weapon perk.
- Magnify – Set your desired stat focus on the Attributes screen with the Magnify perk before allocating points to maximize its effect.
Attribute Breakdown:
- STR – Increases damage for most Tank weapons, aiding in Threat generation and Aggro control.
- DEX – Beneficial for tanks using Spear or Greatsword, as it boosts damage and specific perks.
- FOC – Enhances the Flail’s healing abilities with Cleric skills, providing reduced cooldowns and increased incoming healing.
- CON – Adds max health, armor, grit, and reduced incoming damage, supporting tank durability.
To maximize attributes, you’ll need to reach level 65, utilize stat-buffing food, and equip max-level gear.
| Beginner Tank | General Tank | Great Sword/Spear Tank | Experienced Tank |
|---|---|---|---|
|
|
|
|
*Put remaining points into Strength
New World Tank Build Weapons
Best PvE Tank Weapon Combinations:
- Sword & Shield + War Hammer – Ideal for general tanking and pulling adds.
- Sword & Shield + Spear – Best for focused boss fights.
- Flail & Shield + War Hammer/Spear – An alternative to Sword, though not necessarily stronger.
- Greatsword + Spear/War Hammer – Suited to experienced tanks, offering higher DPS but requiring skill to use effectively.
Primary Weapon Insights:
- Sword & Shield remains the safest and most reliable PvE tank weapon, providing strong damage reduction and higher DPS than the Flail. Choosing the Leadership perk adds passive group-wide damage boosts.
- War Hammer excels in add pulls, offering Rend, Weaken, and multiple Crowd Control options, making it invaluable for group utility and AoE damage.
- Spear shines in boss fights, delivering excellent DPS, Rend, and Weaken, though frequent dodging is required. Spear use is less essential if another group member has one.
- Flail & Shield is a newer option and can replace Sword & Shield as the primary tank weapon. It pairs well with War Hammer for general use or with Spear for boss fights.
- Greatsword is challenging yet rewarding for advanced tanks, providing enhanced group DPS. It works well with War Hammer for managing adds and with Spear for boss fights, though it requires speccing into Dexterity for optimal effectiveness.
Additional Tanking Weapons:
- Great Axe – Useful for groups lacking clumping control, though typically used by DPS.
- Hatchet – Beginner-friendly, with an anti-death passive.
- Ice Gauntlet – An unconventional tank option with defensive capabilities, range, and CC, occasionally used in niche or boss scenarios.
- Rapier – A high-DPS choice for optimized groups, requiring kiting and frequent dodging, suitable for highly skilled tanks.
New World Sword Tank Build
Sword & Shield
Main-hand Weapon
Gem:
Weapon Perks:
Best Named Swords:
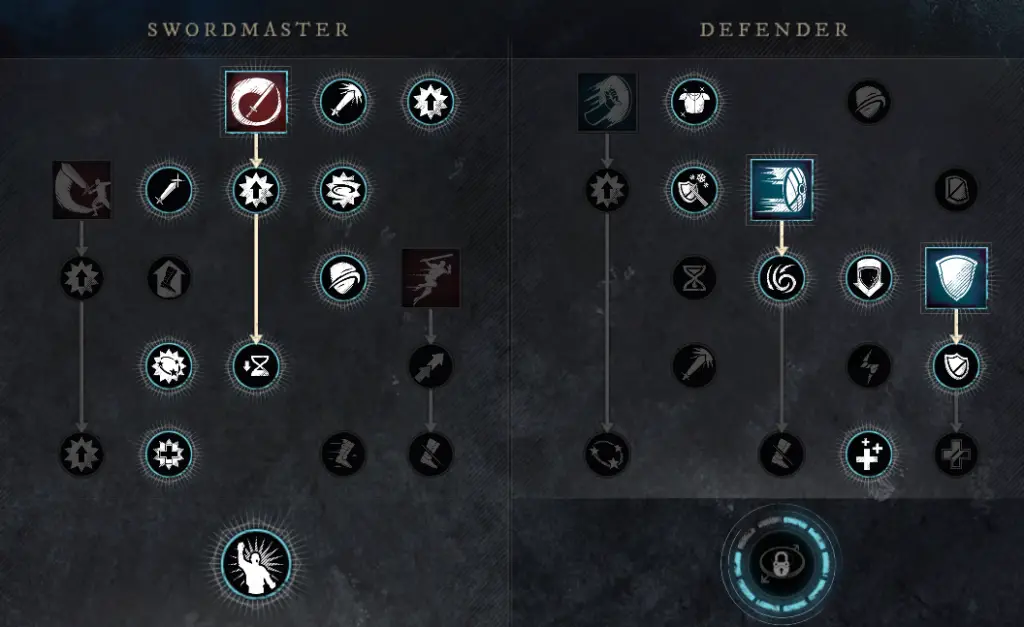
Whirling Blade
Quickly spin around while extending the sword out, dealing two hits of 80% weapon damage to all foes within 3m.
Cooldown: 15 seconds
Shield Rush
Rush forward 5m, staggering and pushing back foes. This attack deals 100% weapon damage.
This ability has grit. (Grit prevents you from being staggered by incoming attacks.)
Cooldown: 20 seconds
Defender’s Resolve
For 8s, reduce the incoming base damage from attackers by 30% and reduces the attacker’s stamina damage while blocking by 20%.
This ability has grit. (Grit prevents you from being staggered by incoming attacks.)
Taunt Gem Compatible: If you have a Carnelian gem equipped in your sword, this ability inflicts taunt for 8s taunt to all enemies within 8m. (Taunt causes monsters to focus only on you.)
Cooldown: 35 seconds
Sword Info & Rotation
Sword and Shield is an excellent weapon choice for Tanking in New World and should be the main hand weapon of choice for the majority of players. You have access to taunt skills plus a lot of defensive benefits. For a more beginner friendly option check out our New World Beginner Tank Build.
This is an Offensive setup where the Leadership buff is given to group members granting them Empower increased damage by 10%.
It’s essential to make sure you have a good setup when using the Sword and Shield. This would include a Tower Shield with Fortifying Shield Rush perk and an Amulet with the Fortified perk, this will buff your survival massively making you close to immortal.
Ability Priority: Shield Rush, Defenders Resolve, Whirling Blade.
Example Rotation
- Instigate combat with Shield Rush this is because you will generate a good amount of initial threat and also proc your Fortifying Shield Rush perk on your shield to make you very defensively strong.
- Next use Defenders Resolve to Taunt all enemies in the surrounding area but to also further buff your defence and incoming healing.
- Finally use Whirling Blade when all enemies are stacked in to apply Rend.
- Light Attack as much as possible, when doing so your cooldowns get reduced due to the Refreshing Move perk which will be essential for your ability uptimes, survival, you’ll also have better Stamina sustain for Blocking and Dodging.
- Cast Shield Rush as often as possible, every time you use it you Weaken the enemies by 20% for 10 seconds and you gain fortify which buffs your armor by 35% for 6 seconds.
- Cash Whirling Blade as often as possible to maintain the Rend debuff.
- Ensure not to block permanently, each time you block an attack remember “Heavy After A Heavy” – when you block a hit, do a heavy attack back to the boss which helps you regain stamina.
New World War Hammer Tank Build
War Hammer
Off-hand Weapon
Gem:
Weapon Perks:
Best Named War Hammer:
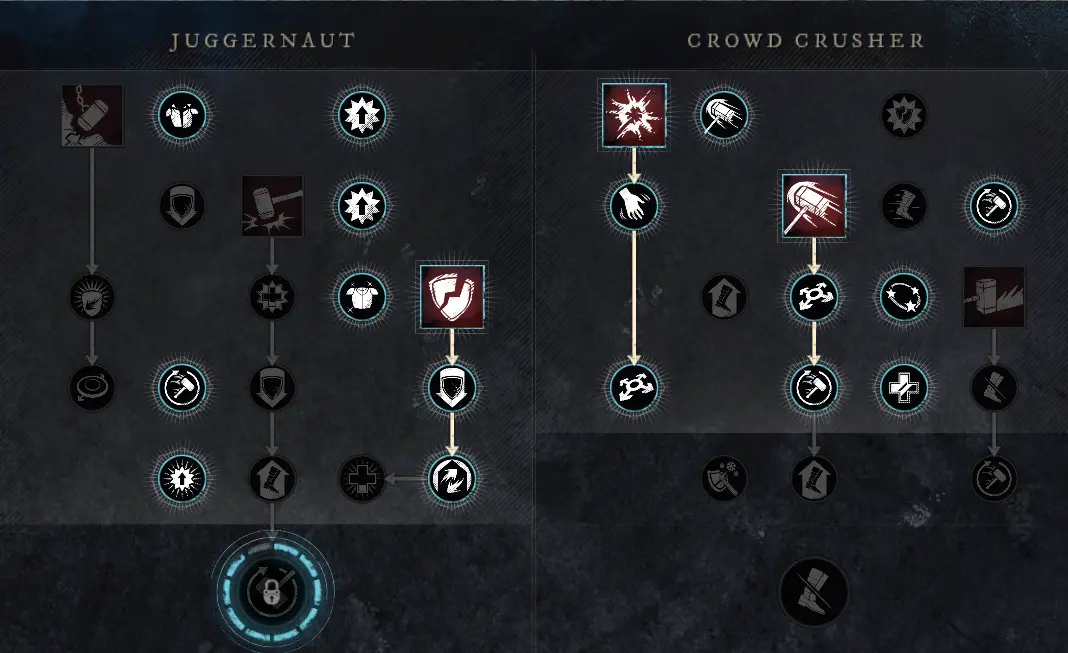
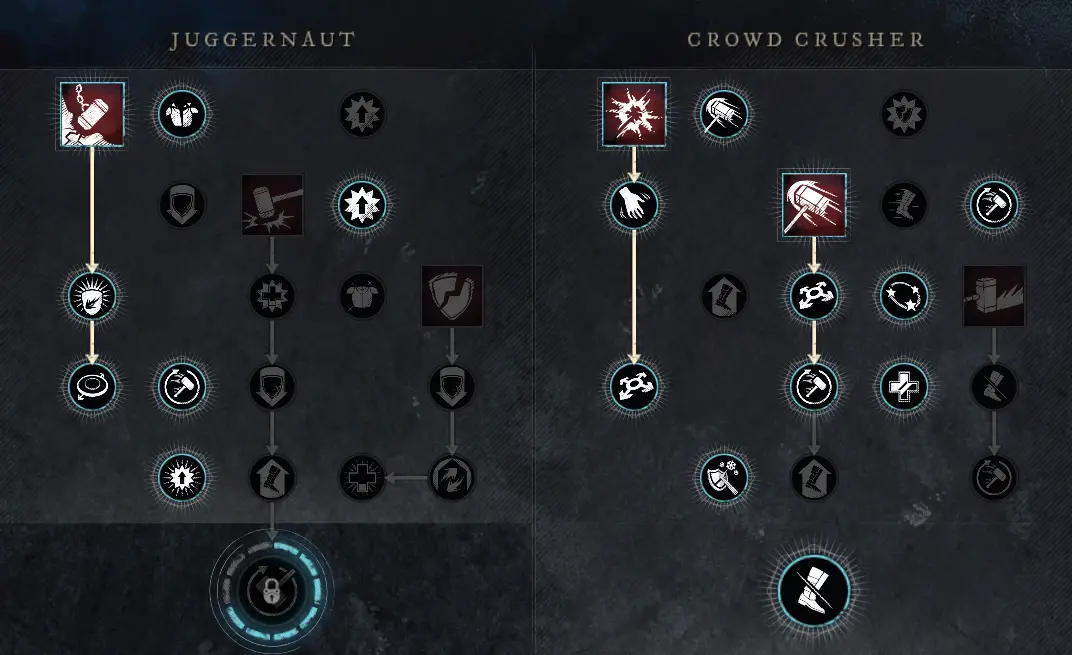
Armor Breaker
A powerful swing that penetrates 35% of the target’s armor and deals 160% weapon damage.
Cooldown: 12 seconds
Shockwave
Slam your war hammer into the ground, causing a 3m radius earthquake that deals 60% weapon damage, staggering and stunning all impacted targets for 2s.
This ability has grit. (Grit prevents you from being staggered by incoming attacks.)
Taunt Gem Compatible: If you have a Carnelian gem equipped in your war hammer, this ability inflicts taunt for 6s to all enemies hit. (Taunt causes monsters to focus only on you.)
Cooldown: 20 seconds
Clear Out
A wide swing that knocks back targets 4m and deals 100% weapon damage.
This ability has grit. (Grit prevents you from being staggered by incoming attacks.)
Cooldown: 15 seconds
War Hammer Info & Rotation
War Hammer is the best general secondary weapon for Tanks in New World, especially for add pulls. In niche situations you might use Great Axe but this should usually be used by a DPS. When fighting bosses it can be replaced for a Spear, especially if your group are missing a Spear user.
If you have a group member using a Spear, then you won’t need to use the Armor Breaker ability because Rend will be covered so use Wrecking Ball instead.
This weapon is an absolute monster for add pulls due to the crowd control benefits and the ability to apply Area of Effect Rend and Weaken debuffs to the enemy.
It’s also generally a good Tank weapon due to the survival and sustain on offer via the Warhammer passives.
War Hammer rotation:
- Run into an add pull and use Clear Out to crowd control enemies and apply Sundering Clear Out, this also provides your group with Fortify.
- Light Attack to proc the Acceleration passive
- Next use Shockwave this will combine an AoE taunt, stagger, stun, Weaken and Rend all into one fantastic skill. Ideally have the Sundering Shockwave perk on one armor piece.
- Light Attack to reduce ability cooldowns.
- To keep control of the enemies use Wrecking Ball which smashes them all into the ground to keep them in place longer and buffs you up with Fortify.
- Use Armor Breaker once enemies are stacked and CC’ed if you’re using this skill to apply another Rend debuff source.
- Light Attack between every skill cast to proc the Acceleration passive, this is vital so you can use Crowd Control abilities to keep enemies endlessly stuck on the spot.
- On boss fights use Heavy Attacks to benefit from passives that increase your damage.
New World Spear Tank Build
Spear
Off-hand Weapon
Gem:
Weapon Perks:
Best Named Spear:
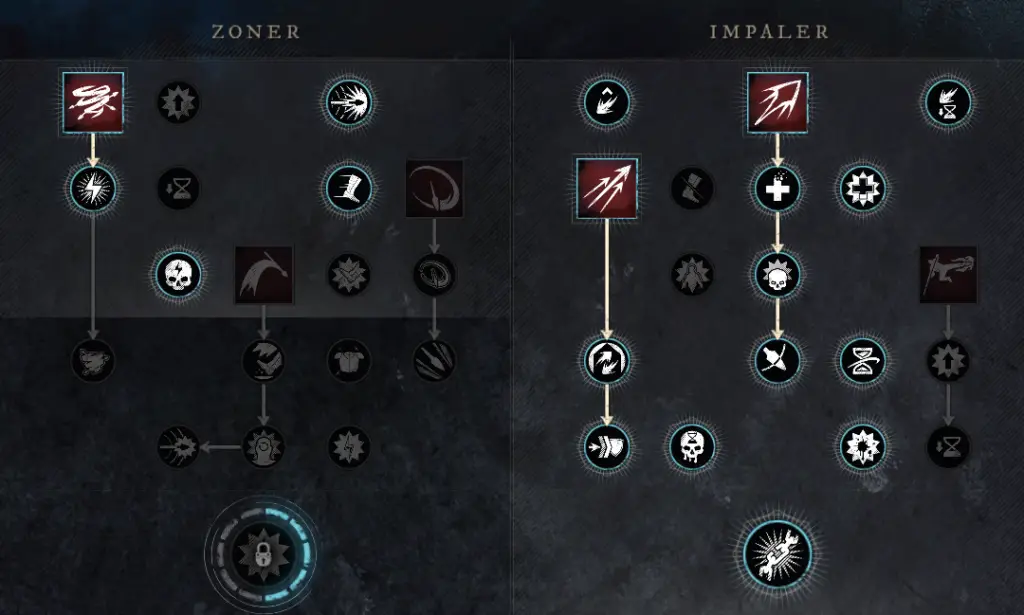
Cyclone
Perform a spin attack that deals 165% weapon damage to targets within a 3m radius, and applies a 30% slow for 3s. This ability has grit.
(Slow reduces target’s movement speed.)
(Grit prevents you from being staggered by incoming attacks.)
Taunt Gem Compatible: If you have a Carnelian gem equipped in your spear, hits with this ability inflict taunt for 2s. (Taunt causes monsters to focus only on you.)
Cooldown: 12 seconds
Perforate
Execute 3 quick piercing strikes that each deal 80% weapon damage and inflict the target with 5% rend for 10s. (Max 3 stacks.)
(Rend reduces target’s armor.)
Perforate can be block/dodge cancelled after the 2nd attack.
Cooldown: 12 seconds
Skewer
Rush forward and skewer your target, dealing 125% weapon damage and applying bleed. Bleed deals 20% weapon damage every 1s for 10s.
Cooldown: 15 seconds
Spear Info & Rotation
Spear is a really strong weapon for Tanks especially on Boss fight.
They are not as useful however if you have one other people in your group using one. If you can use one then you have access to great DPS and good group benefits.
You would only typically use a Spear on boss fights and maintain using a War Hammer during add pulls, due to the fact the War Hammer is great for Crowd Control and the spear is not.
Spear is highly reliant on you being a Damage focussed Tank. Everything in this build revolves around debuffing the enemy, applying Bleed, Critical hit as much as possible, and dodge frequently. Combining all of these things helps to increase DPS but also helps with sustain, increases uptimes on debuffs, reduced your Spear cooldowns.
The way you maximise your Spear:
- Activate Skewer to leap into the fight and apply a Bleed to the enemy, it also procs the Enfeebling Skewer debuff which applies a huge Weaken.
- Use Cyclone on cooldown for the AoE Slow, Taunt and Stamina regen.
- Hit the enemies with Perforate to apply Rend and Weaken to the enemy.
- Dodge Backwards to avoid hits as its cheaper and follow up immediately with an attack to reduce cooldowns.
- Light Attacks do increased damage and the 2nd Light Attack in a chain will reduce cooldowns.
- Reapply Perforate on cooldown to maintain Rend and Weaken, by doing a Critical Hit this extends their duration by 20%.
New World Flail Tank Build
Flail & Shield
Main-hand Weapon
Gem:
Weapon Perks:
Best Named Flail:
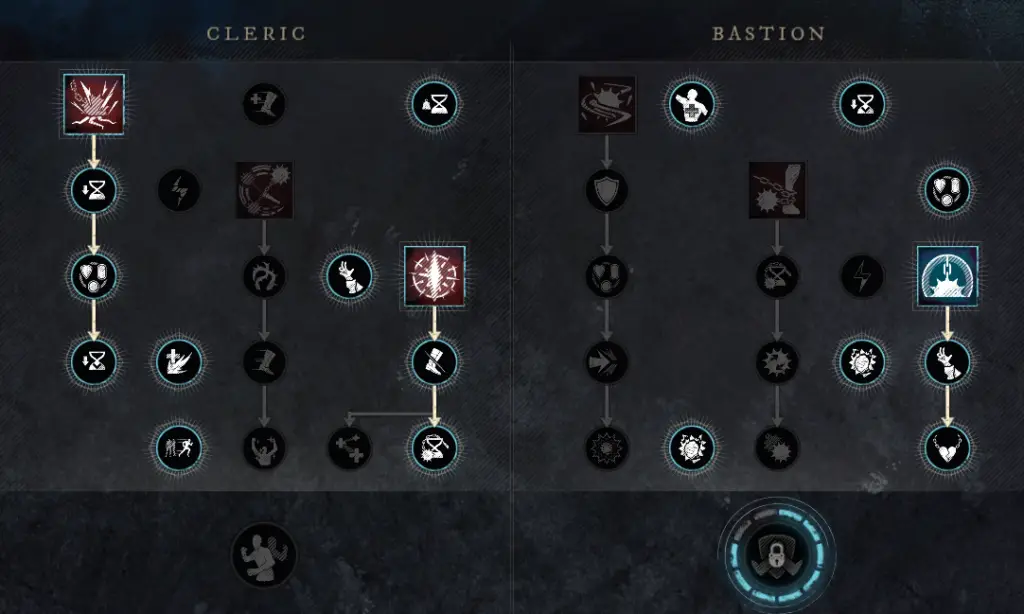
Arcane Smite
Leap forward and strike the ground with arcane force dealing 130% weapon damage to all targets within 2.7m of the impact.
Leave behind a hazardous area at the impact point that inflicts a stack of Impairment for 6s to all targets that enter.
Impairment deals 10%weapon damage per second and inflicts weaken, reducing their base damage by 10%. (Max 3 stacks)
This ability has grit. (Grit prevents you from being staggered by incoming attacks.)
Cooldown: 18 seconds
Arcane Eruption
Drag the head of the flail against the ground causing an eruption of arcane energy in front of the player, dealing 120% weapon damage and inflicting two stacks of Impairment for 6s to all targets hit.
Automatically follow up with an additional melee attack that deals 150% weapon damage.
Impairment deals 10% weapon damage per second and inflicts weaken, reducing their base damage by 10%. (Max 3 stacks)
Cooldown: 16 seconds
Warding Bludgeon
Perform a spinning leap then swing the flail down to strike targets, dealing 100% weapon damage.
While leaping, trigger a burst of energy, granting a reinforced fortify to self and all allies within 3m of player, increasing armor by 50% for 8s or until 3 hits are taken.
This ability has grit. (Grit prevents you from being staggered by incoming attacks.)
Taunt Gem Compatible: If you have a Carnelian gem equipped in your Flail, this ability inflicts taunt for 8s to all enemies within 8m. (Taunt causes monsters to focus only on you.)
Cooldown: 22 seconds
Flail Info & Rotation
Flail and Shield is a good weapon choice for Tanking in New World and should be used as a main hand weapon. You have access to taunt skills plus a lot of weakening application to the enemy, damage reduction, group damage buffs and passive healing.
The Cleric skills seem much more useful than the Bastion abilities so we have options for both, but Cleric abilities scale with Focus meaning you get less healing and damage from them if you don’t have any points into Focus.
Example Rotation:
- Use Arcane Smite to gap close and place down the AoE, it will to apply an Impairment stack, apply Deflecting Frailty and 10% lifesteal to your group and give you another source of fortify.
- Heavy attack again with 3s to gain an Impairment stack (weaken).
- Use Warding Bludgeon to apply an AoE Taunt while also giving yourself reinforced fortify, buffing a nearby ally and applying more Impairment stacks.
- Heavy attack again with 3s to gain an Impairment stack (weaken).
- Activate Arcane Eruption to apply 2 impairments stacks and do a follow up attack to do increase damage and extend the enemies debuff durations.
- Ensure not to block permanently, each time you block an attack remember “Heavy After A Heavy” – when you block a hit, do a heavy attack back to the boss which helps you regain stamina.
- Regular Light Attacks are essential to reduce cooldowns via the Refreshing Move weapon perk which allows you to recast abilities more often.
Outside of this rotation of abilities and heavy attacks you don’t really have much incentive to stay on this weapon – you gain benefits by blocking or being hit so your best bet is to run through abilities on both weapons, focus on being active with your other weapon and when you need to turtle up and take damage or you are on low health, make sure you are on your Flail.
New World Greatsword Tank Build
Greatsword
Main-hand Weapon
Gem:
Weapon Perks:
Best Named Greatsword
- Serenity (Artifact)
- Other Greatswords: Tank Gear Guide
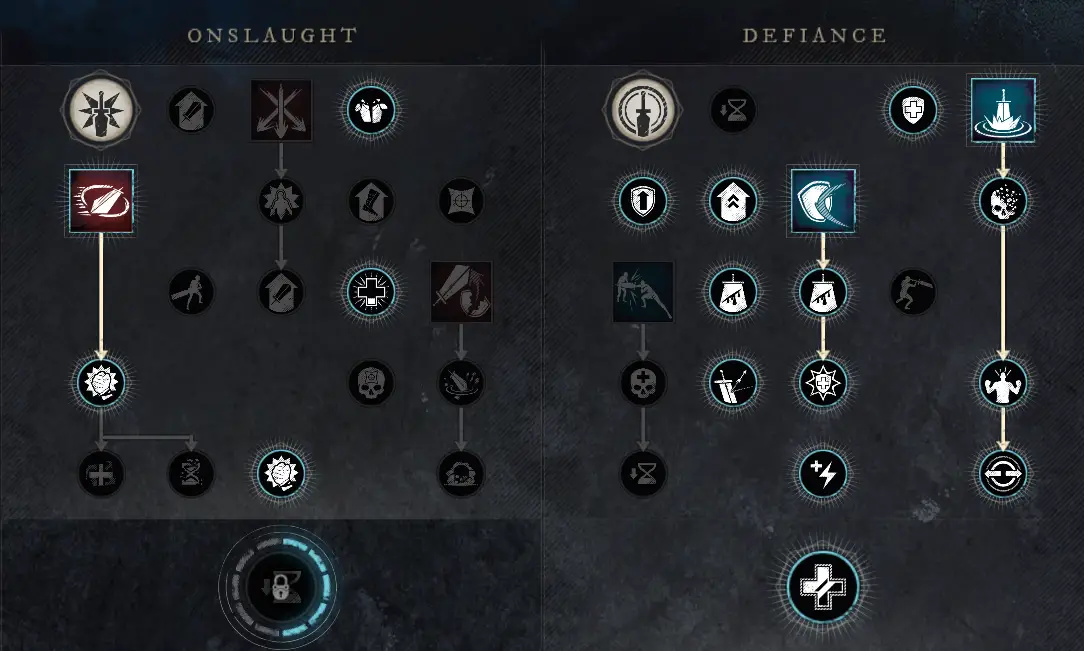
Relentless Rush
Dash through foes while spinning and apply a 20% slow for 4s on hit.
First Hit: 110% weapon damage.
Second Hit: 120% weapon damage. (This attack cannot backstab.)
Enter onslaught stance when this ability ends.
Cooldown: 20 seconds
Calamity Counter
Block for 2s while reducing block stamina damage taken by 90%, then unleash a counterattack that strikes all foes within a 4m radius.
• No Blocks: 80% weapon damage.
• 1 Block: 80% weapon damage and staggers.
• 2 Blocks: 80% weapon damage and staggers longer.
• 3 Blocks: 80% weapon damage and causes a knockback.
This ability has grit. (Grit prevents you from being staggered by incoming attacks.)
Reactivate this ability or use light attack to counterattack earlier.
Enter defiant stance when the counterattack of this ability ends.
Taunt Gem Compatible: If you have a Carnelian gem equipped in your greatsword, activating this ability inflicts taunt for 8s to all enemies within 8m. (Taunt causes monsters to focus only on you.)
Cooldown: 20 seconds
Roaring Rupture
Stab the ground and send out a shockwave with a 4m radius that deals 120% weapon damage. Gain 8% fortify for 5s for each foe hit. (Max 3 stacks.)
This ability generates 200% threat and has grit. (Grit prevents you from being staggered by incoming attacks.)
Enter defiant stance when this ability ends.
Taunt Gem Compatible: If you have a Carnelian gem equipped in your greatsword, this ability inflicts taunt for 8s to all enemies hit. (Taunt causes monsters to focus only on you.)
Cooldown: 20 seconds
Greatsword Info & Rotation
Greatsword is an alternative Main-hand weapon that you use in place of Sword or Flail and Shield to deliver more DPS. It’s requires much more effort and is better used by an experienced Tank.
By using Greatsword you also get access to additional sources of Rend and Weaken on your Main Hand weapon which should help to maintain higher uptimes on those debuffs, you also gain a good increase in DPS. The downside is it can be hard to manage your Stamina and you take increased damage compared to the Sword and Shield and its generally harder to use because your intention is to play more Offensively.
You’ll likely need to change Attributes to support the use of a Greatsword which also contributed to making the survival more challenging which is the sacrifice that’s made to output more damage.
Maximising the Greatsword:
- Use Relentless Rush for positioning and moving quickly into fights and for outputting DPS.
- Apply Weaken to enemies with your Roaring Rupture which also generates a lot of threat, taunts and applied a stacking Fortify buff to you.
- Calamity Counter also gives you an additional taunt but the passives on this are the strong point with the Bleed application and the Critical Calamity passive providing some nice benefits.
- Inflict Rend on the enemy by maintain your Faultless Defender passive. To do this you need the Guard Point buff which is obtained when you have the Defiance Stance active. You then need to charge up Heavy Attacks and be hit, the Guard Point buff will block attacks and then proc the Faultless Defender passive.
- Dodge to activate Empower and make sure to perform regular Heavy Attacks.
New World Great Axe Tank Build
Great Axe
Main-hand Weapon
Gem:
Weapon Perks:
Best Named Great Axe:
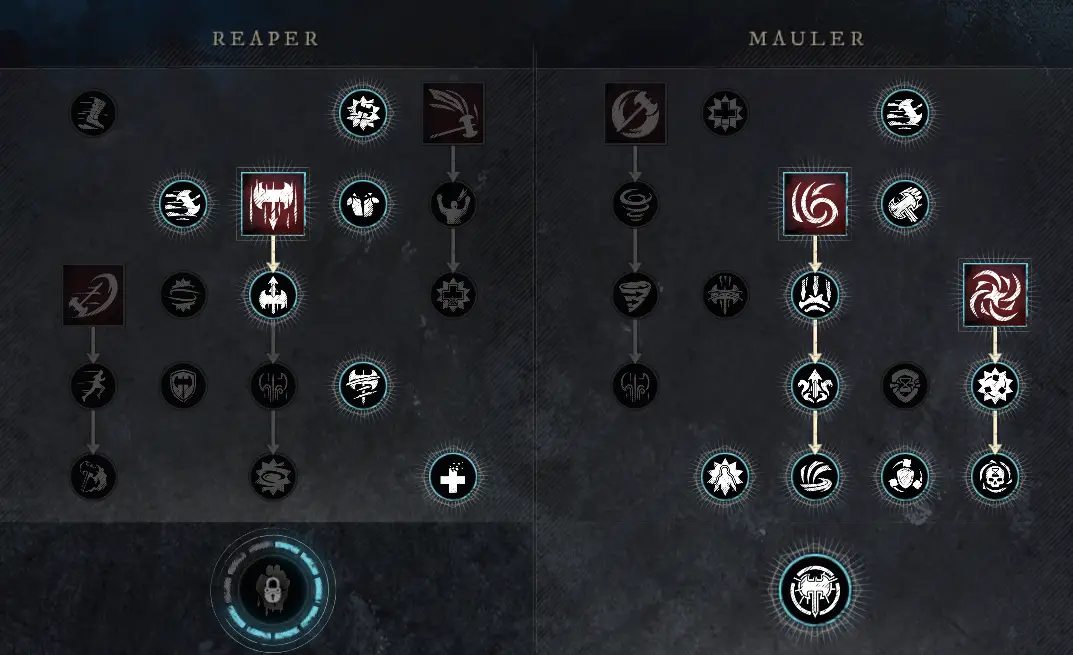
Reap
Extend your axe 5m, pulling foes to you and dealing 80% weapon damage and staggering struck foes.
Taunt Gem Compatible: If you have a Carnelian gem equipped in your great axe, this ability inflicts taunt for 4s when it hits. (Taunt causes monsters to focus only on you.)
Cooldown: 18 seconds
Maelstrom
Perform a fast, spinning attack that pulls targets within a 2.5m radius closer to you. Deals 110% weapon damage.
Taunt Gem Compatible: If you have a Carnelian gem equipped in your great axe, hits with this ability inflicts taunt for 4s. (Taunt causes monsters to focus only on you.)
Cooldown: 20 seconds
Gravity Well
An upward swing dealing 25% weapon damage and projecting a powerful tear in reality that creates a vortex up to 10m away. The vortex pulls foes within 4m to its centre and roots them for 1s.
Foes within the vortex have their movement speed is reduced by 60% due to the intense gravity.
The collapsing vortex ends after 3s with a damaging burst dealing 100% weapon damage.
Cooldown: 30 seconds
Great Axe Info & Rotation
The way you play a Great Axe Tank is not complicated. You use this weapon on add pulls only and you use your three abilities Reap, Gravity Well and Maelstrom to stack up enemies so your group can burn them down and kill as fast as possible.
New World Tank Build Gear
New World Tank Build Gear Perks
See More: New World Tank Gear Guide
For your gear you want to run Heavy Armor to achieve a Heavy Equip Load.
When you are experienced and have an organised group, using Light or Medium is also an option for advanced Tanking for score pushing and doing more DPS.
Best in Slot “BiS” gear will include perks that buff your weapon abilities such as Contagious Reverse Stab, Leeching Cyclone and Relentless Freedom. These are combined with both the Refreshing and/or Health perk. You can only use max 4 Refreshing perks.
Other useful gear perks include:
Protection perks are also very useful. To find out which Protection perks you need for each Expedition and each Boss, take a look at the New World Ward And Protection Article
Armor Perks
These are the perks you need to use on your Armor pieces depending on which weapon you are using. These perks will buff up your weapon abilities to give them more functions which is essential for endgame Tanking.
| Weapon Equipped | Armor Gem | Weapon Perk Used on Gear |
|---|---|---|
| Flail | Opal / Onyx | |
| Sword | Opal / Onyx |
|
| War Hammer | Opal / Onyx |
|
| Greatsword | Opal / Onyx |
|
| Spear | Opal / Onyx |
|
Other Gear Perks
For the rest of your gear you can focus on other various details to improve your build.
Protection Perks should be used on Shields and Amulets
These are particularly useful to have and you can match them against specific Mutation types and Boss Damage types to reduce incoming damage. Check out the Wards and Protection Article to see which of the perks you need for every boss and mutation in New World. The most useful are Slash Protection, Strike Protection, Flame Protection and Void Protection.
Tower Shield must have Fortifying Shield Rush if you’re using a Sword & Shield build to play this build most effectively, Shield Defence and Sturdy are also very good.
Amulets must have a Protection Perk then Health. Fortified is the best when using Fortifying Shield Rush if not then Divine is great.
Earring must have Refreshing Toast to reduce the cooldown of all of your potions.
Ring must have Hearty to give you more Max Stamina for more blocking/dodging, Enfeebling is also really good especially with a Flail.
| Item Equipped | Attributes | Gem | Perk 1 | Perk 2 | Perk 3 |
|---|---|---|---|---|---|
| Tower Shield | CON / STR / DEX | Opal |
| Shield Defense | Sturdy, Sturdy Energy |
| Amulet | CON / STR / DEX | Mutation Specific |
| Health | |
| Earring | CON / STR / DEX | Opal | Refreshing Toast | Nimble | |
| Ring | CON / STR / DEX | Opal | Hearty | Leeching |
New World Tank Build Heartrune
There are a few great Heartrunes to use with your Tank build for PvE.
Generally, the Brutal Grasping Vines is the best in slot Heartrune but mostly for add pulls since it offers group utility and benefits.
When you reach bosses the Stalwart or Greater Stoneform Heartrunes are very useful.
Read more: Best PvE Tank Heartrunes

Summon vines around you that deal 100% heartrune damage and root enemies within a 4m radius for 3s.
250 Base Damage
10.0% Critical Hit Chance
1.30 Critical Damage Multiplier
30.0 Block Stamina Damage
5.0 Stagger Damage
Enfeebling Vines: Inflicts Weaken on successful hits, reducing the target’s damage by 20% for 8s.
Rending Vines: Inflicts Rend on successful hits, reducing the target’s damage absorption by 20% for 5s but also reducing your stamina regeneration by 50% for 5s.

Harden yourself with layers of stone, cleansing all crowd control debuffs and granting immunity to both stagger and crowd control debuffs for 5s.
150 Base Damage
10.0% Critical Hit Chance
1.30 Critical Damage Multiplier
50.0 Block Stamina Damage
5.0 Stagger Damage
Fortifying Form: Damage absorption is increased by 10% while active.
Mending Form: Heal for 75% heartrune damage per second while active but outgoing damage is reduced by 20%.
New World Tank Build Consumables
To maximise your ability as a Tank you’ll want to use a range of consumables that give you a number of different boosts.
Most of the consumables benefit your damage, even as a newer Tank you should at least be using the Minor house Trophies since that’s 9% more damage to a certain enemy type depending on the Expedition and they are very cheap to buy.
Using Weapon Coating and Honing Stones are also good damage increases and pretty cheap options even when using lower graded items, it’s still extra damage.
With potions you should have Health Potions, Regeneration Potions and Ward Potions all slotted as you can use them all at the same time since they do not share a cooldown.
Incense is also good to use, Oakflesh Balm and Gemstone Dust are less important and it’s good to carry a few to use if they are needed but this is not always the case. See more about New World Damage Absorption
Use whichever food is relevant to your individual needs based upon your gear and attribute distribution.
- Infused Health Potion – should be used for an emergency boost to your Health
- Infused Regeneration Potion – should be used to keep you with a ticking amount of incoming healing.
- Infused Ward Potion: Ancient, Angry Earth, Beast, Corrupted, Human, Lost – these reduce your damage to a specific enemy type, look at our Ward & Protection Guide to see which potions to use in which content. Once you know this, you use a potion at the start of an expedition and you are protected to that enemy damage type for 40 minutes.
Recent changes to potions makes Healing and Regeneration potions share a cooldown. Use Ward Potion all at the same time and you should do this to keep yourself alive.
Coatings are applied to your weapon to increase the damage you do to a specific enemy type. You can find a full list of enemy types for each expedition on our Ward & Protection Guide.
The reason you need to use coating is because you apply it once to your weapon at the start of an expedition and then you do increased damage to the enemy. By increasing your damage you will have a much easier time maintaining aggro while also killing enemies faster and the extra damage will stack with the damage gained from Honing Stones and Combat Trophies in your houses.
Use a Honing Stone at the start of any expedition to give you increased damage throughout which is necessary to help you generate threat and maintain aggro of enemies. There is no reason not to use one even as a Tank since its easy additional extra damage and even if you can’t afford to buy or craft the powerful version, using any Honing Stone is worth it for the additional damage.
You can place 1 of each trophy per house and you can own 3 houses.
Use either Ancients, Angry Earth, Beast, Corrupted, Human or Lost trophies depending on the enemy type in the Expedition you are doing.
There is no reason not to use trophies to boost your damage because it’s free damage, even just using the Minor trophies is worth it because that is 9% increased damage and they are extremely cheap to buy and you’ll obtain them fairly easily from each specific enemy type.
Incense is a good way to increase your overall resistance to afflictions so use them to assist you with reducing incoming damage. These are long lasting benefits of up to 50 minutes with Powerful Incense so it will help you to reduce damage to things such as Poison, Disease, Bleed, Frostbite, Curse and Blight.
When you are dealing with physical damage, using Oakflesh Balm can be used to give you increase absorption to physical damage types. The main problem is they have a really short duration time so you would need to use them in a controlled and timed way to benefit from the properly. The most effective use of these would be when you are against bosses that do Strike, Slash or Thrust damage.
When you are dealing with elemental damage, using Gemstone Dust can be used to give you increase absorption to elemental damage types. The main problem is they have a really short duration time so you would need to use them in a controlled and timed way to benefit from the properly. The most effective use of these would be when you are against bosses that do Acid, Arcane, Fire, Lightning, Void, Nature or Ice damage.


