










Main Tanking in ESO is fundamentally different from dungeon tanking. In a 12-player trial, the Main Tank handles the primary boss, positions enemies, manages key mechanics, and survives heavy incoming damage while working alongside an Off Tank, healers, and damage dealers.
There is no single “best” Main Tank build for every trial. Your gear and skills need to suit the encounter and your group’s setup, while keeping you alive through the mechanics you are responsible for.
Class Mastery gives you another reason to build around your original class. Its passives can strengthen what your class already does well, so subclassing is no longer the automatic choice for filling gaps in a tank setup. It remains an option when a particular skill line provides something valuable to your group, but you give up Class Mastery when you use it.
This guide provides a flexible ESO Main Tank Build framework that works across all classes. It focuses on group utility, survivability, and control, with options you can adjust for different trials, mechanics, and team setups.
Playing the Off Tank role instead?
This guide focuses on ESO Trial Main Tanking. If your role is add control, secondary debuff coverage, and supporting the Main Tank, you’ll want the dedicated Off Tank build instead.
Serious About Tanking?
Unlock early builds, meta insights, and direct optimisation support.
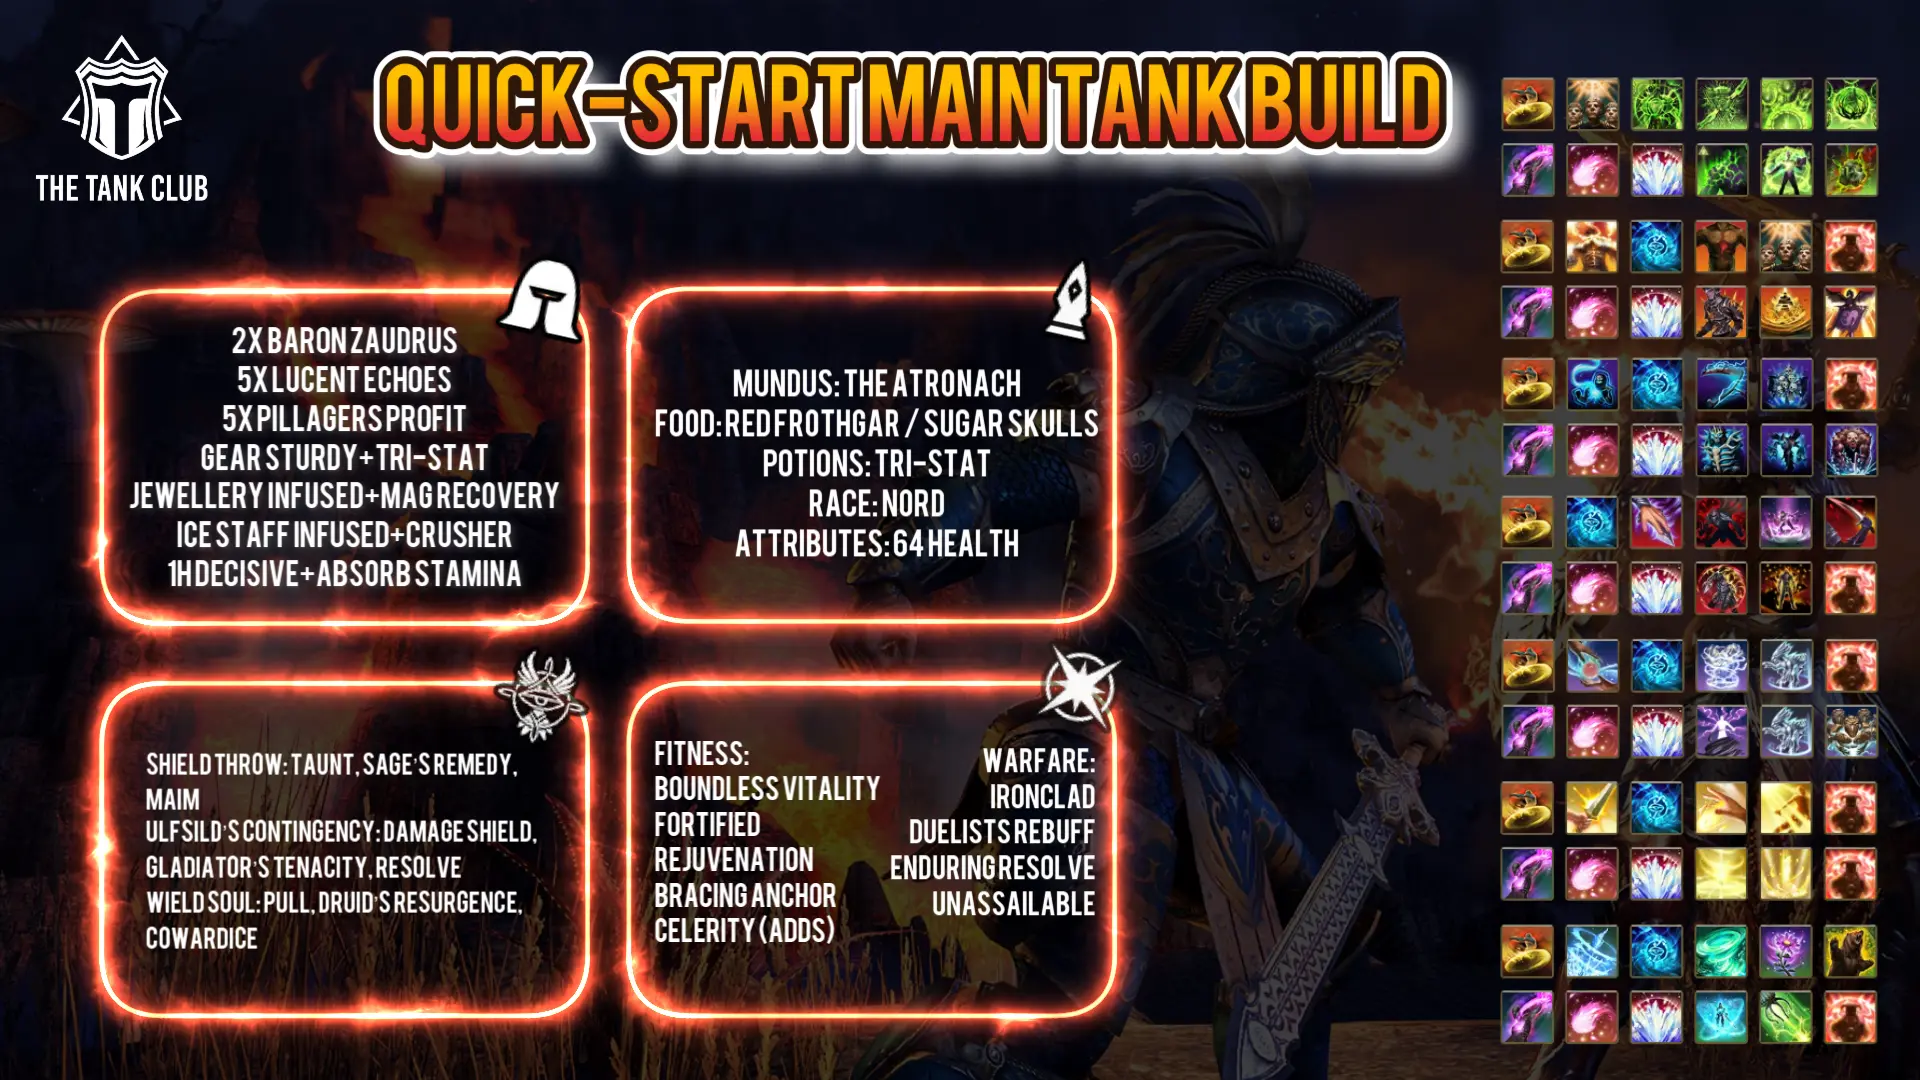
Quick-Start ESO Main Tank Build
What Does a Trial Main Tank Do?
In 12-player ESO trials, the Main Tank usually controls the primary boss, establishes its position and manages the attacks and mechanics assigned to that target. Your positioning gives the group a safe, consistent place to deal damage, while your defensive skills, resource management and support effects help keep the encounter stable.
The exact responsibilities change between trials and bosses. Some encounters require you to hold one target for long periods; others involve multiple enemies, frequent movement or coordinated tank swaps. Main Tank and Off Tank assignments work together, with both roles needing to understand what the other is handling.
- Boss & Priority Target Control – Maintain taunt on your assigned bosses and elite enemies. Identify which targets need immediate attention, pick them up promptly and avoid taking enemies assigned to the Off Tank unless the strategy requires it.
- Positioning & Boss Facing – Hold enemies where the group can damage them safely, keeping dangerous frontal attacks away from allies. Limit unnecessary movement, but reposition promptly when mechanics or the encounter strategy require it.
- Add Pull Coordination – Secure your assigned elite enemies and move them into the agreed stack alongside the Off Tank’s targets. Dangerous enemies take priority over chaining smaller adds, and the tanks should coordinate their approach so the group can attack a controlled pull.
- Mechanics & Tank Swaps – Recognise attack patterns and respond with the appropriate block, dodge, interrupt or movement. Coordinate swaps and handovers clearly, including when debuffs, split phases or additional bosses require the other tank to take control.
- Survivability & Sustain – Maintain defensive buffs, healing and enough resources to respond to dangerous attacks. Prepare for sustained pressure and overlapping mechanics rather than relying entirely on the healers to recover you after damage.
- Buff & Debuff Coverage – Maintain the skills, Class Masteries and gear effects assigned to you. Coordinate with the Off Tank and healers to cover group needs, reduce unnecessary overlap and time Ultimates around useful damage or defensive windows.
- Consistency & Communication – Give the group predictable positioning and clear calls when something changes. If a target moves, a swap is delayed or you need support, communicate early so the group can adjust.

Best ESO Main Tank Class
Every class can Main Tank ESO trials, but some combine personal survivability and group support more comfortably than others. My recommendations below reflect my experience and the reasons I would choose each class for this role, rather than a strict ranking for every encounter.
Nightblade is my first choice for an optimised Main Tank setup. Other classes remain strong options when their toolkit suits the encounter or provides benefits missing from the group. Consider what your Off Tank, healers and damage dealers already cover before choosing.
The best choice is the class that lets you perform your assignment reliably while contributing support the group needs. A familiar class with a suitable setup can serve your group better than changing class solely to follow a recommendation.
| Class | Why I would choose it for Main Tanking |
|---|---|
| Arcanist | A strong alternative with a complete defensive toolkit, powerful shields and compact utility skills. Healing and overhealing from its abilities can maintain Major Force through Ink-Scribe’s Verve, combining personal survival with group damage support. Shielding alone does not activate the Mastery, so your skill choices need to include reliable healing. |
| Dragonknight | A capable Main Tank with strong healing, shields, mitigation and enemy control. I would choose it when those tools suit the encounter or the group needs Dragonknight benefits. Its main limitation is overlap: a Dragonknight damage dealer can often cover those benefits more efficiently, while the tank needs additional skills to manage sustain. |
| Necromancer | Useful when an encounter puts significant pressure on you through damage over time, with defensive passives and Spirit Guardian helping reduce incoming damage. Veil’s Forfeit extends Major Vulnerability you apply, adding value when that coverage is needed. It is less often my first Main Tank choice when a Necromancer damage dealer already handles the group’s requirements. |
| Nightblade | My preferred option for its excellent sustain, Ultimate generation and valuable group support. Cutthroat’s Focus makes an attacker take 5% more damage after you dodge its attack, whether through a roll dodge or the Mastery’s brief dodge window. Holding the primary boss gives you regular opportunities to maintain this benefit for the group. |
| Sorcerer | A particularly defensive choice, with Bound Aegis providing strong protection against blockable damage. Sorcerers also bring valuable group buffs and Class Mastery benefits, making them useful as either tank. I would consider one especially when the group has no Sorcerer damage dealer covering that support. |
| Templar | A viable Main Tank with useful group armor and damage buffs, healing and improved block defence. I would consider it when those benefits fill a gap in the composition. Compared with my preferred choices, its sustain and defensive flexibility can require more attention, particularly during demanding encounters. |
| Warden | Provides excellent group value through Major Resolve, Minor Toughness and its Class Masteries. It can Main Tank effectively, but I often prefer it as an Off Tank or healer, where staying near allies makes healing-based support easier to deliver. It remains worth considering when the group otherwise lacks Warden coverage. |
Core Essentials
Attributes
- 64 Health
Mundus Stone
The Atronach increases Magicka Recovery, helping you maintain taunts, defensive skills, buffs and debuffs throughout a trial. It is a dependable choice across all classes, especially when your assignment involves frequent add control or you are working away from the group’s healers.
→ See more: ESO Tank Mundus Stones
Food
Choose food to cover what your Main Tank setup needs most. Orzorga’s Red Frothgar is a reliable default, providing Max Health and strong Magicka Recovery to help you keep your skills running through longer fights.
If your sustain is already comfortable, Bewitched Sugar Skulls provides Max Health, Magicka, and Stamina, plus Health Recovery. The larger resource pools are useful, but it does not replace the Magicka Recovery from Red Frothgar.
Experienced tanks who can safely release block between mechanics may prefer Orzorga’s Smoked Bear Haunch, or the cheaper Jewels of Misrule. Both add Stamina Recovery, but give up some Max Health and Magicka Recovery compared with Red Frothgar. Bear Haunch also provides Health Recovery. If you spend most of a fight holding block, you will get little value from the added Stamina Recovery.
Potions
Essence of Health (Tri-Stat) potions restore Health, Magicka and Stamina together. They are a reliable default when an unexpected add wave, tank swap or mechanic demands several resources at once. Use them proactively when a demanding phase is approaching rather than waiting until every resource is nearly empty.
Race
Nord is the strongest overall race for ESO trial tanking due to its bonus resistances, Max Stamina, and increased Ultimate generation. These benefits directly support survivability, blocking, and Ultimate uptime across all tank classes. While Race is not something you catogorically need to be a good Tank, the extra resistances are a considerable help in veteran and hardmode trials for a main tank to reach that 33.1k resistance cap
→ See more: ESO Tank Race
Attributes
Placing all 64 attribute points into Health is the most consistent approach for Main Tanks. Trial damage and mechanics are often unforgiving, and higher Max Health improves survivability, damage shields, and burst healing effectiveness.
Recommended Stats (Fully Buffed)
40,000+ Health
A strong starting point for veteran trials. Some classes and gear setups will take you well beyond this. Extra Health gives you more room to survive mistakes and sudden damage, but it will not save you from every missed mechanic.
20,000+ Stamina
A comfortable pool for blocking, dodging, breaking free, sprinting, and using Stamina skills. Experienced tanks can run less if their sustain and block timing allow it, but running out during a heavy mechanic can leave you unable to block a lethal hit. Keep your Max Stamina higher than your Max Magicka if you want Orb and Shards synergies to restore Stamina.
15,000+ Magicka
Enough for most trial setups when paired with good Magicka Recovery. Your maximum pool gives you room for several casts; recovery is what lets you keep taunts, buffs, debuffs, and utility skills running over a long fight.
25,000–33,100 Resistances
The amount you need depends on the encounter and your other sources of mitigation. Around 33,100 reaches the resistance cap, and getting close to it is valuable in demanding veteran hard mode fights, particularly against sustained damage that block does not mitigate. Check your resistances with your normal buffs active. Avoid sacrificing essential sustain or group utility just to display a capped number at all times.
2,000+ Magicka Recovery
A useful target for keeping your Magicka skills active in longer encounters. Some classes can manage with less through their own resource tools, while more demanding skill bars may benefit from more. Judge it by whether you can maintain your skills without repeatedly running dry.
75%+ Block Mitigation
A useful benchmark for a trial Main Tank, especially when blocking repeated boss attacks. It reduces damage from blockable hits, but does not protect you from damage over time, including Bleed effects. You still need Health, resistances, and the right response to each mechanic.
Under 1,000 Block Cost
A helpful target for encounters with frequent hits or long blocking phases. Block Cost determines how much resource blocking consumes when you take a blockable hit, so lowering it can make a noticeable difference. You still need to manage Stamina by releasing block when safe, taking heavy attack opportunities, using potions, and making use of your class’s resource tools.
Subclassing
Is Subclassing Worth Using on a Trial Main Tank?
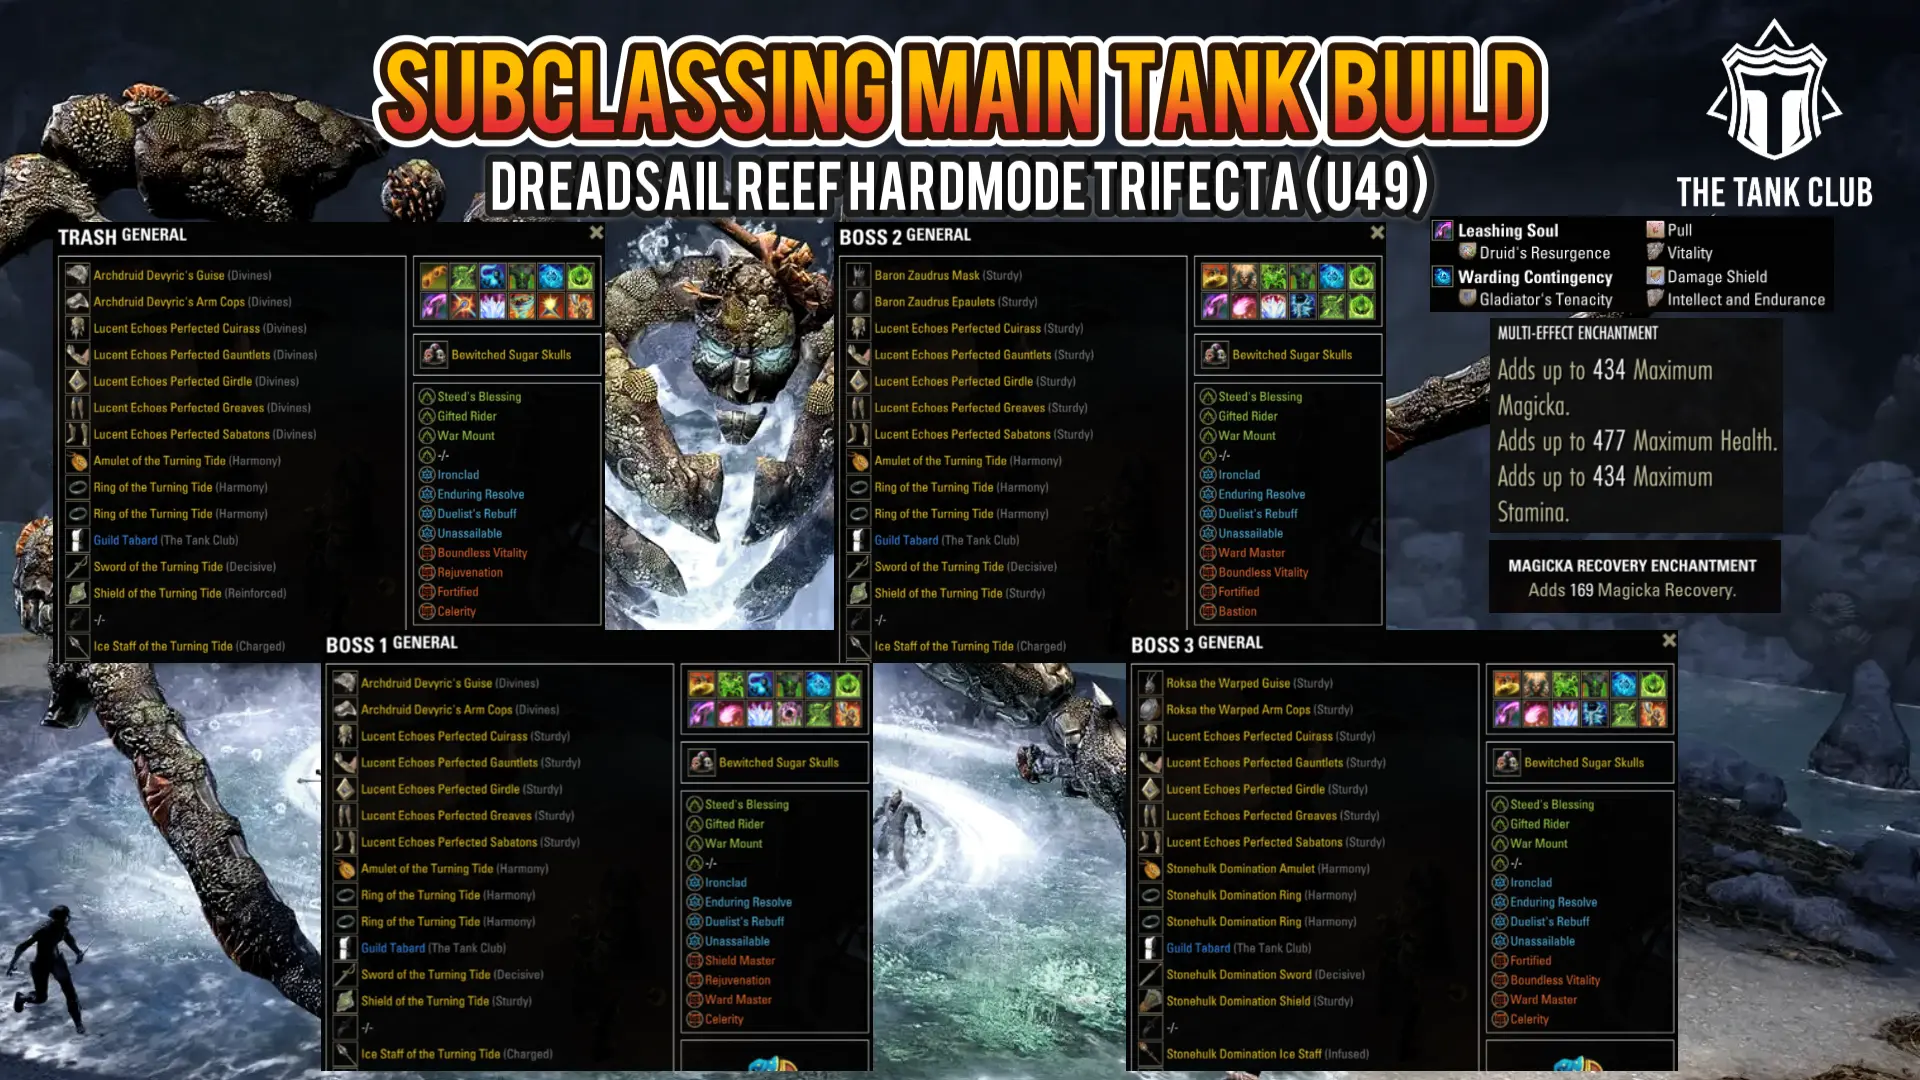
For most trial Main Tanks, staying with all three native class skill lines is the stronger starting point. This keeps your Class Mastery passives, which you lose as soon as you use a subclassed skill line. Subclassing is an option, but it is not the default setup for this build.
It becomes useful when your group needs a specific buff, debuff, or utility skill that the Tank can provide more efficiently than a healer or damage dealer. In that case, choose the subclassed line for the job it needs to do, then weigh its group benefit against the Class Mastery passives you give up.
→ See more: ESO Tank Subclassing Guide
Trial Main Tank Gear
Which Gear Setup Should You Use?
This ESO Trial Main Tank setup balances three priorities: improving group damage, covering useful buffs and debuffs, and surviving the mechanics assigned to you. The gear below gives you a flexible starting point across all classes, but it is not a fixed loadout for every trial.
Before a run, check what your Off Tank, healers, and damage dealers already provide. You can then swap sets to fill a genuine gap rather than bringing an effect your group already has covered.
| Piece | Set | Weight | Trait | Enchantment |
|---|---|---|---|---|
| Head | Tremorscale | Medium | Divines/Sturdy | Prismatic Defence |
| Shoulder | Tremorscale | Light | Divines/Sturdy | Prismatic Defence |
| Chest | Lucent Echoes | Heavy | Reinforced | Prismatic Defence |
| Hands | Lucent Echoes | Heavy | Divines/Sturdy | Prismatic Defence |
| Waist | Lucent Echoes | Heavy | Divines/Sturdy | Prismatic Defence |
| Legs | Lucent Echoes | Heavy | Divines/Sturdy | Prismatic Defence |
| Feet | Lucent Echoes | Heavy | Divines/Sturdy | Prismatic Defence |
| Necklace | Pillager’s Profit | Jewellery | Harmony/Infused | Magicka Recovery |
| Ring | Pillager’s Profit | Jewellery | Harmony/Infused | Magicka Recovery |
| Ring | Pillager’s Profit | Jewellery | Harmony/Infused | Magicka Recovery |
| Main Hand | Armor of the Trainee | Any 1H | Decisive | Hardening |
| Off Hand | Druid’s Braid | Shield | Divines/Sturdy | Prismatic Defence |
| Main Hand Backup | Pillager’s Profit | Ice Staff | Infused | Crusher |
| Piece | Set | Weight | Trait | Enchantment |
|---|---|---|---|---|
| Head | Baron Zaudrus | Medium | Divines/Sturdy | Prismatic Defence |
| Shoulder | Baron Zaudrus | Light | Divines/Sturdy | Prismatic Defence |
| Chest | Claw of Yolnahkriin | Heavy | Reinforced | Prismatic Defence |
| Hands | Claw of Yolnahkriin | Heavy | Divines/Sturdy | Prismatic Defence |
| Waist | Claw of Yolnahkriin | Heavy | Divines/Sturdy | Prismatic Defence |
| Legs | Claw of Yolnahkriin | Heavy | Divines/Sturdy | Prismatic Defence |
| Feet | Claw of Yolnahkriin | Heavy | Divines/Sturdy | Prismatic Defence |
| Necklace | Pillager’s Profit | Jewellery | Harmony/Infused | Magicka Recovery |
| Ring | Pillager’s Profit | Jewellery | Harmony/Infused | Magicka Recovery |
| Ring | Pillager’s Profit | Jewellery | Harmony/Infused | Magicka Recovery |
| Main Hand | Armor of the Trainee | Any 1H | Decisive | Hardening |
| Off Hand | Druid’s Braid | Shield | Divines/Sturdy | Prismatic Defence |
| Main Hand Backup | Pillager’s Profit | Ice Staff | Infused | Crusher |
Gear Information
Gear Weights
5 Heavy / 1 Medium / 1 Light: A strong default for trial Main Tanks. Five Heavy pieces provide defensive passives and resistances, while one Medium and one Light give you the full Undaunted Mettle bonus and useful passives from both armor lines. This is a balanced setup for veteran and hard mode trials, though you can adjust the weights for a specific encounter.
Armor Traits
- Divines: The default when using The Atronach and prioritising Magicka Recovery, as it increases the benefit from your Mundus Stone.
- Sturdy: Useful when an encounter requires frequent blocking. Lower Block Cost makes sustained pressure easier to manage.
- Reinforced: A situational choice, particularly on larger armor pieces, if you need more resistances to reach your target with your normal buffs active.
Armor Enchants
- Prismatic Defence (Tri-Stat) – Provides Max Health, Magicka and Stamina together, supporting survival and both resource pools. Single-stat enchants provide more of their individual resource if your setup needs a specific adjustment.
- Prismatic glyphs require Hakeijo and can be expensive. If you are upgrading gradually, prioritise the chest, legs, head and shield, which receive the full enchantment value.
Jewellery
- Harmony + Magicka Recovery: Strong when your group provides frequent synergies. Harmony restores additional Health, Magicka and Stamina whenever you activate one, while Magicka Recovery enchants provide steady sustain.
- Infused + Magicka Recovery: A reliable alternative when synergies are less frequent or inconsistent. It improves your recovery without depending on another player.
- Prismatic Cost Reduction: Consider this if you regularly cast both Magicka and Stamina skills. If most of your active skills cost Magicka, a more focused enchant may provide better value.
- Magicka Cost Reduction: Can work well if you cast Magicka skills frequently. It saves resources on each cast, whereas Magicka Recovery continues to provide value between casts. Compare them against how you actually play rather than assuming either is always stronger.
- Swift: Useful for add pulls, especially with a separate gear setup for those phases. The extra movement speed helps you reach, taunt and position enemies before they spread through the group.
One-Hand & Shield
- Decisive + Hardening: A solid all-round choice. Decisive gives you a chance to generate additional Ultimate, while Hardening provides a small damage shield.
- Infused + Weakening: A defensive option when you need to reduce a dangerous enemy’s Weapon and Spell Damage, particularly in encounters where the group splits or tanks handle separate targets.
- Absorb Stamina enchant: Offers some Stamina return and can apply Sundered for Minor Breach. Check whether your other skills and group members already maintain Minor Breach before choosing it for that purpose.
Ice Staff
- Infused + Crusher: The standard boss setup when you are responsible for Crusher. Infused strengthens the enchant and helps maintain its Armor reduction through Wall of Elements. Keep the Wall positioned so Crusher applies to the priority target.
- Charged + Crusher: An option for add pulls when spreading Chilled is more valuable than maximising Crusher on a single target. With Frost Pulsar, Charged improves your chance of applying Chilled across the pack, providing Minor Maim and Minor Brittle.
Main Tank Set Choices
Monster Set — Nazaray, Tremorscale, Archdruid Devyric, Encratis’s Behemoth or Baron Zaudrus
There is no single Monster Set that every trial Main Tank should wear. Choose one based on the buffs and debuffs your group needs:
- Nazaray extends existing Major and Minor debuffs on nearby enemies when you use an Ultimate. It is a strong general option if your group has valuable debuffs to extend and nobody else is wearing it.
- Tremorscale reduces enemy Armor when you taunt. Use it when the group needs more penetration, after accounting for sources such as Alkosh and Crimson Oath’s Rive. It contributes to reaching the 18,200 penetration target; it does not cover the whole gap by itself.
- Archdruid Devyric applies Major Vulnerability to several enemies after a Heavy Attack. It is useful when your group needs another source of the debuff, but its value falls if Necromancer Colossus or other sources already provide enough uptime.
- Encratis’s Behemoth increases Flame Damage taken by nearby enemies and reduces Flame Damage taken by nearby group members. Choose it when your group deals substantial Flame Damage or the encounter makes its defensive effect valuable.
- Baron Zaudrus generates additional Ultimate when you repeatedly apply status effects. It is an option when the other Monster Set effects are already covered and your setup can trigger it consistently.
5-Piece Set — Lucent Echoes
Lucent Echoes increases nearby group members’ Critical Damage and Critical Healing while you are above 50% Health. At 50% Health or below, that group bonus switches off and you gain damage reduction against monsters instead. It offers strong group value during normal play and a defensive buffer when you come under pressure, although it cannot prevent a hit that kills you outright.
If your damage dealers are already at the Critical Damage cap, consider a set that fills a different need. Pearlescent Ward provides group Weapon and Spell Damage while the group is alive, Turning Tide offers Major Vulnerability, and Claw of Yolnahkriin supplies Minor Courage. Check those effects against your group’s existing coverage before swapping.
5-Piece Set — Pillager’s Profit or a Group Utility Alternative
Pillager’s Profit shares Ultimate with nearby group members when you cast an Ultimate, with the amount scaling from the Ultimate spent. A Main Tank who generates Ultimate quickly can make good use of it, particularly when planning casts around the group’s damage windows.
First check whether a healer is already wearing Pillager’s Profit and how your group is maintaining Major Force. Aggressive Horn can still be valuable when that buff is not covered reliably; other groups may get it from an Arcanist’s Class Mastery.
If Pillager’s Profit is covered, your second set can address another gap: Crimson Oath’s Rive for enemy Armor reduction, Claw of Yolnahkriin for Minor Courage, Xoryn’s Masterpiece for group Max Magicka and Stamina, The Morag Tong for a group Poison Damage buff or Serpent’s Disdain on a Warden Main Tank to extend the duration of the Major Brittle debuff.
Armor of the Trainee & Druid’s Braid
The front-bar sword and shield each provide a separate one-piece Max Health bonus. These require no activation and give you additional Health while using that bar.
The extra Health is lost when you switch to the ice staff. Keep this difference in mind when checking your stats and taking heavy damage on the back bar.
Where to Get the Main Sets
- Lucent Echoes – Lucent Citadel Trial (Gold Road).
- Pearlescent Ward – Dreadsail Reef Trial (High Isle).
- Pillager’s Profit – Dreadsail Reef Trial (High Isle).
- Claw of Yolnahkriin – Sunspire Trial (Elsweyr).
- Xoryn’s Masterpiece – Lucent Citadel Trial (Gold Road).
- Turning Tide – Shipwright’s Regret Dungeon (Ascending Tide).
- Crimson Oath’s Rive – The Dread Cellar Dungeon (Waking Flame).
- The Morag Tong – Bruma Elite Gear Vendor in Cyrodiil, purchased with Alliance Points, or Guild Traders (Base Game).
- Nazaray – Veteran Shipwright’s Regret Dungeon (Ascending Tide); shoulders from Urgarlag Chief-bane.
- Tremorscale – Veteran Volenfell Dungeon (Base Game); shoulders from Glirion the Redbeard.
- Archdruid Devyric – Veteran Earthen Root Enclave Dungeon (Lost Depths); shoulders from Urgarlag Chief-bane.
- Encratis’s Behemoth – Veteran Black Drake Villa Dungeon (Flames of Ambition); shoulders from Urgarlag Chief-bane.
- Baron Zaudrus – Veteran The Cauldron Dungeon (Flames of Ambition); shoulders from Urgarlag Chief-bane.
- Serpent’s Disdain – Crafted at Stonelore Forge and Craft in High Isle; requires 5 researched traits (High Isle).
- Druid’s Braid – Crafted at Hidden Foundry in High Isle; requires 7 researched traits (High Isle).
- Armor of the Trainee – Overland drops in Bal Foyen, Betnikh, Bleakrock Isle, Khenarthi’s Roost and Stros M’Kai, or Guild Traders (Base Game).
Main Tank Skill Bars
Arcanist Skills
Bosses


Adds


Soldier of Apocrypha • Earthen Heart • Winters Embrace
Dragonknight Skills
Bosses


Adds


Draconic Power • Soldier of Apocrypha • Winters Embrace
Necromancer Skills
Bosses


Adds


Bone Tyrant • Soldier of Apocrypha • Winters Embrace
Nightblade Skills
Bosses


Adds


Siphoning • Soldier of Apocrypha • Winters Embrace
Sorcerer Skills
Bosses


Adds


Daedric Summoning • Soldier of Apocrypha • Winters Embrace
Templar Skills
Bosses


Adds


Restoring Light • Soldier of Apocrypha • Winters Embrace
Warden Skills
Bosses


Adds


Winters Embrace • Soldier of Apocrypha • Earthen Heart
Shared Main Tank Skills Information
These skills appear across multiple class setups or provide useful options for specific trial encounters. Choose them around your assigned targets, mechanics and group coverage. You do not need every skill listed here on your bars at once.
Elemental Susceptibility – Applies Major Breach and repeatedly inflicts Burning, Chilled and Concussion, inflicting Minor Maim, Minor Vulnerability and your Frost Staff’s Minor Brittle interactions. Frost Blockade also applies Minor Breach to Chilled enemies. Maintain it on your priority target. Let its duration run before refreshing it to avoid unnecessary Magicka costs.
Elemental Blockade – Maintains your back-bar Crusher enchantment while you work on the front bar. With a Frost Staff, it also snares enemies, applies Minor Breach to Chilled targets and provides a group projectile damage shield. Position the wall beneath the enemies you need to debuff with Crusher.
Inner Rage – A ranged taunt for securing dangerous adds, secondary bosses or a target during a tank swap. Its Radiate synergy provides additional Flame damage for the group. Use it on targets assigned to you; avoid taking the Main Tank’s boss unless a swap or emergency requires it.
Razor Caltrops – Applies AoE Major Breach and slows enemies, making it useful for add waves and large stacks. Cast it where the enemies will gather. As an Assault ability, it also activates Powerful Assault when you cast it in combat while wearing the set.
Pulsar – Primarily used on add waves to apply Minor Mangle, reducing the Max Health of non-elite enemies. Frost Pulsar also provides group Minor Protection and helps spread Chilled, especially with a Charged Frost Staff. This supports Minor Maim, Minor Brittle and Minor Breach through Frost Blockade. Use it once enemies are grouped so the cast reaches as much of the pack as possible.
Revealing Flare – Slotted for Major Protection on the active bar, providing damage reduction without another skill to maintain. It also contributes to the Magicka Aid passive, increasing Magicka Recovery for each Support ability slotted on that bar. Its reveal effect is unnecessary in trials; the slot is used for its defensive and sustain benefits.
Defensive Stance – While slotted on your one hand and shield bar, increases block mitigation and reduces Block Cost. Useful when your role involves sustained blocking or several hard-hitting enemies. Casting it also provides a Max Health-scaling shield and reflects an eligible direct-damage projectile, but the passive bonuses are the main reason to slot it.
Crushing Shock – Interrupts enemy casts from range, letting you handle an assigned interrupt without leaving your position to Bash. Slot it when a trial mechanic requires reliable ranged interrupts. Its damage and potential status effects are secondary benefits.
Race Against Time – Provides a short Major Expedition speed boost, removes snares and immobilisations, and briefly grants immunity to them. Useful for reaching add spawns, moving between positions or handling movement mechanics when your class lacks a suitable speed skill. Its Minor Force is a secondary benefit for a tank.
Resolving Vigor – Provides a self-heal over time and grants Minor Resolve, increasing your resistances. Useful when you lack Minor Resolve.
Ultimates
Aggressive Horn – Increases group Max Magicka and Stamina and provides Major Force for a damage window. It is a situational choice when the group lacks reliable Major Force coverage. If an Arcanist already maintains it through Ink-Scribe’s Verve, coordinate whether Horn’s remaining benefits justify the Ultimate slot and cost.
Replenishing Barrier – Provides a large shield to you and nearby group members, helping the group through dangerous damage or recovery phases. Each ward that dissolves restores Magicka to you. It is also useful as a passive slot for the Magicka Aid passive, even when you normally cast your other Ultimate.
Temporal Guard – Slotted primarily for Minor Protection on the active bar. Having a Psijic Order ability slotted also enables Concentrated Barrier’s passive shield while blocking. You normally preserve your Ultimate for group support; casting Temporal Guard rewinds your position and resources, which can disrupt tank positioning.
Key Passive & Gear Interactions
Magicka Aid benefits each bar separately, so Revealing Flare and Replenishing Barrier only contribute recovery while their bar is active. Temporal Guard or Race Against Time enables Concentrated Barrier on its respective bar; that shield recharges after you spend time without blocking.
Assault skills can activate Powerful Assault, while normal Ultimate casts can activate sets such as War Machine or Pillager’s Profit when equipped and ready. If you use Cryptcanon Vestments, your Ultimate becomes a resource transfer instead of casting the listed skill, so you cannot rely on Horn or Barrier’s normal effects.
Arcanist Main Tank Skill Information
Impervious Runeward – Your main defensive shield and an important self-heal when used with Crux. Both the shield and healing scale with Max Health, making it particularly effective against hard-hitting bosses and priority adds. Its strongest shield lasts only one second, so cast it immediately before a dangerous hit. Consuming Crux provides healing and activates Implacable Outcome for additional Ultimate generation. Its healing and overhealing contributes towards Ink-Scribe’s Verve.
Runeguard of Freedom – Grants Minor Resolve to you and nearby group members, alongside personal Minor Protection. When you take damage below 50% Health, it consumes Minor Protection to trigger a Max Health–scaling heal, additional armor and temporary crowd control immunity. This provides a defensive buffer while holding dangerous bosses, making it useful when the immobilisation from Still Waters offers little value. Keep the buff active and refresh after the emergency heal triggers to regain Minor Protection; the crowd control immunity has a separate 30-second cooldown.
Tidal Chakram – Provides shields to yourself or up to four allies in front of you, consuming Crux to add healing while those shields remain. This healing and overhealing helps activate Ink-Scribe’s Verve, making the skill particularly valuable when you are responsible for Major Force. Aim it towards allies and rebuild Crux between casts. Its cost uses whichever maximum resource is higher, so it will usually spend Stamina on this tank setup.
Cruxweaver Armor – Maintains Major Resolve and generates Crux when you take damage, while applying Minor Breach to attackers. Keep it active whenever you are handling enemies. With Erudite’s Rigor, taking damage also applies Minor Cowardice, grants group Major Vitality and generates Ultimate based on your active Crux.
Zenas’ Empowering Disc – Provides Minor Courage alongside Minor Fortitude, Minor Intellect and Minor Endurance, supporting group damage and recovery. Place it where your group can enter the area; its buffs remain for up to ten seconds after they leave, making this morph useful when mechanics require movement. It also keeps a Curative Runeforms ability on your back bar for Intricate Runeforms.
Gibbering Shelter – Primarily slotted for Wellspring of the Abyss, which increases Health, Magicka and Stamina Recovery for each Soldier of Apocrypha ability on your active bar. This adds sustain without requiring another cast. When needed, the Ultimate provides strong personal shielding and grants shields to nearby allies as you take damage, making it useful when handling dangerous adds close to the group.
Resonating Glyphic – An offensive support Ultimate that provides nearby allies with healing and up to 200 Weapon and Spell Damage. You and your allies strengthen this morph by damaging the glyphic, so place it where the group can power it up and remain within its area. Its healing contributes towards Ink-Scribe’s Verve, while casting it can activate gear sets that trigger on Ultimate use.
Runic Sunder (Optional) – An alternative ranged Stamina taunt that generates Crux, applies Minor Maim and steals 2,200 Armor from the enemy, improving your defence while supporting group damage. While slotted, it also reduces your damage taken by 2% per active Crux. Consider it if you want an additional source of Crux generation, but account for the utility lost by replacing your scribed taunt.
Key passive and Class Mastery interactions:
- Erudite’s Rigor – Adds group Major Vitality, enemy Minor Cowardice and Ultimate generation to your armor skill when you take damage, with a two-second cooldown. Holding more Crux increases the Ultimate returned. Its value depends on actively handling enemies, so expect less benefit during phases where nothing is attacking you.
- Ink-Scribe’s Verve – Healing or overhealing a combined 100,000 Health in combat generates Crux and grants group Major Force for ten seconds. Tidal Chakram, Resonating Glyphic and self healing help reach this threshold. Positioning and healing output determines uptime.
- Hideous Clarity & Implacable Outcome – Generating Crux restores Magicka and Stamina, while consuming it generates Ultimate on an eight-second cooldown. This makes rebuilding and spending Crux useful for both sustain and Ultimate generation.
- Aegis of the Unseen & Circumvented Fate – Keeping a beneficial Soldier of Apocrypha ability active grants additional Armor. Casting Arcanist abilities also maintains group Minor Evasion, reducing damage from area attacks.
- Intricate Runeforms & Erudition – Slotting a Curative Runeforms ability increases shield strength and reduces shield costs on that bar. Tidal Chakram provides this on the boss front bar, while Zenas’ Empowering Disc and Resonating Glyphic cover the back bar.
- Crux Management – Cruxweaver Armor is your main regular source of Crux in these setups, generating it when you take damage, up to once every five seconds. Use Impervious Runeward when survival requires it, and spend Crux on Tidal Chakram when you can safely support nearby allies. Avoid repeatedly consuming Crux without a purpose: retaining it also improves the Ultimate generation from Erudite’s Rigor.
Dragonknight Main Tank Skill Information
Heart of Flame – A sustain skill that restores a percentage of your missing Magicka and Stamina over four seconds while providing Max Health–scaling healing. Useful during prolonged blocking phases, where you need resource returns without relying on heavy attacks. Cast it once your resources have dropped enough to benefit, and let it complete before refreshing. Its delayed returns make it a proactive sustain tool rather than an emergency refill.
Blood of the Green Dragon – Your main self-heal, scaling with Max Health and becoming stronger as your Health falls. It adds healing over time, Major Fortitude, Major Endurance and Minor Vitality, improving healing received and damage shield strength. This makes it well suited to sustained boss pressure or assignments away from the group. Major Endurance helps Stamina Recovery when you release block, but does not restore Stamina while blocking. Keep Minor Vitality active and use the burst heal when needed. If additional group buffs are needed and personal survival is already fine, Blood of the Elder Dragon is an alternative.
Hearth and Home – Provides a Max Health–scaling heal over time, granting healed allies Minor Heroism and Minor Fortitude while they remain inside. You also gain Major Protection within the area, while enemies are heavily snared. Place it where you can benefit from its protection without disrupting enemy positioning, ideally overlapping nearby allies to support their Ultimate generation. When your role separates you from the group, it remains useful for personal healing and defence.
Earthshield Mantle – Provides Major Resolve and a short Max Health–scaling damage shield. It is particularly useful when handling enemies away from the group, where you may lose access to a Warden’s Frost Cloak. As an Earthen Heart skill, it also activates Blessing at the Peak in combat and enables Mountain Giant on that bar.
Protect the Brood – Combines personal Major Expedition with projectile damage reduction for yourself and nearby group members, plus group Minor Protection. Use it to move between enemies, reach priority adds or protect nearby allies during projectile-heavy mechanics. Casting it also activates Elder Dragon for Minor Brutality. Its protection requires casting; simply slotting it does not grant Minor Protection.
Standard of Might – Provides allies inside the banner with 300 Weapon and Spell Damage and 10% damage reduction, with additional offensive and defensive benefits for you. Place it where the group can remain within its area during a useful damage window. Casting it restores resources through The Storm Voice and activates Lead from the Front, combining group support with personal sustain. When you are positioned away from the group, consider whether another Ultimate would provide more value.
Magma Fist (Optional) – Used when you are assigned to maintain Heat Shock, increasing the target’s damage taken from all sources. Build three stacks on the priority enemy, then refresh before the seven-second effect expires. Its frequent Stamina cost competes with blocking, dodging and other skills, so only carry this responsibility when your group needs it. Casting it also contributes to Ultimate generation through Blessing at the Peak. If another DK maintains Heat Shock, this becomes a flexible slot.
Igneous Weapons (Optional) – Supplies group Major Brutality, increasing Weapon and Spell Damage, alongside an additional Flame damage effect from Light and Heavy Attacks. Its long duration makes it convenient for covering this buff and allowing group members to choose different potions. Refresh it before it expires rather than repeatedly casting it. It also provides an Earthen Heart ability on your back bar for passive interactions, although its value depends on what the group already covers.
Burning Embers (Optional) – Provides an initial self-heal and further healing whenever its damage-over-time ticks hit, scaling with Max Health. Its initial hit guarantees Burning, supporting Combustion, and activates Traumatic Burns to increase the target’s Flame Damage taken by 5%. Useful when your group needs that debuff or you want additional healing while holding a target. Traumatic Burns lasts only five seconds, so maintaining full coverage requires more frequent casts than the ten-second damage effect alone would suggest.
Key passive and Class Mastery interactions:
- Lead from the Front – Activating The Storm Voice through an Ultimate cast grants nearby group members Major Berserk and Major Protection. Duration increases with Ultimate spent, so coordinate your cast with group damage windows and remain within range of the players you intend to buff.
- Resolute Defense – Builds additional block mitigation while you remain blocking and gives blocked attacks a chance to restore Stamina. Useful during sustained pressure from multiple enemies, but it does not replace careful resource management.
- Inexorable Descent – An alternative for less block-intensive situations. It adds healing and shield strength to your Landslide stacks, which build through dealing damage while an Earthen Heart ability is active.
- The Storm Voice – Casting an Ultimate restores Health, Magicka and Stamina based on Ultimate spent, with stronger returns from having more DK abilities slotted. Plan Ultimate use around both group requirements and your resource needs.
- Elder Dragon & Burnished Scales – Casting Blood of the Green Dragon or Protect the Brood grants group Minor Brutality. Burnished Scales adds block mitigation, helping you withstand dangerous targets.
- Blessing at the Peak & Mountain Giant – Casting or dealing damage with an Earthen Heart ability in combat generates Ultimate on a six-second cooldown. With an Earthen Heart skill slotted on your active bar, fully charged Heavy Attacks also restore additional Stamina and apply Off Balance.
- Traumatic Burns – Direct damage from an Ardent Flame ability makes affected enemies take 5% more Flame Damage for five seconds. Heart of Flame’s finishing blast can apply it, while optional Burning Embers provides a targeted application. Coordinate coverage with another Dragonknight before adding frequent casts to your tanking duties.
- Combustion & A Soul Ablaze – Applying Burning restores Magicka and Stamina while an Ardent Flame ability is slotted. Elemental Susceptibility supplies Burning. A Soul Ablaze increases healing received.
Necromancer Main Tank Skill Information
Necrotic Potency – Converts nearby corpses into Ultimate and a Max Health–scaling heal over time, while reducing damage taken by 3% when slotted. Use it after enemies die, when Spirit Guardian leaves a corpse, or when your armor skill or Mastery enables another consumption opportunity. This helps rebuild Glacial Colossus between group damage windows. Consuming a corpse also activates Corpse Consumption for additional Ultimate, subject to that passive’s cooldown.
Hungry Scythe – Your main burst heal, with additional healing for each extra enemy hit and a heal over time afterwards. All of its healing scales with Max Health, making it particularly effective when holding several adds. You must damage an enemy to receive the healing, so keep a target within reach. With Veil’s Forfeit, its direct self-heal can also enable corpse consumption when you heal yourself below the Mastery’s Health threshold.
Agony Totem – Provides nearby allies with Minor Protection, applies Major Cowardice to enemies inside its area and periodically fears susceptible enemies in place. Place it within your established add stack to reduce incoming damage and help keep enemies controlled. Against bosses, its defensive effects remain useful even when the fear cannot affect them. The Pure Agony synergy adds group damage and gives allies another synergy to activate.
Summoner’s Armor – Maintains Major and Minor Resolve, helping you reach the resistance cap without depending on another player’s buffs. Keep it active while holding bosses or priority enemies; it also maintains Disdain Harm’s damage-over-time reduction and reduces Spirit Guardian’s cost. Casting it in combat enables corpse consumption on yourself, once every ten seconds, providing another opportunity to use Necrotic Potency even when no enemies have died.
Spirit Guardian – Transfers 10% of your incoming damage to the spirit and regularly heals you or a nearby low-Health ally. Keep it active during sustained boss pressure rather than waiting until your Health drops. While active, it also enables Undead Confederate for additional recovery and leaves a consumable corpse when it expires in combat, which you can consume with Necrotic Potency.
Glacial Colossus – Your main group damage Ultimate, applying Major Vulnerability to enemies hit and stunning susceptible enemies with its final smash. This morph provides a longer debuff than Pestilent Colossus, making it better suited to maintaining coverage. Veil’s Forfeit extends its seventeen-second Major Vulnerability to 25.5 seconds, with subsequent smashes refreshing the application. Coordinate casts around group damage windows and other sources of Major Vulnerability; high uptime depends on rebuilding Ultimate quickly enough between casts.
Key passive and Class Mastery interactions:
- Veil’s Forfeit – Extends the Major Vulnerability you apply by 50%. Directly healing a target below 66% Health in combat also allows you to use a corpse-consuming ability against them within ten seconds. This creates consumption opportunities without requiring an enemy to die, helping support Necrotic Potency and your Ultimate generation.
- Pound of Flesh – Taking damage has a chance to heal you and restore a percentage of your missing Stamina, with the chance increasing as your Health falls. Its healing scales with Max Health. This is useful under sustained pressure, but treat it as supporting sustain rather than a guaranteed resource return.
- Corpse Consumption – Consuming a corpse grants ten additional Ultimate on a sixteen-second cooldown. This works alongside Necrotic Potency’s own Ultimate return, making regular consumption valuable even during encounters with few enemy deaths.
- Disdain Harm & Last Gasp – Keeping a Bone Tyrant ability active reduces damage taken from damage-over-time abilities by 15%. Maintaining Summoner’s Armor provides reliable coverage while tanking bosses or adds. Last Gasp increases Max Health, improving your survival buffer and the strength of your Health-scaling heals.
- Death Gleaning & Health Avarice – With a Bone Tyrant skill slotted, nearby enemy deaths restore Magicka and Stamina. Each Bone Tyrant skill on your active bar also increases healing received, making your front bar particularly comfortable when managing damage.
- Undead Confederate & Near-Death Experience – An active Spirit Guardian increases Health, Magicka and Stamina Recovery, although Stamina Recovery remains paused while blocking. Slotting it also enables Near-Death Experience on that bar, increasing healing Critical Chance against wounded targets.
Nightblade Main Tank Skill Information
Siphoning Attacks – Your main sustain tool. While slotted on either bar, dealing damage provides healing and restores Magicka and Stamina once per second, so keep damage effects such as Elemental Blockade active. Casting it exchanges Health for an immediate resource return and activates the Transfer passive. With Share the Spoils, that cast also supplies group resources and Ultimate. Use it regularly when safe, but avoid spending Health immediately before a dangerous mechanic.
Dark Cloak – Provides a short Max Health–scaling heal over time, with substantially stronger healing while blocking. It also grants Minor Protection while slotted on either bar, giving you constant damage reduction without needing to cast it for that buff. Use the heal during sustained pressure. Casting it activates Shadow Barrier for Major Resolve, while slotting it increases your front-bar Max Health through Dark Vigor.
Phantasmal Escape – Provides Major Evasion, reducing incoming area damage, and removes snares and immobilisations when cast, granting brief immunity to both. While active, taking direct damage builds a reduction to your next Roll Dodge cost, helping you handle dodgeable mechanics and maintain Cutthroat’s Focus without placing as much pressure on Stamina. Casting it also activates Shadow Barrier for Major Resolve. Keep it active during sustained pressure, and recast when you need its movement protection. Unlike Mirage, this morph does not provide Minor Resolve but this is covered by your Scribing skills.
Refreshing Path – Combines healing over time with group Major Expedition, Minor Endurance and Minor Intellect. Place it where nearby allies can benefit, or along your route when moving between enemies. Its recovery buffs support the group during longer encounters, while the speed boost helps with repositioning and mechanics. Casting it also maintains Shadow Barrier, and its healing provides opportunities for Critical Heals that can activate Hemorrhage when an Assassination skill is slotted on your active bar.
Mass Hysteria – An add-control skill that fears nearby susceptible enemies and applies AoE Major Cowardice, reducing their Weapon and Spell Damage. Use it once enemies are positioned to reduce their damage on the group. It also activates Shadow Barrier and adds front-bar Max Health through Dark Vigor.
Soul Harvest – Primarily slotted for its passive ten Ultimate whenever you land a killing blow, which works while it is slotted on either bar. This makes it useful during add waves, although you must secure the kill rather than simply damage the enemy. It also supplies an Assassination skill on your front bar for Hemorrhage and Nocturnal Inspiration. Normally, preserve your Ultimate for the group support effect assigned to your setup.
Key passive and Class Mastery interactions:
- Share the Spoils – Casting Siphoning Attacks in combat activates Transfer, granting group members 250 Magicka and Stamina and two Ultimate, while doubling your own Ultimate return to four. Transfer has a four-second cooldown, so additional casts within that window provide no extra Mastery benefit. Use it when you need resources and can safely afford the Health cost.
- Cutthroat’s Focus – A key group damage Mastery for Main Tanking. Casting a Nightblade ability while blocking creates a 0.3-second dodge window. Dodging an attack, through this effect or a Roll Dodge, increases that attacker’s damage taken by 5% for twenty seconds. Maintain it on the boss through safely timed dodges while preserving positioning and following the encounter’s mechanics.
- Hemorrhage & Pressure Points – Critical damage or healing grants group Minor Savagery while an Assassination ability is slotted on your active bar. Pressure Points increases Critical Chance for each Nightblade skill slotted.
- Catalyst & Transfer – Drinking a potion generates 22 Ultimate, while casting Siphoning Attacks in combat activates Transfer. Regular potion use and carefully timed Siphoning casts help rebuild your group support Ultimate between mechanics.
- Magicka Flood – Having Siphoning Attacks on your active bar increases Max Magicka and Stamina by 6%. Its own passive resource returns work on both bars, but this separate passive requires a Siphoning skill on the bar you are using.
- Shadow Barrier & Dark Vigor – Casting Shadow skills maintains Major Resolve, with Heavy Armor extending its duration. Each Shadow skill slotted also increases Max Health on that bar, improving survivability and Dark Cloak’s healing.
- Executioner – Restores Magicka and Stamina when an enemy dies within two seconds of taking damage from you. Unlike Soul Harvest, it does not require the killing blow. Keeping Elemental Blockade damaging the add stack helps you benefit as enemies die, providing additional sustain during large pulls.
Sorcerer Main Tank Skill Information
Dark Deal – Converts Magicka into Health and Stamina, providing an initial return when its cast completes and additional Stamina over ten seconds. This gives you a way to rebuild Stamina without relying entirely on heavy attacks or recovery. Its one-second cast drops your block, so use it between dangerous attacks rather than waiting until your resources are exhausted. Casting it also activates Exploitation for group Offensive Penetration and provides an opportunity to trigger Calculated Defense.
Summon Unstable Clannfear – Your main on-demand burst heal for boss fights, with healing that scales with Max Health. Summon it before combat, then activate its special ability when you need healing. While alive, it also maintains Daedric Protection’s damage reduction and Expert Summoner’s additional Max Health. Keep it on both bars so bar swapping does not dismiss it. If it dies, you lose those defensive benefits until it is resummoned.
Vibrant Shroud – Your add-pull heal and source of AoE Major Maim, reducing the damage dealt by enemies in front of you. It also grants Minor Vitality to you and healed allies, improving healing received and shield strength. Aim it through the dangerous enemies while including nearby allies where possible. Casting it activates Exploitation and provides an opportunity to trigger Calculated Defense. Unlike the boss setup’s Clannfear heal, its healing scales with offensive stats rather than Max Health.
Bound Aegis – Provides Minor Protection and Minor Resolve while slotted on either bar, giving you reliable defensive benefits without another upkeep cast. Activate it before dangerous blockable attacks for a substantial increase to block mitigation, with duration influenced by your resistances. Its active effect also enables Daedric Protection for additional damage reduction. Use it for heavy attacks and sustained block phases; increased block mitigation does not protect against unblockable damage.
Boundless Storm – Maintains Major Resolve and grants a short Major Expedition boost when cast, helping you move between enemies and collect priority targets. Its nearby damage continues while you handle other duties, making it convenient during add waves. Casting it also provides an opportunity to activate Calculated Defense. Maintain the resistance buff throughout combat, but avoid repeatedly refreshing its long duration solely for movement unless the mechanic requires it.
Liquid Lightning – Primarily used for its Conduit synergy and additional group utility. Unlike many synergy skills, you can activate your own Conduit, giving you access to Undaunted Command’s Health, Magicka and Stamina returns when other players’ synergies are unavailable. Allies can also use it for additional damage and their own synergy interactions. Place it where you or the group can reach the synergy safely. Casting it also helps maintain Calculated Defense’s group buff.
Summon Charged Atronach – Provides AoE damage, guaranteed Concussion against enemies hit and a synergy that grants nearby allies Major Berserk. Place it near the group during a useful damage window and ensure someone activates Charged Lightning: casting the Ultimate alone does not grant Major Berserk. The Charged morph is particularly useful against stacked adds, spreading Concussion and its associated Minor Vulnerability. Coordinate its use with other Sorcerers and Dragonknights using Lead from the Front to avoid duplicating the same group buff.
Key passive and Class Mastery interactions:
- Calculated Defense – Beginning a Sorcerer ability creates a brief Max Health–scaling shield. If it survives, you and nearby group members gain 6% Weapon and Spell Damage for twenty seconds. Your regular class casts provide opportunities to refresh this buff, but incoming damage can break the shield and prevent its application. Check coverage when you’re away from the group.
- Conservation of Energy – Expands Blood Magic to work with abilities that have a cost, excluding abilities with a cost per tick, and adds Magicka and Stamina returns when it activates. This lets your shared tank skills contribute to sustain alongside your class abilities. Resource returns scale with your maximum resources.
- Blood Magic – Provides a Max Health–scaling self-heal when activated below full Health. At full Health, it instead increases whichever maximum resource is higher for ten seconds. Conservation of Energy broadens access to these effects, helping support both survival and resource management.
- Exploitation – Attempting to activate a Dark Magic ability grants you and your group 2,974 Offensive Penetration for twenty seconds. Dark Deal supplies this during boss fights, while Vibrant Shroud supplies it during add pulls.
- Unholy Knowledge & Persistence – Unholy Knowledge reduces the costs of non-core combat abilities. After blocking an attack, Persistence reduces the cost of your next resource-costing ability, helping make necessary skill casts more efficient during defensive phases.
- Power Stone & Daedric Protection – Power Stone reduces Ultimate costs, helping you cast group support Ultimates more frequently. Daedric Protection reduces damage taken while a Daedric Summoning ability is active. Your Clannfear maintains this during boss fights; without a permanent pet on the add bars, Bound Aegis’s activated effect provides temporary coverage.
- Expert Summoner – Increases Max Magicka and Stamina by 5%, with an additional 5% Max Health while a permanent combat pet is active. The boss setup gains the Health bonus through Clannfear, but the add setup does not. Summon Charged Atronach does not qualify as a permanent pet.
- Capacitor & Expert Mage – Capacitor increases Health, Magicka and Stamina Recovery. Expert Mage adds Weapon and Spell Damage for each Sorcerer skill on your active bar, supporting abilities that scale with offensive stats, including Vibrant Shroud’s healing.
- Expert Summoner’s Max Health bonus applies to the boss setup. The Clannfear is a permanent combat pet, so keeping it active provides the additional 5% Max Health.
Templar Main Tank Skill Information
Radiant Aura – Provides Minor Fortitude, Minor Intellect and Minor Endurance to you while slotted on either bar, increasing Health, Magicka and Stamina Recovery. Casting it extends those buffs to nearby group members for one minute, making it useful when your group does not already have reliable coverage. The Stamina Recovery helps between blocking phases; it does not restore Stamina while you hold block.
Extended Ritual – Cleanses up to five harmful effects from you and places a large healing area for you and nearby allies. Allies can activate its Purify synergy to cleanse themselves and receive an additional heal. Standing inside your own Ritual also activates Sacred Ground, improving healing and block mitigation. Its cleanse only removes effects that can be purged, so it cannot bypass every trial mechanic.
Purifying Light – Used on bosses mainly to activate Illuminate, Bright Harbinger and Prism, providing group armor, Weapon and Spell Damage, and personal Ultimate generation. When its damage mark expires, it leaves a healing effect around the target, adding support for nearby players. Allow the mark to finish before refreshing it, and prioritise maintaining your group buffs over repeatedly casting it for damage.
Restoring Focus – Your main source of Major Resolve, with direct Stamina return and a Max Health–scaling heal. The Stamina return continues while blocking, making it particularly valuable when holding several enemies or managing sustained pressure. Standing inside the rune significantly strengthens its healing and activates Sacred Ground, but the resistance buff and Stamina return remain useful when mechanics require you to move.
Blazing Spear – Included on the bar to activate Spear Wall, granting Minor Protection and Minor Berserk when cast, while also providing an ally with a resource synergy. Its initial hit immobilises susceptible enemies, giving it additional value when used during add phases. Place it near allies who can use Blessed Shards to restore whichever of their maximum resources is higher. You cannot activate your own synergy with this morph. It provides these benefits without moving you away from your assigned position.
Living Dark – A defensive option for add pulls that heals you when you take direct damage, with a short cooldown between healing triggers. This is useful when several enemies are attacking you, although damage-over-time ticks do not trigger the heal. Casting it also activates the same Dawn’s Wrath passive and Mastery benefits as Purifying Light, allowing the add setup to maintain your group buffs while gaining a more defensive skill.
Key passive and Class Mastery interactions:
- Illuminate + Bright Harbinger – Casting Purifying Light or Living Dark grants you and your group 2,974 additional Armor for twenty seconds. Bright Harbinger also grants 300 Weapon and Spell Damage to allies and 600 to you for the same duration.
- Prism – Casting a Dawn’s Wrath ability in combat generates 3 Ultimate, with a six-second cooldown. Purifying Light and Living Dark activate it naturally, but repeated casts inside that cooldown do not generate additional Ultimate.
- Sacred Ground + Steadfast Candescence – Standing inside your own Extended Ritual or Restoring Focus activates Sacred Ground, granting Minor Mending and additional block mitigation, with a brief duration after leaving. Steadfast Candescence also activates and refreshes Sacred Ground while blocking, allowing you to maintain it when mechanics take you outside those areas. Remaining stationary provides further block mitigation, but move whenever the encounter requires it.
- Spear Wall – Casting Blazing Spear grants personal Minor Protection and Minor Berserk for six seconds. These buffs require refreshing even though the spear’s ground effect lasts longer.
- Balanced Warrior – Increases Armor for each Templar ability slotted and provides additional Weapon and Spell Damage based on your Armor and class skill count.
- Mending + Light Weaver – Mending improves healing on wounded targets. Light Weaver grants Ultimate to allies you heal below 50% Health with Restoring Light abilities, allowing Extended Ritual to provide additional ultimate support.
- Restoring Spirit – Reduces the Health, Magicka, Stamina and Ultimate costs of your abilities, supporting sustain. This does not reduce block cost, so blocking still needs to be managed separately.
Warden Main Tank Skill Information
Gripping Shards – Primarily used to apply Chilled through its continuing Frost Damage, activating Tundra’s Maw to provide Major Brittle and increase enemies’ Critical Damage taken by 20%. Keep it active while holding targets within range to maintain reliable coverage. It also immobilises susceptible adds, although many trial enemies are immune. If your role keeps you away from the target, use Winter’s Revenge for its ranged placement instead.
Budding Seeds – Provides ongoing healing to you and allies within its area, followed by a larger heal when it blooms. Its frequent healing ticks can activate Nature’s Gift through overhealing, restoring your resources and triggering Bountiful Harvest for group Major Heroism and additional resource returns. It also maintains Minor Toughness through Maturation and provides a Harvest healing synergy. Place it under the group and refresh after it blooms; reactivate early when an immediate heal is needed.
Polar Wind – Your main burst heal, followed by Max Health–scaling healing over time. Use it to recover from heavy boss damage and maintain healing during sustained pressure. Its initial cast also heals a nearby ally, providing additional support when someone is within range. Its healing can grant Minor Toughness through Maturation, but it is a Winter’s Embrace ability, so it does not activate Nature’s Gift or Bountiful Harvest.
Expansive Frost Cloak – Maintains Major Resolve for you and nearby group members. Its large radius helps you cover allies while holding a boss away from the damage stack, although separated players still need to be within range when you cast. Refresh before the buff expires.
Bull Netch – A free sustain skill that directly restores Stamina over time, including while blocking. It also periodically removes a negative effect and provides you personal damage buffs. Keeping it active helps fund blocking, dodging and Stamina-based utility skills. Casting it in combat activates Savage Beast when available, while slotting it enables Flourish on your back bar.
Deceptive Predator – Provides Major Expedition and temporary immunity to snares and immobilisations, helping you reach adds, complete movement mechanics and return to the group. While slotted, it grants Minor Evasion, reducing incoming area damage on that bar. It also enables Flourish and activates Savage Beast when cast in combat, combining movement, defence and passive sustain in one slot.
Feral Guardian – Primarily a passive slot to enable Flourish on your bar, increasing Magicka and Stamina Recovery without occupying a regular skill slot. You do not need to summon the bear for this benefit; preserve your Ultimate for your assigned support ability.
Key passive and Class Mastery interactions:
- Tundra’s Maw + Glacial Presence – Tundra’s Maw makes your Chilled applications also apply Major Brittle, increasing enemies’ Critical Damage taken by 20%. Glacial Presence improves your chance to apply Chilled. Gripping Shards, Elemental Susceptibility and Frost Pulsar provide opportunities to maintain this short debuff.
- Nature’s Gift + Bountiful Harvest – Overhealing yourself or an ally with a Green Balance ability restores 250 Magicka and Stamina, once per second. Bountiful Harvest adds 125 Magicka and Stamina for you and your group, alongside three seconds of Major Heroism, once every two seconds. Budding Seeds supplies these interactions; keep its healing active where it can regularly overheal you or allies.
- Maturation – Your heals grant their recipients Minor Toughness, increasing Max Health by 10% for twenty seconds. Budding Seeds provides group coverage through its repeated healing, while Polar Wind covers you and its nearby ally target. Keep Seeds where it can reach the relevant players without compromising your boss positioning.
- Flourish – Having an Animal Companions ability slotted increases Magicka and Stamina Recovery by 20% on that bar.
- Savage Beast – Casting an Animal Companions ability in combat generates 4 Ultimate, once every eight seconds. Bull Netch and Deceptive Predator activate it during normal use; simply slotting Feral Guardian does not.
- Frozen Armor + Piercing Cold – Frozen Armor increases resistances for each Winter’s Embrace ability on your active bar, while Piercing Cold improves block mitigation.
- Icy Aura – With a Winter’s Embrace ability slotted, direct attacks from enemies in melee range build Bite of Winter stacks. At five stacks, the attacker receives Major Maim. This provides additional damage reduction while holding melee enemies, but requires repeated hits to activate.
- Accelerated Growth – Healing yourself or an ally below 40% Health with a Green Balance ability grants Major Mending. Budding Seeds can activate this when its heal lands; Polar Wind cannot trigger it.
Key Scribed Skills for ESO Trial Main Tanks
Scribing introduces powerful multi-purpose abilities that allow Main Tanks to combine sustain, debuffs, and defensive utility into fewer skill slots. This reduces bar pressure and makes it easier to maintain full trial coverage without sacrificing survivability or group support.
- Wield Soul
- Pull
- Druid’s Resurgence
- Cowardice
A highly efficient multi-purpose skill. Primarily used to chain in smaller adds while applying a taunt, it also functions as a strong sustain tool by restoring both Magicka and Stamina when cast. When used on bosses, it applies Major Cowardice, reducing enemy damage output.
- Shield Throw
- Taunt
- Sage’s Remedy
- Maim
A compact ranged taunt that scales with Max Health to provide a self-heal. It also applies Major Maim, reducing boss damage dealt. With Major and Minor Breach typically covered elsewhere, this skill allows you to replace traditional options like Pierce Armor or Frost Clench with a more efficient multi-use alternative.
- Ulfsild’s Contingency
- Damage Shield
- Gladiator’s Tenacity
- Resolve
Provides a Max Health-scaling group damage shield. For the Main Tank, it also grants an additional 8% damage reduction and Minor Resolve making it both a group utility tool and a personal survivability boost.
Champion Points
Slottable Champion Points (use 4)
- Ironclad
- Duelist’s Rebuff
- Bulwark
- Enduring Resolve (DoT damage fights)
- Unassailable (AoE damage fights)
Slottable Champion Points (use 4)
- Boundless Vitality
- Fortified
- Rejuvenation
- Bracing Anchor (Boss Fights)
- Celerity (Add Pulls)
How to Play a Trial Main Tank
Main Tanking starts with understanding your assigned targets, their attack patterns and the group’s positioning strategy. Before pulling, agree responsibilities with the Off Tank, including enemy assignments, tank swaps and buff coverage. Your class determines which tools you use, but the priorities remain consistent: secure your targets, establish safe positioning, survive their attacks and maintain your assigned support effects.
Add Pulls
- Prepare before engaging. Identify your assigned elite enemies and the agreed stacking position. Activate defensive buffs and check that the Off Tank and group are ready.
- Taunt your priority targets first. Secure dangerous enemies before placing ground effects or chaining smaller adds. Leave the Off Tank’s assigned targets to them unless a handover is needed.
- Bring enemies into the agreed stack. Move enemies that cannot be chained through taunt and positioning. Coordinate your approach with the Off Tank, keeping dangerous frontal attacks away from the group. Use line of sight where appropriate to bring ranged enemies closer.
- Establish your defensive coverage. Several enemies attacking together can create more pressure than a single boss. Maintain your mitigation, healing and shields, and prepare for overlapping heavy attacks or dangerous casts. Dodge roll avoidable attacks to lower incoming damage, especially where attacks inflict bleeds or DoTs on you.
- Apply buffs, debuffs and gear effects. Place ground effects beneath the stack and activate your assigned support tools. Coordinate with the other supports so group members receive damage amplification while enemies receive damage reduction.
- Collect smaller enemies when safe. Chain susceptible enemies into the established stack once your elites are controlled. Immobilise them where useful, avoiding roots that leave enemies outside the group’s damage area.
- Maintain control until the pull ends. Refresh priority taunts, interrupt enemiescasts and watch surviving enemies for dangerous attacks. Recover resources during safe openings and use Ultimates according to the group’s plan.
- Move efficiently between pulls. Use speed buffs to reach the next pull ahead of your group and establish positioning. Depending on the strategy, you may alternate pulls with the Off Tank or have one tank move ahead as the current pack is nearly defeated. Coordinate this so remaining dangerous enemies stay controlled, particularly when the next pull needs extra time to gather ranged enemies through line of sight.
Bosses
Boss fights follow an encounter-specific priority system rather than a fixed rotation. Maintain control and prepare for the next mechanic while fitting support skills into safe openings.
- Prepare and initiate together. Activate defensive buffs before the pull, then taunt your assigned boss once the group is ready. Move it to the agreed position promptly so damage dealers can establish their own ground effects.
- Keep positioning predictable. Face dangerous frontal attacks away from allies and hold the boss still whenever the strategy allows. Reposition deliberately for mechanics, avoiding unnecessary turns or movement that disrupt group damage.
- Read the boss’s attacks. Learn which attacks require blocking, dodging, interrupting or movement. Prepare shields and mitigation before dangerous hits, maintain healing through sustained damage and heal promptly when needed.
- Maintain taunt with a safety margin. Refresh before it expires, particularly before movement, interruptions or mechanics that could prevent casting. Track each assigned target separately when holding multiple enemies.
- Keep defensive buffs active. Watch resistance buffs, mitigation skills and healing effects alongside your taunt. Refresh them before a dangerous sequence rather than trying to rebuild your defences while already under pressure.
- Maintain assigned support effects. Apply debuffs to the correct target and keep your gear and Class Mastery effects working. Refresh near expiry where appropriate; repeated unnecessary casts increase resource pressure and leave less time for mechanics.
- Manage resources proactively. Use sustain skills, potions and available synergies before you become unable to respond. Release block only when safe, and time heavy attacks around known openings. Preserve enough Stamina for the next required block, dodge or break free.
- Coordinate swaps and transitions. Follow the agreed handover, confirm when the other tank has control and move into your next position. Avoid competing taunts outside planned swaps, and be ready to resume control when required.
- Time Ultimates purposefully. Align offensive support with useful group damage windows, while preserving defensive casts for assigned mechanics. If your Ultimate also provides sustain, plan around that return without delaying it until resources are exhausted.
Adjusting Between Encounters
Keep alternative skills and gear available for ranged interrupts, movement, projectile protection, additional healing or sustained blocking. Build around the encounter’s most dangerous phases and your assigned responsibilities.
If positioning breaks down, resources become difficult to maintain or a swap is delayed, communicate early. Consistent Main Tanking gives the group a stable target to attack and enough warning to respond when the encounter changes.
Main Tank Builds I've Used in Trials
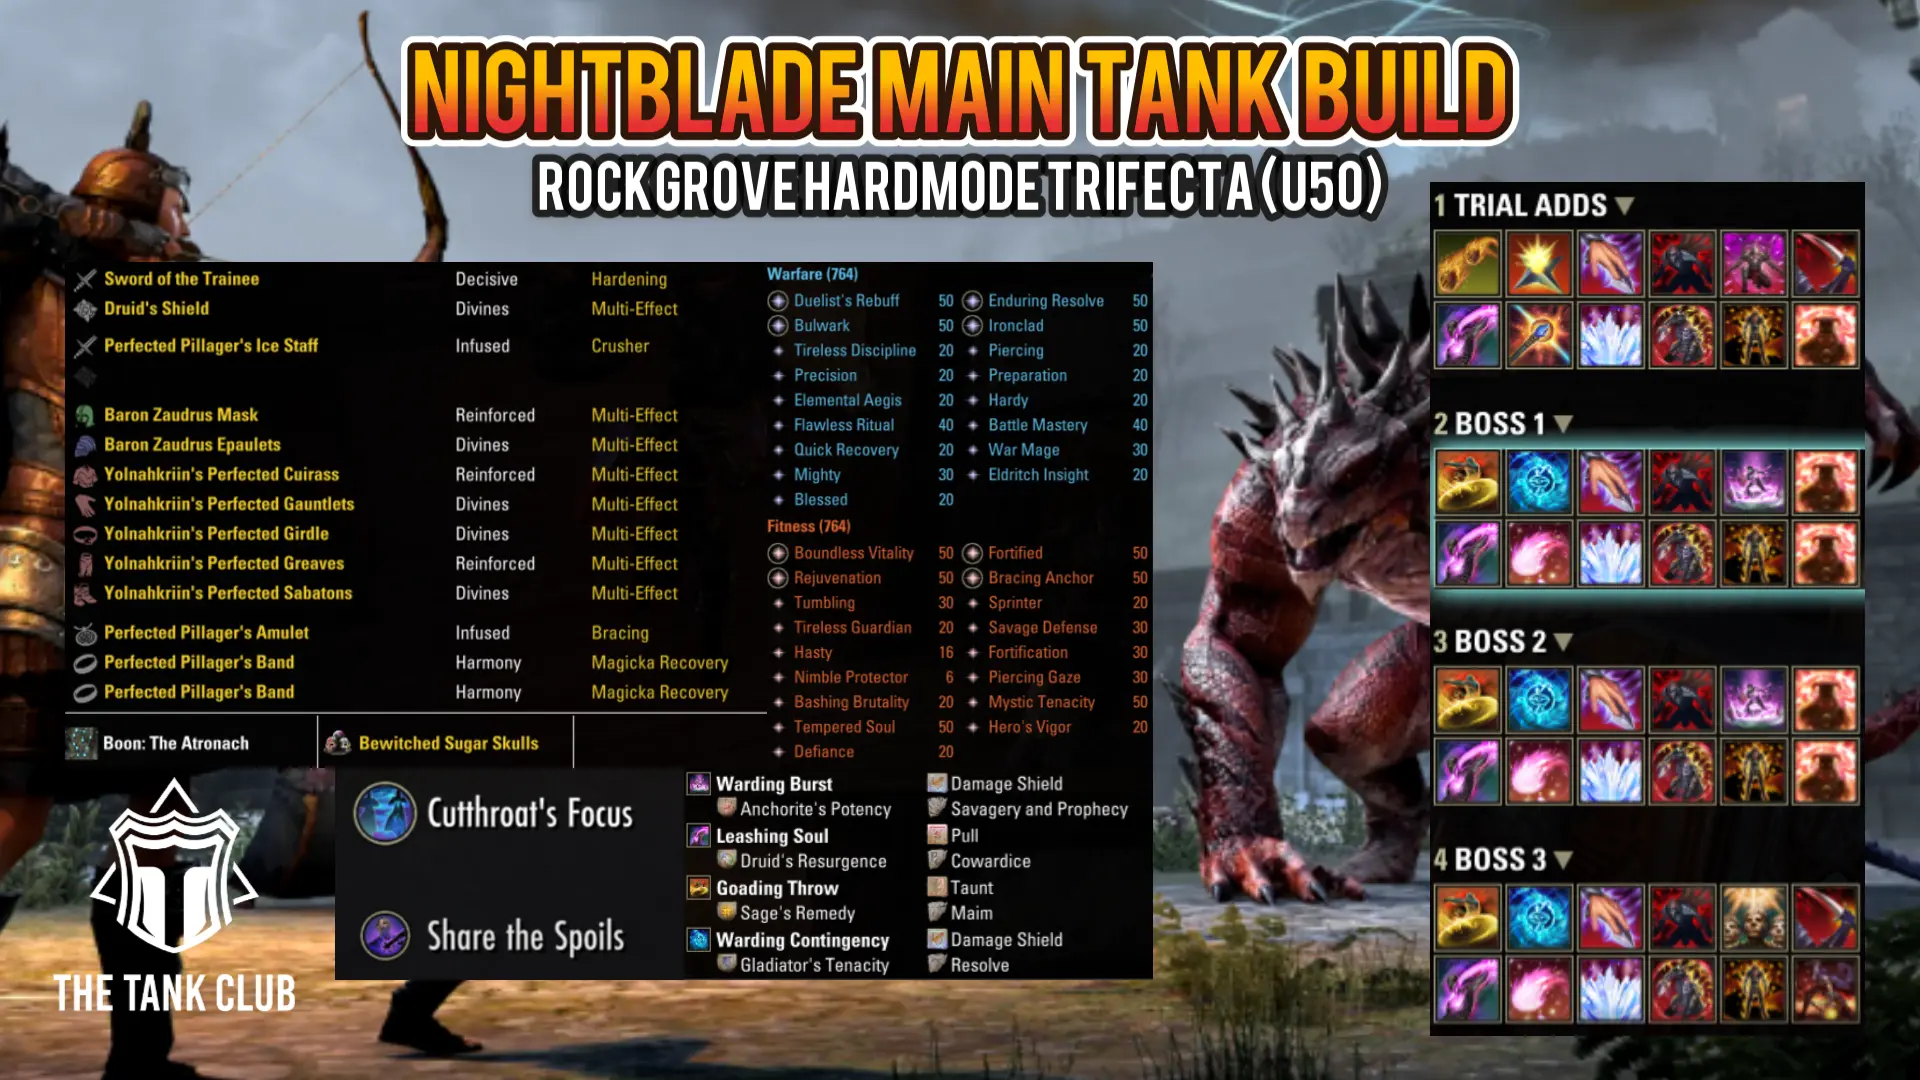
These are the Main Tank setups I used for recent Veteran trial trifectas: Hardmode, Speed Run and No Death completed together. Each was tailored to an organised, experienced team, with gear and skills chosen around group damage, survivability and existing buff coverage.
Use them as examples of how to adapt the builds in this guide. Your group may need different support effects or more defensive options. The notes below explain the important choices, encounter adjustments and anything I would change.
Veteran Rockgrove Main Tank Build
Achievement: Planesbreaker — Veteran Hardmode, Speed Run & No Death
Class: Nightblade Pure Class
This setup focused on converting the Nightblade’s strong Ultimate generation into frequent group Ultimate returns through Pillager’s Profit. Warding Burst’s Soul Gem interaction, repeated Elemental Susceptibility casts to trigger Baron Zaudrus, regular Siphoning Attacks and potions used on cooldown supported this approach. During this run, I could activate Pillager’s Profit with 500 Ultimate every 45-60 seconds.
The group lacked Minor Courage, so I wore Claw of Yolnahkriin instead of Lucent Echoes. Cutthroat’s Focus provided strong uptime on its additional 5% damage taken debuff: Rockgrove’s frequent incoming attacks made it easier to time Dark Cloak or Siphoning Attacks while blocking to activate the Mastery’s dodge.
For add pulls, I included AoE Major Cowardice to reduce enemy damage. Boss setups used Scribing to provide additional shields, damage reduction and missing buffs. Adding Minor Resolve to Contingency allowed me to choose Phantasmal Escape over Mirage for its snare and immobilisation protection. Frequent Siphoning Attacks casts also maintained Share the Spoils and made sustain comfortable.
What I would change: I double-barred Barrier on bosses with few adds, where Soul Harvest’s killing-blow Ultimate generation offered less value. However, removing Soul Harvest also left me without an Assassination skill to activate Hemorrhage and provide Minor Savagery. Another Nightblade covered that buff in this group, but I would check that coverage before making the same swap again.
Veteran Asylum Sanctorium Main Tank Build
Achievement: Immortal Redeemer — Veteran Hardmode, Speed Run & No Death
Class: Werewolf Tank with a full-class Arcanist base
This was a fun run that suited Asylum Sanctorium’s specific demands, rather than a recommendation to use Werewolf as your default trial Main Tank. The lack of a ranged taunt limits its flexibility in other encounters, but this setup worked well for our strategy here.
The Arcanist base provided Ink-Scribe’s Verve, allowing Werewolf’s frequent self-healing to generate strong Major Force uptime for the group. Maintaining the Werewolf buffs and debuffs, then using the self-heal regularly, supported both survival and group damage.
Werewolf’s taunt enabled Tremorscale to reduce the boss’s Armor. Turning Tide activations were timed around damage windows, aiming to apply Major Vulnerability when the group returned to attacking the boss after killing the adds. Lucent Echoes supplied additional group Critical Damage.
An important setup detail: I entered Werewolf form from the Infused Crusher ice staff bar, carrying that weapon’s enchantment into the transformation. Transforming from a one-handed weapon would provide a weaker enchant.
The boss’s relatively slow attacks left plenty of room to maintain support effects and contribute damage. For this encounter, Divines armor and Infused Magicka Recovery jewellery suited the setup: additional Magicka sustain supported frequent healing casts, which also returned Stamina. Prismatic Cost Reduction is another option if maintaining those casts becomes difficult.
The gear was not fully optimised, and the successful clear reflects both the setup and the group’s experience. This is an example of where an unconventional tank can work well when its limitations fit the encounter.
Playing as a Main Tank in ESO
Main Tanking in ESO trials is about consistency, awareness, and control. Your positioning dictates how safely your group can play, your debuff uptime impacts overall damage, and your stability under pressure determines whether mechanics feel manageable or chaotic.
Trial performance as a Main Tank carries significant responsibility. You are often the first player to engage, the one handling the most dangerous mechanics, and the person absorbing the highest sustained damage. Learning encounter mechanics thoroughly and managing your resources effectively under pressure are just as important as your gear or skill choices.
With class mastery, scribing and subclassing, Main Tanks now have more tools than ever to optimise coverage without sacrificing survivability. The role has evolved beyond simply surviving, it now requires intelligent setup, mechanical understanding, and the ability to adapt in real time.
Mastering Main Tanking is less about memorising a fixed build and more about understanding what your group needs in each encounter. Adjust your gear, subclassing choices, Champion Points, and skill bars accordingly, and you will consistently provide value in any trial environment.
Ready to Improve Your Tanking?
🔹 Explore more ESO Tank Builds
🔹 New to the Role? Start with our Beginner Tank Guide
🔹 Optimising Gear? Read the ESO Tank Gear Guide
🔹 Want More ESO Content? Visit the ESO Hub
🔹 Playing on Console? See the Best Console MMORPGs for 2026
Serious About Tanking?
Unlock early builds, meta insights, and direct optimisation support.