This is a deep dive into the New World Sword and Shield weapon.
The Sword and Shield is the gold standard for Tank weapon in virtually every MMO game and New World is no different.
There is a lot on offer to you as a Tank when using the Sword and Shield and it’s incredibly hard to replace this weapon for something else, it offers both damage along with damage reduction which makes it the first choice for New World Tanks.
There are 3 to 4 different ways you can apply your points into your Sword and Shield abilities to maximise your efficiency for Tanking in New World and it may vary depending on how good you are at Tanking and how good your group are in the content you’re doing.
Join The Tank Club Discord for all of your New World Tank help and discussion.
For more details on Tanking see our New World Tank Build and New World Tank Guide.
General Information
Damage with a Sword scales with both Strength and Dexterity however, as a Tank you’ll want to focus on the Strength attribute.
When dealing damage with a Sword, it does a combination of slash and thrust damage.
The light attack chain of the Sword requires 3 hits, and light attacks deal 100% slash damage. The final attack in the light attack chain deals 105% slash damage.
Sword heavy attacks deal 120% thrust damage and charged heavy attacks deal 160% thrust damage.
It’s not possible to attack with your shield unless it’s done specifically with an ability.
Sword and Shield Abilities
Swordmaster
The Swordmaster tree is mostly designed around dealing damage with the Sword.
For this reason, it’s not essential to focus on the Swordmaster tree for Tanking. However, there are a few vital components to this tree which make it important for Tanks even if it’s not completely essential for you as a Tank.
Key Passives
- Unstoppable Stab: Reverse Stab now has grit.
- Tactician: On a successful hit with Reverse Stab, all other sword cooldowns are reduced by 25.0%. (Max 1 reduction per ability use.)
- Leadership: While holding a sword, the damage of all group members is increased by 10.0%.
Whirling Blade and Leaping Strikes don’t hold any real value for a New World Tank. Reverse Stab is an extremely useful ability when it’s combined with the Tactician passive since you’ll be able to reduce your cooldowns meaning you are able to recast your other abilities again sooner.
The Leadership passive is hard to obtain since you’ll need to pick up 10 abilities most of which are damage orientated within the Swordmaster tree to unlock it, but when you are pushing the end game content with an organised team it becomes essential.
Defender
The Defender tree is the more Tank orientated side of the Sword abilities and passives.
There are a number of essential abilities and passives that are going to make Tanking easier and this is where you’ll want to focus a lot of your attention even more so for less experienced Tanks.
Key Passives
- Sturdy Shield: Grants an additional 15.0% physical armor.
- Defensive Formation: While blocking, reduce damage to all allies within 2m by 30.0%. (Cooldown 1s.)
- Sturdy Grip: Stamina damage is reduced by 15.0% when blocking a melee attack with a shield.
- Recuperation: All incoming healing and regeneration is increased by 10.0%.
- Elemental Resistance: Reduce damage from all magical types by 10.0%.
- Final Countdown: If your health is above 50%, damage reduction is increased by 20.0%.
- Improved Rush: On a successful hit, all enemies within 5m are weakened 10.0% for 10.0s. (Weaken reduces target’s outgoing damage.)
Defender’s Resolve is an essential ability to use as it will reduce your incoming damage and also do an area taunt of enemies.
Secondary to that, you have two possible options with using Shield Bash for an additional taunt and some minor crowd control or Shield Rush which can be used as a method for stacking a lot of damage reduction when combined with certain gear perks. It does a weaken to the enemies and crowd controls but it doesn’t taunt.
When you are playing defensively you can basically take every passive from the defender tree as they all provide some benefit to a Tank. The essential ones however are the ones listed.
Defensive Formation is basically the opposite of the leadership group buff in the Swordmaster tree, this one however provides a group damage reduction.
Perks & Gems
There are a number of perks and gems that can be used and some will drastically improve the use of the Sword and Shield and some of the abilities.
Defensive Tanking
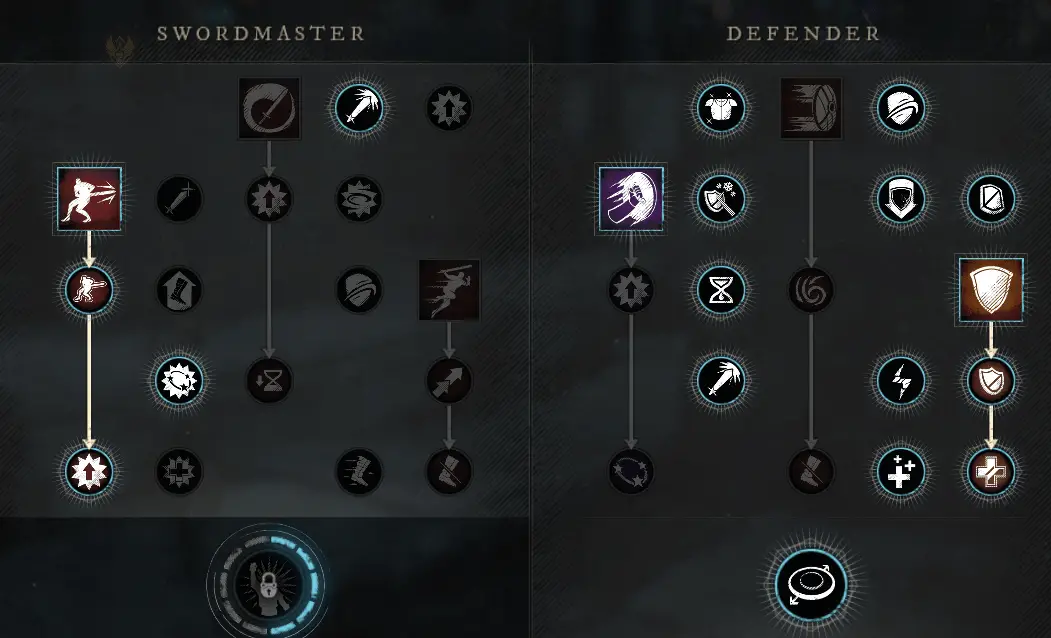
This setup is one that should be used when you are either inexperienced or with a random group.
Quite simply you take every available Defender passive other than the Shield Bash/Rush ones. This gives you every possible defensive Tank benefit.
You need to use Reverse Stab along with the Tactician passive to reduce the cooldowns on your Sword abilities. You do this by activating your Defender’s Resolve which has a really long cooldown. Then use Shield Bash as and when it’s needed. Once both of those abilities are on cooldown you Reverse Stab an enemy and it reduces the cooldowns on those skills making them available again much sooner.
The Shield Bash ability is used because in random groups you will struggle to taunt everything and keep it locked on you mostly due to your teammates poor positioning so you benefit greatly from an additional taunt and stun. Finally you use Defender’s Resolve with the addons because this will give you an area of effect taunt combined with damage reduction and a heal.
You should be regularly using Light and Heavy attacks to benefit from the Refreshing Move perk on your Sword. This will reduce your weapon ability cooldowns which is essential but it also help you to maintain your threat on the enemies with the constant damage output. Not only that but by dropping block to do these attacks you’ll also have a sustain benefit with your Stamina, allowing you to perform more dodges and blocks.
The Swordmaster passives you choose aren’t that important they are just needed to unlock the next level to get to Reverse Stab and Tactician, since they increase your damage with the Sword it will help increase your threat and maintain the aggro of enemies.
Offensive Tanking
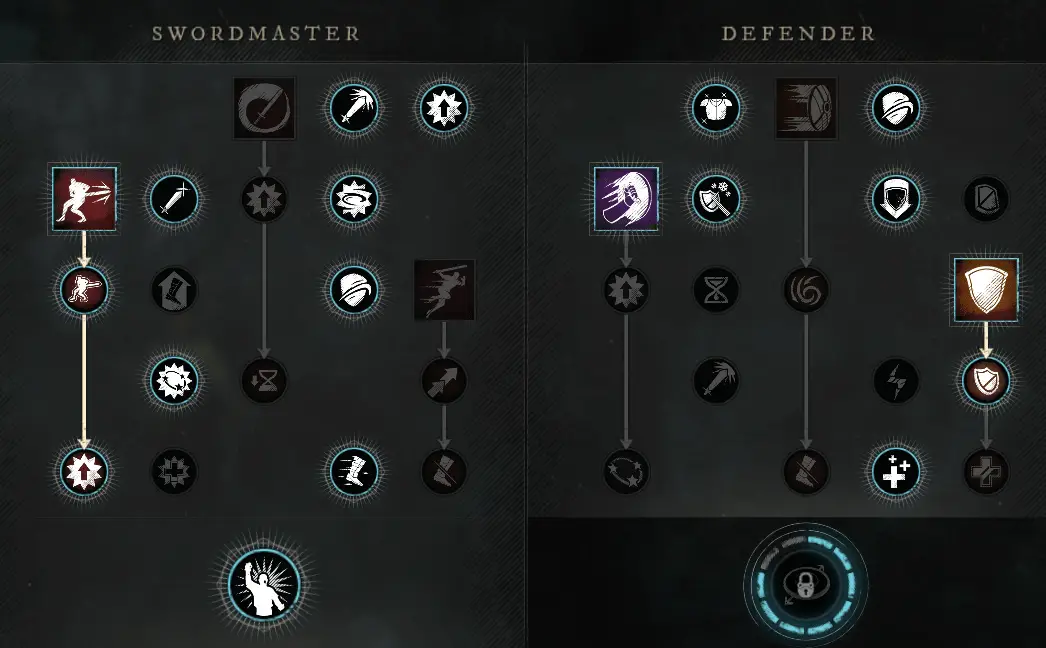
When you begin grouping up with experienced players and the Expeditions you are doing become more organised you can start to think about playing more offensively.
This is where you start to remove some of the less important Defender passives just keep the essential damage reduction passives. You are trying to unlock the Leadership group buff so you need 10 points used in the Swordmaster section.
Take the best possible Leadership passives that both increase your damage and help you unlock the Leadership group buff. The Leadership buff is good way to assist with increasing your groups DPS, and by increasing your own DPS you speed up the kill times on bosses but also have a much easier time maintaining threat of enemies.
The abilities you use are the same, you are maintain a similar playstyle but with an organised group you can think about dropping block more safely and fight times should be much shorter.
You might start to notice you are using Shield Bash more infrequently. When you have an organised group and they know where to position themselves with you becoming more efficient at dealing damage, taunting and threat and positioning, you become less reliant on needing this second taunt from Shield Bash.
Defensive Tanking with Shield Rush
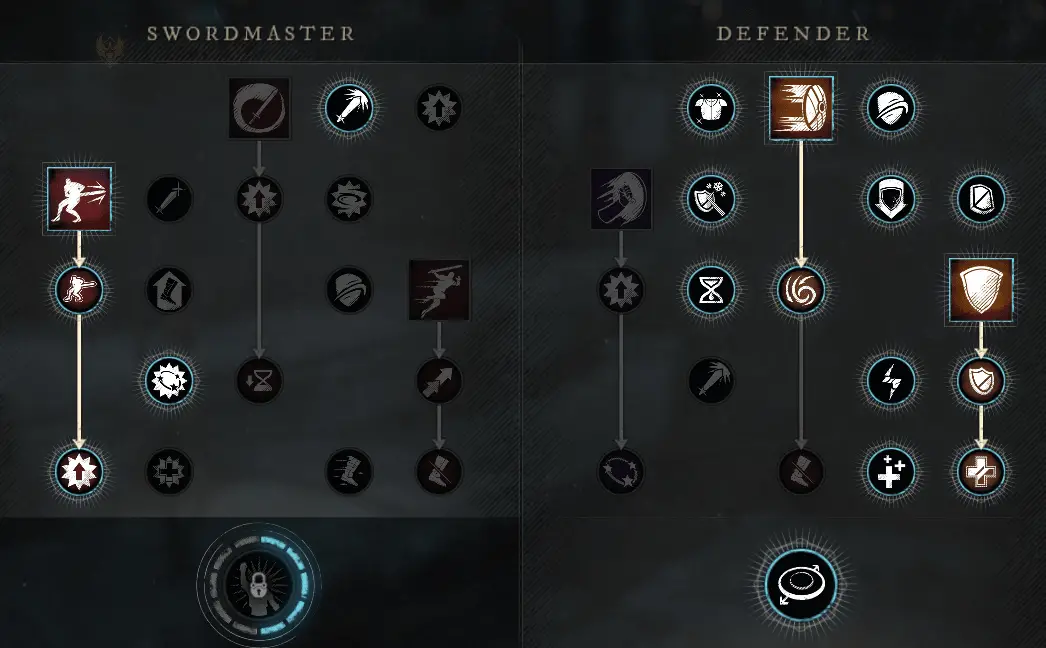
It’s hard to say when this setup becomes a better option that the ones we’ve already mentioned but you gain a lot of additional benefits by switching away from Shield Bash and using Shield Rush instead.
This setup is still a Defensive setup since you are not using the Swordmaster passives but you are now benefitting from the additional AoE damage caused by Shield Rush which increases your threat on enemies, applies crowd control and with the Improved Rush passive, applies weaken.
The main strength of this setup is the fortify you can gain which will reduce your damage received and this is achieved by using certain gear perks combined with the Shield Rush.
- Fortifying Shield Rush: After hitting a target with Shield Rush, gain Fortify, increasing damage absorption on self by 33% for 6 seconds.
- Fortified: Fortify you apply lasts 30% longer.
The combination of all of these things means you’ll receive a lot less damage from enemies and because you should also be using Reverse Stab with Tactician and the Refreshing Move perk on your Sword, you should have basically no problem maintaining this damage absorption with a really high uptime.
By having a large amount of Fortify you’ll receive less damage and you can also benefit a lot when doing Mutated Expeditions because you won’t need to keep switching your gems for each Mutation. If you use a full set of Opal gems along with this setup you’d be at the elemental mitigation cap of 50% for every Mutation type when your fortify is active.
Offensive Tanking with Shield Rush

Going down the offensive route while also using Shield Rush and the gear perk Fortifying Shield Rush and amulet perk Fortified is a strong option when doing hard content. You’re able to apply damage, provide a damage buff for your group but also reduce your damage a lot as well.
This is something to really think about moving into 2023 in New World especially. The game is due to have it’s first Raid introduced and it’s expected to be incredibly hard. That is presumably going to mean a large amount of damage for a Tank so I can see this kind of setup being really important for that situation especially.
In terms of the passives chosen here, the defender tree is a it’s bare bones and only the most essential perks have been selected and the priority is on increasing damage done and reducing damage received.
